This tutorial demonstrates some options in formatting and parsing data.
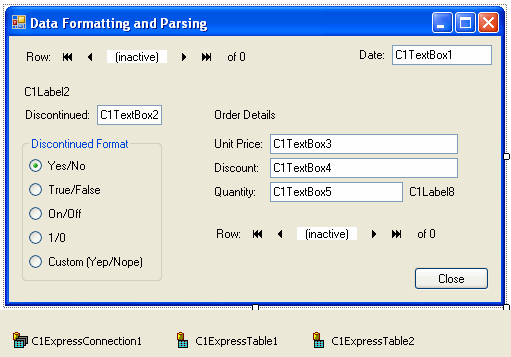
- Create a new Windows Application project. Place the following components on the form as shown in the figure:
- C1ExpressConnection (C1.Data.Express.C1ExpressConnection)
- C1ExpressTable1-2 (C1.Data.Express.C1ExpressTable)
- C1Label1-8 (C1.Win.C1Input.C1Label)
- C1TextBox1-5 (C1.Win.C1Input.C1TextBox)
- C1DbNavigator1-2 (C1.Win.C1Input.C1DbNavigator)
- GroupBox1 (System.Windows.Forms.GroupBox)
- RadioButton1-5 (all of the type System.Windows.Forms.RadioButton)
- Button1 (System.Windows.Forms.Button)
- From the Properties window, set the following properties for the C1Label, RadioButton, and Button controls:
Control Property Value C1Label1 TextDetached True Text Date: C1Label3 TextDetached True Text Discontinued: C1Label4 TextDetached True Text Order Details C1Label5 TextDetached True Text Unit Price: C1Labe6 TextDetached True Text Discount: C1Label7 TextDetached True Text Quantity: RadioButton1 Name rbYesNo Text Yes/No Checked True RadioButton2 Name rbTrueFalse Text True/False RadioButton3 Name rbOnOff Text On/Off RadioButton4 Name rbOneZero Text 1/0 RadioButton5 Name rbCustom Text Custom (Yep/Nope) Button1 Name btnClose Text Close - Select the C1ExpressConnection1 component, go to the Properties window, open the ConnectionString property combo box. Add the following to the ConnectionString property: Provider=Microsoft.Jet.OLEDB.4.0;Data Source="Documents\ComponentOne Samples\Common\C1NWind.mdb.".
- Set the properties of C1ExpressTable1-2 as follows:
Control Property Value C1ExpressTable1 ConnectionComponent C1ExpressConnection1 DbTableName Products C1ExpressTable2 ConnectionComponent C1ExpressConnection1 DbTableName Order Details Now, create a master-detail relation between C1ExpressTable1 (master) and C1ExpressTable2 (detail):
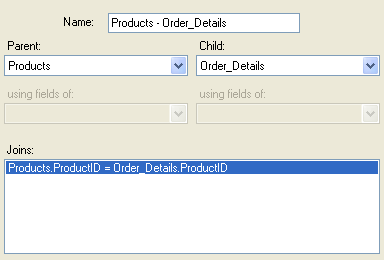
- Click the ellipsis button in the Relations property of the C1ExpressionConnection1 control to open the Relations dialog box.
- In the dialog box, select Products for Parent, Order Details for Child, add a join with ProductID for both Parent field and Child field, and press OK to close the Relations dialog box.
- To bind controls to the data source, set the following properties:
Control Property Value C1DbNavigator1 DataSource C1ExpressConnection1 DataMember _Products C1DbNavigator2 DataSource C1ExpressConnection1 DataMember _Products.Products - Order_Details C1Label2 DataSource C1ExpressConnection1 DataField _Products.ProductName C1TextBox2 DataSource C1ExpressConnection1 DataField _Products.Discontinued C1TextBox3 DataSource C1ExpressConnection1 DataField _Products.Products - Order_Details.UnitPrice C1TextBox4 DataSource C1ExpressConnection1 DataField _Products.Products - Order_Details.Discount C1TextBox5 DataSource C1ExpressConnection1 DataField _Products.Products - Order_Details.Quantity C1Label8 DataSource C1ExpressConnection1 DataField _Products.Products - Order_Details.Quantity - For the C1TextBox2 control, bound to the Discontinued field, set the FormatType property to YesNo. This is a Boolean format showing “Yes” for True and “No” for False.
This will be the default format of the C1TextBox2 control, but we will also make provisions for a custom format, setting the CustomFormat property of the C1TextBox2 control to Yep|Nope. This custom format will be enabled when the FormatType property is set to CustomFormat, which will be done with option buttons in the next step.
- To switch the Discontinued field format between various Boolean formats, use the radio buttons. Assign the following event handlers to the radio buttons’ Click events:
To write code in Visual Basic
Visual Basic Copy CodePrivate Sub rbYesNo_Click(ByVal sender As Object, ByVal e As System.EventArgs) Handles rbYesNo.Click Me.C1TextBox2.FormatType = C1.Win.C1Input.FormatTypeEnum.YesNo End Sub Private Sub rbTrueFalse_Click(ByVal sender As Object, ByVal e As System.EventArgs) Handles rbTrueFalse.Click Me.C1TextBox2.FormatType = C1.Win.C1Input.FormatTypeEnum.TrueFalse End Sub Private Sub rbOnOff_Click(ByVal sender As Object, ByVal e As System.EventArgs) Handles rbOnOff.Click Me.C1TextBox2.FormatType = C1.Win.C1Input.FormatTypeEnum.OnOff End Sub Private Sub rbOneZero_Click(ByVal sender As Object, ByVal e As System.EventArgs) Handles rbOneZero.Click Me.C1TextBox2.FormatType = C1.Win.C1Input.FormatTypeEnum.Integer End Sub Private Sub rbCustom_Click(ByVal sender As Object, ByVal e As System.EventArgs) Handles rbCustom.Click Me.C1TextBox2.FormatType = C1.Win.C1Input.FormatTypeEnum.CustomFormat End SubTo write code in C#
C# Copy Codeprivate void radioButton_Click(object sender, System.EventArgs e) { switch (((RadioButton)sender).Name) { case "rbYesNo": this.c1TextBox2.FormatType = C1.Win.C1Input.FormatTypeEnum.YesNo; break; case "rbTrueFalse": this.c1TextBox2.FormatType = C1.Win.C1Input.FormatTypeEnum.TrueFalse; break; case "rbOnOff": this.c1TextBox2.FormatType = C1.Win.C1Input.FormatTypeEnum.OnOff; break; case "rbOneZero": this.c1TextBox2.FormatType = C1.Win.C1Input.FormatTypeEnum.Integer; break; case "rbCustom": this.c1TextBox2.FormatType = C1.Win.C1Input.FormatTypeEnum.CustomFormat; break; } } - For C1TextBox3 bound to the UnitPrice field, set the FormatType to Currency. The currency format with dollar sign is used both in display and edit mode. For C1TextBox4 bound to Discount, set the FormatType to Percent (values are displayed and entered times 100 with percent sign). Also, for C1TextBox5 bound to Quantity, set the FormatType to Hexadecimal, so it will be represented in hexadecimal form (think of it as a kind of low-tech encryption; we, of course, need this rather unusual format for purely demonstrational purposes).
- Now, to decipher the hexadecimal Quantity, we want to convert it to the normal decimal representation and display the decimal number in C1Label8 with suffix “(base 10)”. There is no standard or custom format for such representation, but we can define our own formatting in code, in the Formatting event. If we set the FormatType to UseEvent, our code can perform whatever formatting we need. Create the following event handler:
To write code in Visual Basic
Visual Basic Copy CodePrivate Sub C1Label8_Formatting(ByVal sender As Object, ByVal e As C1.Win.C1Input.FormatEventArgs) Handles C1Label8.Formatting e.Text = e.Value.ToString() + " (base10)" End SubTo write code in C#
C# Copy Codeprivate void C1Label8_Formatting(object sender, C1.Win.C1Input.FormatEventArgs e) { e.Text = e.Value.ToString() + " (base10)"; }In the C1TextBox1 control we will show how you can allow entering dates in multiple formats. Complete the following tasks:
- Since this control is unbound, you need to set its DataType property manually; therefore, set the DataType property to DateTime.
- Initialize its value with the current date in code, in the Form_Load event:
To write code in Visual Basic
Visual Basic Copy CodePrivate Sub Form1_Load(ByVal sender As System.Object, ByVal e As System.EventArgs) Handles MyBase.Load Me.C1TextBox1.Value = DateTime.Now End SubTo write code in C#
C# Copy Codeprivate void Form1_Load(object sender, System.EventArgs e) { this.c1TextBox1.Value = DateTime.Now; } - The DateTimeInput mode (see the Using C1TextBox for Date-Time Input tutorial) only works with a single date format, so we need to turn it off by setting the DateTimeInput property to False for the C1TextBox1 control. Set the custom format as follows:
Control Property Value C1TextBox1 DateTimeInput False FormatType CustomFormat CustomFormat MM/dd/yyyy|d-MMM-yyyy|d.M.yy This is a list of allowed formats separated with '|'. Parsing an input string, all formats will be tried until a matching one is found. Formatting values for display, we obviously need a single format, so only the first format will be used for formatting.
We also want the control to display the date in LongDate format when not in focus.
- Expand the DisplayFormat property, and set FormatType to LongDate.
Now the control shows its date value in long format when not in focus, in the first short format when in focus, and the user can type data in any of the three allowed sort formats.
Run the program and observe the following:
- By selecting different option buttons you can see how Discontinued is shown in different formats. The currently selected format also determines how Discontinued values can be entered by the user. Note also that you can enter Boolean values in abbreviated form; just the initial letter is enough for all formats except On/Off where you need to enter the first two letters. Using the 1/0 format, entering any number except 0 results in a True value, which corresponds to the standard .NET conversion from integer to Boolean.
- In the UnitPrice field you can enter or omit the dollar sign. Negative numbers can be entered both with minus sign and in parentheses, according to financial conventions.
- The Discount field allows you to enter the optional percent sign. When you enter a value in percent, it is automatically divided by 100 when it is saved in the data source.
- You can enter the date in the control at the bottom in any of the three allowed formats, as it is most convenient to you. For instance June 5, 2002 can be entered as 06/05/2002, or 5-Jun-2002, or 5.6.02.