In this step you learn how to create regular tasks, milestones, and set the duration of the tasks.
To add tasks to the project at design time:
- Right-click on the control and select Edit Tasks.
The C1GanttView.Tasks Collection Editor appears. - Select the first member from the list, member[0] and enter a name next to the Name property such as, Project Management.
- Set the Mode to Automatic. For more information on Automatic tasks see Task Mode.
- Set Days to 30.
- Select the second member from the list, member[1] and enter a name next to the Name property such as, Conception Approval.
- Set Start to 7/2/2012 and Finish to 7/10/2012.
- Set the Mode to Automatic.
- Set the PercentComplete to 100%. For more information see Task Percent Complete.
- Select the third member from the list, member[2] and enter a name next to the Name property such as, Refine the System.
- Set Start to 7/4/2012 and Finish to 7/31/2012.
- Select the fourth member from the list, member[3] and enter a name next to the Name property such as, Requirements Set A.
- Set Start to 7/18/2012 and Finish to 7/23/2012.
- Select the fifth member from the list, member[4] and enter a name next to the Name property such as, Requirements Set B.
- Set Start to 7/23/2012 and Finish to 7/27/2012.
- Select the sixth member from the list, member[5] and enter a name next to the Name property such as, Requirements Set C.
- Set Start to 7/20/2012 and Finish to 7/23/2012.
- Select the seventh member from the list, member[6] and enter a name next to the Name property such as, Analysis and Design.
- Set Start to 7/10/2012 and Finish to 7/30/2012.
- Set the Mode to Automatic.
- Select the eighth member from the list, member[7] and enter a name next to the Name property such as, Completion Review.
- Set Start to 7/31/2012 and Finish to 7/31/2012.
- Click OK to save and close the C1GanttView.Tasks Collection Editor.
Run and observe the following:
- Run your project and drag the grey splitter bar over to the left to expand the chartview area.
- Notice the Automatic scheduled tasks, Project Management and Conception/Approval have a different bar color than the remaining tasks which are Manual.
- As you scroll along the chartview area notice the vertical orange line represents today’s date.
The color can be modified using the TodayLineColor property. For more information see C1GanttView Appearance Properties. - Scroll along the chartview area and notice the two vertical dotted silver lines to indicate the project start/finish dates.
The color can be modified using the StartFinishLineColor property. For more information see C1GanttView Appearance Properties. - Hover over each task bar and notice a tooltip appears with the task’s summary.
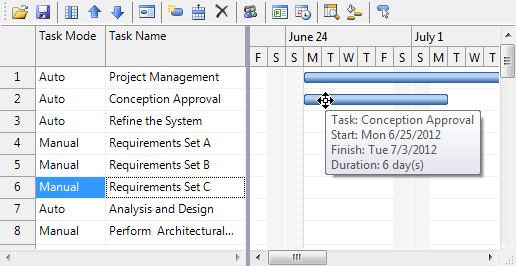
- Locate the diamond shaped bar in the chartview area.
This task represents a milestone. Notice by default the Finish date is displayed to the right of the bar.
In the next step you will learn how to add resources, constraints, and predecessors to the tasks.
See Also