C1Upload control can be used with the FileExplorer, in order to upload files. The following document shows how to add the ability to upload a file to a folder in the FileExplorer.
In the Designer
- In the Toolbox, locate the FileExplorer control and drag it onto the Web Form. If you cannot find the control in the ToolBox, right click and select Choose Items to locate the FileExplorer control in the Choose ToolBox Items dialog box.
- Right click the FileExplorer control and select Properties.
- In the Properties Window, add the folder location to the ViewPaths property.
In Source View
Complete the following steps:
- Add the following CSS style within the
<head></head>tags, for the new upload button.<style> .uploadbutton { width:22px; height:16px; } </style> - Add the following code within the
<form></form>tags, just below the<cc1:C1FileExplorer></cc1:C1FileExplorer>markup, to add an image button, a hidden field and a script manager. The image add to the image button should have a transparent background, in order to work well on every Visual Style.<asp:ImageButton ID="ImageButton1" runat="server" OnClientClick="showDialog()" ImageUrl="~/uploadFile.png"/> <asp:HiddenField ID="HiddenField1" runat="server" /> <asp:ScriptManager ID="ScriptManager1" runat="server"></asp:ScriptManager>
- Add the following markup within the
<form></form>tags, to add an UpdatePanel control that holds a C1Upload control.<div runat="server" id="dialog"> <asp:UpdatePanel ID="UpdatePanel1" runat="server" UpdateMode="Conditional" EnableViewState="False" ChildrenAsTriggers="False"> <Triggers> <asp:AsyncPostBackTrigger ControlID="ImageButton1" /> </Triggers> <ContentTemplate> <asp:Label ID="Label1" runat="server" Text=""></asp:Label> <cc1:C1Upload ID="c1Upload1" runat="server" Width="600px" ShowUploadedFiles="true" OnClientComplete="uploadComplete" /> </ContentTemplate> </asp:UpdatePanel> </div>
- Add the following script within the
<form></form>tags, to add uploadComplete, showDialog functions:<script type="text/javascript"> function uploadComplete() { $('#<%=dialog.ClientID%>').wijdialog("close"); $("#<%=C1FileExplorer1.ClientID %>").c1fileexplorer("refresh"); } function showDialog() { var currentFolder = $("#<%=C1FileExplorer1.ClientID %>").c1fileexplorer("option", "currentFolder"); $('#<%=HiddenField1.ClientID%>').val(currentFolder); $('#<%=Label1.ClientID%>').text("Please wait..."); $('#<%=c1Upload1.ClientID%>').hide(); $('#<%=dialog.ClientID%>').wijdialog({ title: "Upload to: " + currentFolder }).wijdialog("open"); } $(function () { $('#<%=dialog.ClientID%>').wijdialog({ autoOpen: false, modal: true, resizable: true, width: 640, height: 400, buttons: { Close: function () { $(this).wijdialog("close"); } }, captionButtons: { pin: { visible: false }, refresh: { visible: false }, toggle: { visible: false }, minimize: { visible: false }, maximize: { visible: false } } }); var uploadButtonPanel = $('<li title="Upload File" class="ui-state-default ui-corner-all uploadbutton"><a class="wijmo-wijfileexplorer-link" href="#"></a></li>'); uploadButtonPanel.find("a.wijmo-wijfileexplorer-link").append($('#<%=ImageButton1.ClientID%>')); $("#<%=C1FileExplorer1.ClientID %>").find("ul.wijmo-wijfileexplorer-toolbar").append(uploadButtonPanel); }); </script>
What You've Accomplished
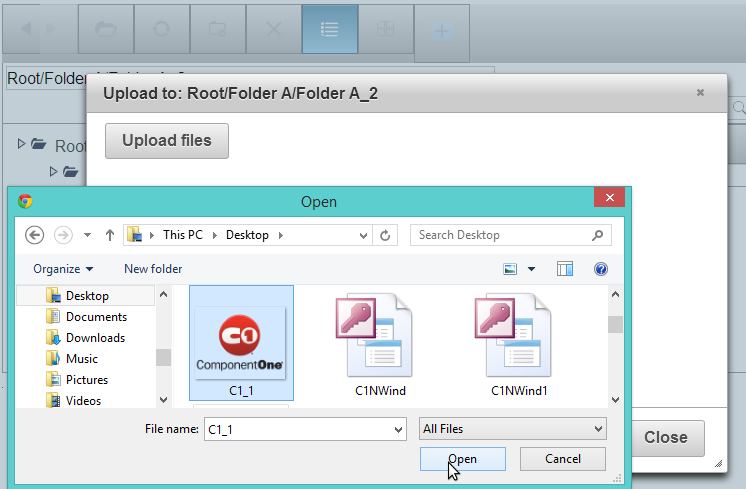
When you run the project, select a folder and click the Upload button that appears in the toolbox.
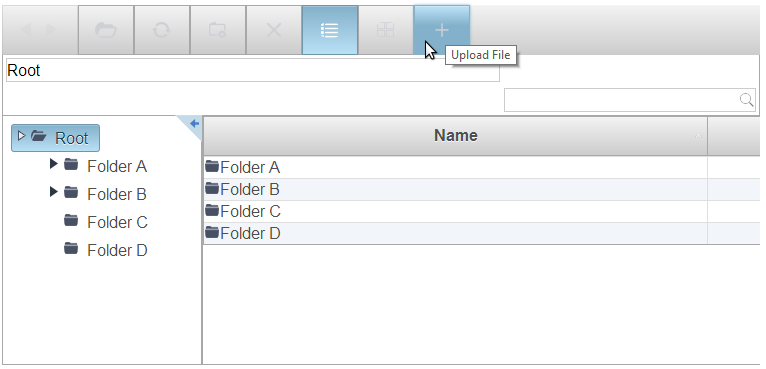
The C1Upload control appears, that lets you browse for files that you can upload to the selected folder.