Menu for ASP.NET Web Forms can be displayed as a traditional flyout menu or as a touch phone-like sliding menu. In this tutorial, you'll create a sliding menu with a breadcrumb header and an elastic sliding animation.
Complete the following steps:
- In Source view, add the following markup between the
<cc1:C1Menu>and</cc1:C1Menu>tags to add menus items and submenus to the C1Menu control:To write code in Source View
<Items>
        <cc1:C1MenuItem ID="C1MenuItem1" runat="server" ImagePosition="Left" Text="File">
             <Items>
      <cc1:C1MenuItem runat="server" Header="True" Text="File Menu" StaticKey="sk1"
                    ImagePosition="Left"
    ID="C1MenuItem2"></cc1:C1MenuItem>
                    <cc1:C1MenuItem runat="server" ImagePosition="Left"
    Text="Open File">
                    </cc1:C1MenuItem>
                    <cc1:C1MenuItem ID="C1MenuItem3" runat="server"
    ImagePosition="Left" Text="Save">
                    </cc1:C1MenuItem>
                    <cc1:C1MenuItem ID="C1MenuItem4" runat="server"
    ImagePosition="Left" Text="Save As...">
                    </cc1:C1MenuItem>
                    <cc1:C1MenuItem runat="server" ImagePosition="Left"
    Separator="True">
                    </cc1:C1MenuItem>
                    <cc1:C1MenuItem ID="C1MenuItem6" runat="server"
    ImagePosition="Left" Text="Close Project">
                    </cc1:C1MenuItem>
                    <cc1:C1MenuItem runat="server" ImagePosition="Left"
    Separator="True">
                    </cc1:C1MenuItem>
                    <cc1:C1MenuItem runat="server" ImagePosition="Left"
    Text="Options">
                        <Items>
                           <cc1:C1MenuItem
    runat="server" ImagePosition="Left" Text="Margins">

    </cc1:C1MenuItem>
                           <cc1:C1MenuItem
    runat="server" ImagePosition="Left" Text="Settings">

    </cc1:C1MenuItem>
                        </Items>
                    </cc1:C1MenuItem>
             </Items>
        </cc1:C1MenuItem>
             <cc1:C1MenuItem ID="C1MenuItem7" runat="server" ImagePosition="Left" Text="Edit">
                </cc1:C1MenuItem>
                <cc1:C1MenuItem ID="C1MenuItem8" runat="server" ImagePosition="Left"
    Text="View">
             </cc1:C1MenuItem>
</Items> - Switch to Design view.
- Click the C1Menu control's smart tag to open the C1Menu Tasks menu. Click Edit Menu.
The C1MenuDesignerForm dialog box opens.
- With C1Menu1 selected in the treeview, set the following properties:
- Set the Mode property to Sliding. This is what changes C1Menu from a traditional flyout menu to a sliding phone-like sliding menu.
- Set the BackLink property to False. This replaces the default "Back" link with breadcrumb links.
- Expand the SlidingAnimation node and set the Easing property to EaseInOutElastic. This sets the animation for the sliding menu.
- Click OK to exit the C1MenuDesignerForm dialog box.
- Press F5 to run your project. The project will look as follows:
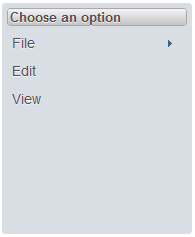
The "Choose an option" text at the top of the menu is a placeholder. It's where the breadcrumb links will appear as you navigate through the menu.
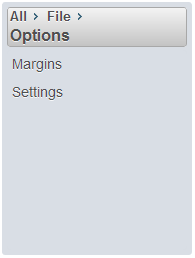
- Click File. Did you notice the elastic animation as the new menu screen slid into view? Also observe that the breadcrumb bar says "All > File"

- Click Options and observe that the breadcrumbs say "All > File > Options". To return to the File menu, click File. To return to the top-level menu, click All.