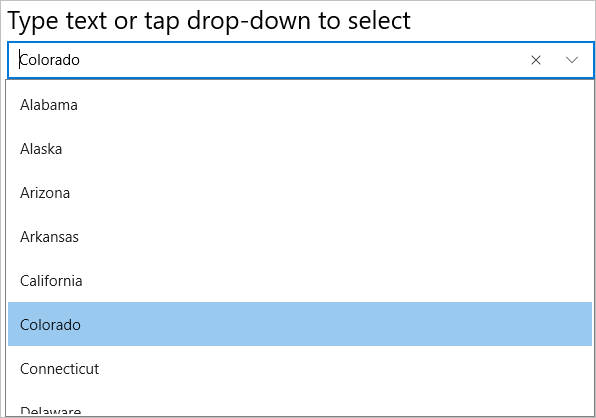
This section describes adding a ComboBox control to your portable or shared application and displaying a list of items in the drop-down as suggestions for users.
Complete the following steps to display a ComboBox control.
- Step 1: Add an item list to be displayed in the drop-down
- Step 2: Add ComboBox control to XAML Page
- Step 3: Run the Project
The following image shows a ComboBox displaying input suggestions as the user types.

Step 1: Add an item list to be displayed in the drop-down
Complete the following steps to add a list of items to be displayed in the drop-down list.
- Create a new portable or shared Xamarin.Forms application (Refer Creating a New Xamarin.Forms App for detailed instructions).
- Add a new class (say States.cs) to your application.
- Add the following code to initialize a collection of items (here, a list of major states in the United States).
C# Copy Codepublic class States { public string Name { get; set; } public States(string name) { this.Name = name; } public static List<States> GetStates() { List<States> data = new List<States>(); data.Add(new States("Alabama")); data.Add(new States("Alaska")); data.Add(new States("Arizona")); data.Add(new States("Arkansas")); data.Add(new States("California")); data.Add(new States("Colorado")); data.Add(new States("Connecticut")); data.Add(new States("Delaware")); data.Add(new States("District of Columbia")); data.Add(new States("Florida")); data.Add(new States("Georgia")); data.Add(new States("Guam")); data.Add(new States("Hawaii")); data.Add(new States("Idaho")); data.Add(new States("Illinois")); data.Add(new States("Indiana")); data.Add(new States("Iowa")); data.Add(new States("Kansas")); return data; } }
Step 2: Add ComboBox control to XAML Page
- Add a new Content Page (say Page1.xaml) to your application.
- Edit the <ContentPage> tag to include the following reference.
XAML Copy Codexmlns:c1="clr-namespace:C1.Xamarin.Forms.Input;assembly=C1.Xamarin.Forms.Input"
- Initialize an editable ComboBox control and set some of its basic properties such as Name, DisplayMemberPath, etc. by adding the given markup between <StackLayout></StackLayout> tags inside the <ContentPage></ContentPage> tags.
XAML Copy Code<StackLayout> <Label Text="Type text or tap drop-down to select" FontSize="25"/> <c1:C1ComboBox x:Name="cbxEdit" IsEditable="True" HorizontalOptions="FillAndExpand" DisplayMemberPath="Name" VerticalOptions="Start" /> </StackLayout>
- Expand the Page1.xaml node in the Solution Explorer to open Page1.xaml.cs and add the given code in the constructor to set the ItemsSource property of the C1ComboBox class.
C# Copy Codevar array = States.GetStates(); cbxEdit.ItemsSource = array;
Step 3: Run the Project
- In the Solution Explorer, double-click App.cs file to open it.
- To return a Content Page, set the MainPage to Page1 in the constructor App() as illustrated in the given code
C# Copy Codepublic App() { // The root page of your application MainPage = new Page1(); }
- Some additional steps are required to run iOS and UWP apps:
- iOS App:
- In the Solution Explorer, double click AppDelegate.cs inside YourAppName.iOS project to open it.
- Add the following code to the FinishedLaunching() method.
C# Copy CodeC1.Xamarin.Forms.Input.Platform.iOS.C1InputRenderer.Init();
- UWP App:
- In the Solution Explorer, expand the MainPage.xaml inside YouAppName.UWP project.
- Double click the MainPage.xaml.cs to open it and add the following code to the class constructor.
C# Copy CodeC1.Xamarin.Forms.Input.Platform.UWP.C1InputRenderer.Init();
-
(Optional) In case you compile your UWP application in Release mode, you need to explicitly add the following code to the OnLaunched method in your App.xaml.cs to include the correct assemblies with your application.
C# Copy Codevar assembliesToInclude = new List<Assembly>(); assembliesToInclude.Add(typeof(C1.Xamarin.Forms.Input.Platform.UWP.C1InputRenderer) .GetTypeInfo().Assembly); assembliesToInclude.Add(typeof(C1.UWP.Input.C1InputRenderer).GetTypeInfo().Assembly); Xamarin.Forms.Forms.Init(e, assembliesToInclude);
- iOS App:
- Press F5 to run the project.