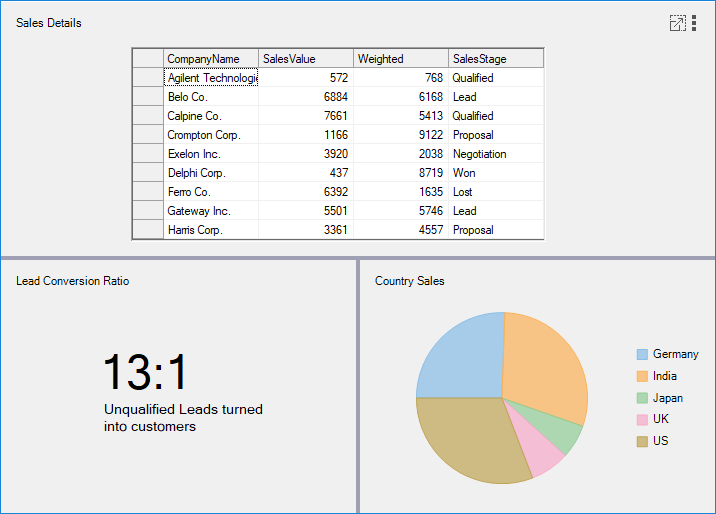
This topic guides you through the steps to create a lead conversion dashboard using split layout. It displays the lead conversion ratio, sales in different countries in a pie chart, and sales details of companies in a FlexgGid.
- Create a new Windows Forms App.
- In the Windows Forms Designer, set the height of the form to 730 and width to 550.
- Drag and drop a DashboardLayout control from the Toolbox onto your form.
Observe: By default, a layout of the type Split is attached to it. - Select the DashboardLayout control. In the Properties window, set it's Dock property to Fill.
- Click inside the DashboardLayout control. The SplitContentPanel (layout control attached to the DashboardLayout by default) is selected.
Observe: By default, SplitContentPanel contains two child containers named C1SplitterPanel1 and C1SplitterPanel2 of type C1SplitterPanel and the C1SplitterPanel2 is aligned horizontally below the C1SplitterPanel1. - Click on the SplitContentPanel’s smart tag to open its Tasks Menu. Select Add Panel from the DashboardSplitContainer Tasks menu.
A third child container named C1SplitterPanel3 is added to the DashboardLayout contro land it aligns itself horizontally below the C1SplitterPanel2. - Select C1SplitterPanel1 and set its Caption on c1DashboardLayout1 property to Sales Details.
- Select C1SplitterPanel2 and set the following properties.
Property Name Value Dock Fill Caption on c1DashboardLayout1 Lead Conversion Ratio
- Select C1SplitterPanel3 and set the following properties.
Property Name Value Text Caption on c1DashboardLayout1 Country Sales
- Drag and drop the C1FlexGrid control on C1SplitterPanel1 and set the following properties.
Property Name Value Location 130,45 Size 415,195
- Add a class named SalesDetails.cs to the project and copy the following code to it to add data for FlexGrid.
C# Copy Codepublic class SalesDetails { public SalesDetails(string companyName, double salesValue, double weighted,string salesStage) { CompanyName = companyName; SalesValue = salesValue; Weighted = weighted; SalesStage = salesStage; } public SalesDetails() { } public string CompanyName { get; set; } public double SalesValue { get; set; } public double Weighted { get; set; } public string SalesStage { get; set; } public List<SalesDetails> GetData() { string[] companyNames = { "Agilent Technologies", "Belo Co.", "Calpine Co.", "Crompton Corp.", "Exelon Inc.", "Delphi Corp.", "Ferro Co.","Gateway Inc.","Harris Corp."}; string[] salesStages={"Qualified", "Lead", "Qualified", "Proposal", "Negotiation", "Won", "Lost","Lead","Proposal"}; List<SalesDetails> salesDetailsList = new List<SalesDetails>(); Random random = new Random(); for(int i=0;i<9;i++) { salesDetailsList.Add(new SalesDetails(companyNames[i],random.Next(0,10000), random.Next(1,10000),salesStages[i])); } return salesDetailsList; } }
- Add the following code to Form1_Load event to populate the grid with data.
C# Copy CodeSalesDetails salesDetails = new SalesDetails(); List<SalesDetails> salesDetailsList = salesDetails.GetData(); c1FlexGrid1.DataSource = salesDetailsList; - Drag and drop a Label control on C1SplitterPanel2 and set the following properties:
Property Name Value Location 90,85 Text 13:1 Font > Size 35 Now, drag and drop another Label control on C1SplitterPanel2 and set the following properties:
Property Name Value Location 100,140 Text Unqualified Leads turned into customers Font > Size 10 - Add a FlexPie to C1SplitterPanel3 and set the following properties:
Property Name Value Dock Fill BindingName CountryName Binding OpportunityCount
- Add a class named CountrySales.cs to the project and copy the following code to it to add data for FlexPie.
C# Copy Codepublic class CountrySales { public CountrySales(string countryName, int opportunityCount) { CountryName = countryName; OpportunityCount = opportunityCount; } public CountrySales() { } public string CountryName { get; set; } public int OpportunityCount { get; set; } public List<CountrySales> GetData() { string[] countryNames = {"Germany", "India", "Japan", "UK" , "US" }; List<CountrySales> countrySalesList = new List<CountrySales>(); Random random = new Random(); for (int i = 0; i < 5; i++) countrySalesList.Add(new CountrySales(countryNames[i],random.Next(0,30))); return countrySalesList; } }
- Add the following code to Form1’s Load event to populate the pie with data.
C# Copy CodeCountrySales countrySales = new CountrySales(); List<CountrySales> countrySalesList = countrySales.GetData(); flexPie1.DataSource = countrySalesList;
The sales conversion dashboard gets created.