In the previous step you set up the application's user interface and added a C1ContextMenu control to your application. In this step you will add some C1MenuItems to the control.
1. First let's create a TextBlock with a border that can be tapped to access the context menu. We'll also add some markup to create a second TextBlock that will tell the user the last context menu item that was tapped. Add the following XAML to the <Grid x:Name="LayoutRoot">, like this:
<Grid x:Name="LayoutRoot">
<Grid.RowDefinitions>
<RowDefinition Height="Auto"/>
<RowDefinition Height="*"/>
</Grid.RowDefinitions>
<Border Margin="10" Height="100"
BorderBrush="WhiteSmoke" BorderThickness="4" VerticalAlignment="Center" Padding="16">
<TextBlock Foreground="WhiteSmoke" Text="Tap and hold here to show the C1ContextMenu." VerticalAlignment="Center"/>
</Border>
<c1:C1ContextMenu>
</c1:C1ContextMenu>
<StackPanel Orientation="Horizontal" Grid.Row="1" Margin="10">
<TextBlock Text="Last menu item selected: "/>
<TextBlock x:Name="MenuFeedback" Grid.Row="1"/>
</StackPanel>
</Grid>
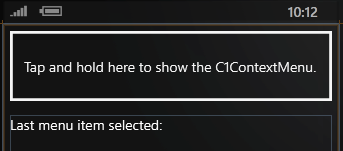
The page should look similar to this:
2. After the closing </Border> tag, let's add opening and closing tags for the C1ContextMenuService. The C1ContextMenuService class exposes context menus as extender properties that can be attached to any FrameworkElement objects on the page. The C1ContextMenuService tags should contain the C1ContextMenu tags so that the XAML markup looks like this:
<c1:C1ContextMenuService.ContextMenu>
<c1:C1ContextMenu>
</c1:C1ContextMenu>
</c1:C1ContextMenuService.ContextMenu>
3. Place your cursor in between the <c1:C1ContextMenu></c1:C1ContextMenu> tags and add three C1MenuItems so the markup resembles the following:
<c1:C1ContextMenuService.ContextMenu>
<c1:C1ContextMenu>
<c1:C1MenuItem x:Name="FirstMenuItem" Header="first menu item"/>
<c1:C1MenuItem x:Name="SecondMenuItem" Header="second menu item"/>
<c1:C1Separator/>
<c1:C1MenuItem x:Name="ThirdMenuItem" Header="third menu item"/>
</c1:C1ContextMenu>
</c1:C1ContextMenuService.ContextMenu>
In this step, you added menu items to the C1ContextMenu control. In the next step, you will run the project and experience the functionality of the control.