License your ActiveReports during installation, or from Add or Remove Programs if you already have a trial version installed.
When you install a service pack or hot fix on top of a previous version of ActiveReports 6, the Customer Registration screen is not shown during installation. If your previous version was not licensed and you wish to license it now, follow the steps described in To license a trial version of ActiveReports without reinstalling below.
 |
Caution: When installing on a Vista machine, do not just double-click the exe to install ActiveReports. This will not license the machine. On Windows Vista, you must instead right-click the exe and select Run as Administrator even if you are already the administrator on your machine. |
To license a machine for ActiveReports during installation
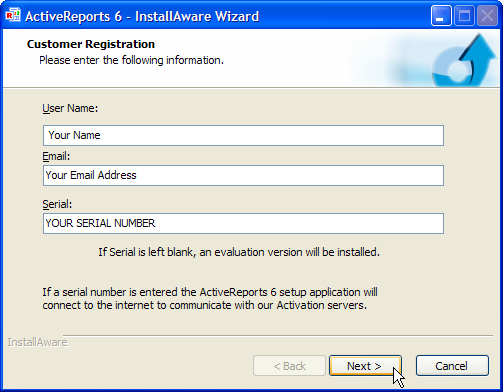
- Near the end of the installation, the Customer Registration screen requests the following information:
- User Name: Enter your name or company name here. You can use any characters in this field except the semicolon.
- Email: Enter your e-mail address in this field.
- Serial: Enter the serial number exactly as you received it from GrapeCity, including any dashes or capital letters.

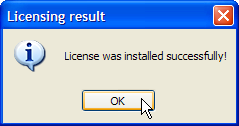
- Click the Next button and then the Finish button to complete the installation. The Licensing result message box informs you that licensing was successful.

- The machine is now licensed, and no nag screens or evaluation banners appear when you use the product or create new solutions with it.
To license a trial version of ActiveReports without reinstalling
- From the Start menu, open the Control Panel.
- Select Add or Remove Programs.
- From the list of currently installed programs, select ActiveReports 6.
- Click the Change button.
- Select License ActiveReports 6 and click the Next button.

- The Customer Registration screen requests the following information:
- User Name: Enter your name or company name here. You can use any characters in this field except the semicolon.
- Email: Enter your e-mail address in this field.
- Serial: Enter the serial number exactly as you received it from GrapeCity, including any dashes or capital letters.
To check an existing ActiveReports Windows application for licensing
 |
Caution: If the application containing ActiveReports is not an executable, licensing must be embedded in the calling application, or root level executable, to take effect. |
- Open an existing ActiveReports Windows application project.
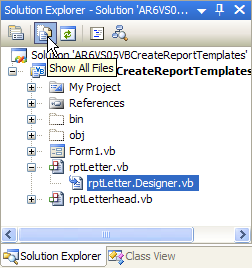
- In the Solution Explorer window, click the Show All Files icon.

- Expand the My Project node. If there is a file called licenses.licx in the file list, the ActiveReports application is licensed.
- If the licenses.licx file does not appear in your file list, follow the instructions under To license Windows Forms projects below.
To license Windows Forms projects made with the trial version
- Ensure that ActiveReports is licensed on the machine by following the steps above for licensing either during installation of ActiveReports or later if using a trial version.
- Open the project in Microsoft Visual Studio.
- Open the Visual Studio Build menu and select Rebuild Solution.
- The executable application is now licensed, and no nag screens or evaluation banners appear when you run it. You can distribute the application to un-licensed machines and no nag screens or evaluation banners appear.
To license Web Forms projects made with the trial version
- Ensure that ActiveReports is licensed on the machine by following the steps above for licensing either during installation of ActiveReports or later if using a trial version.
- Open the project in Microsoft Visual Studio.
- Open the Visual Studio Build menu and select Rebuild Solution.

Note: For licensing Web Site applications, open the Visual Studio Build menu and select Build Runtime Licenses to create the App_Licenses.dll file. - The web application is now licensed, no evaluation banners appear when you run it. You can distribute the Web application to unlicensed machines and no evaluation banners appear.
Required references in the licenses.licx file (for Standard and Professional Editions)
The licenses.licx file must contain the following references to the ActiveReports 6 version and the reference to the Viewer control:
Standard Edition:
| Paste INSIDE the licenses.licx file |
Copy Code |
|---|---|
|
DataDynamics.ActiveReports.ActiveReport, ActiveReports6, Version=x.x.xxxx.x, Culture=neutral, PublicKeyToken=cc4967777c49a3ff DataDynamics.ActiveReports.Viewer.Viewer, ActiveReports.Viewer6, Version=x.x.xxxx.x, Culture=neutral, PublicKeyToken=cc4967777c49a3ff | |
Professional Edition:
| Paste INSIDE the licenses.licx file |
Copy Code |
|---|---|
|
DataDynamics.ActiveReports.ActiveReport, ActiveReports6, Version=x.x.xxxx.x, Culture=neutral, PublicKeyToken=cc4967777c49a3ff DataDynamics.ActiveReports.Web.WebViewer, ActiveReports.Web, Version=x.x.xxxx.x, Culture=neutral, PublicKeyToken=cc4967777c49a3ff DataDynamics.ActiveReports.Export.Pdf.PdfExport, ActiveReports.PdfExport, Version=x.x.xxxx.x, Culture=neutral, PublicKeyToken=cc4967777c49a3ff DataDynamics.ActiveReports.Design.Designer, ActiveReports.Design6, Version=x.x.xxxx.x, Culture=neutral, PublicKeyToken=cc4967777c49a3ff DataDynamics.ActiveReports.Viewer.Viewer, ActiveReports.Viewer6, Version=x.x.xxxx.x, Culture=neutral, PublicKeyToken=cc4967777c49a3ff | |
 |
Note: The version number (Version=x.x.xxxx.x) must correspond to the Active Reports 6 version you are using. |
To create the Web Key with the Web Key Generator utility
You can create a Web Key for your ActiveReports project by using the Web Key Generator utility on a machine with the licensed ActiveReports.
- From the Start Menu, go to All Programs > GrapeCity > ActiveReports 6.0 > Generate WebKey and run the Web Key Generator utility.


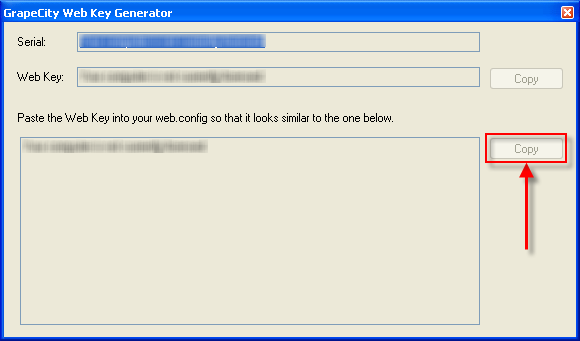
Note: You can find the Web Key Generator utility in the C:\Program Files\Common files\GrapeCity\ActiveReports 6 folder. - In the dialog that appears, copy the Web Key by clicking Copy. We recommend that you use the second Copy button to copy the Web Key together with the corresponding web.config section.

- Paste the Web Key into the web.config file of your project between the opening and closing <configuration> tags to remove the licensing message. The web.config key looks like the following.
| XML code. Paste INSIDE the Web.config file |
Copy Code |
|---|---|
<configuration>
    <appSettings>
        <add key=" ActiveReportsLicense " value="Name,Company,SERIAL NUMBER,Generated Hash Code" />
    </appSettings>
</configuration> | |
 |
Note: If you see the message "Your computer is not currently licensed" in the Web Key Generator dialog, please license your machine. To do that, follow the steps described in the section To license a trial version of ActiveReports without reinstalling that you will find above. |
To license an ActiveReport6 Silverlight project
- Ensure that ActiveReports is licensed on the machine by following the steps above for licensing either during installation of ActiveReports or later if using a trial version.
- Open your project in Microsoft Visual Studio.
- On the Visual Studio Tools menu, select Generate ActiveReports6 Silverlight Runtime License.
- In the dialog that appears, click OK.

To license a Silverlight Class Library project with the ActiveReports 6 Silverlight Viewer
You can license your Silverlight Class Library project that contains the ActiveReports 6 Silverlight Viewer control by running the ActiveReport6 Silverlight Class Library License Generator utility from the Start Menu.
- Ensure that ActiveReports is licensed on the machine by following the steps above for licensing either during installation of ActiveReports or later if using a trial version.
- From the Start Menu, go to All Programs > GrapeCity > ActiveReports 6 > Tools > Silverlight Class Library License Generator and run the Silverlight Class Library License Generator utility.
- In the dialog that appears, click Browse... to select the Silverlight class library with the ActiveReports 6 Silverlight Viewer control and click Open.

- In the same dialog, click OK after selecting the Silverlight class library with the ActiveReports 6 Silverlight Viewer control.
- In the following dialog, click Save to save the generated license data to the GrapeCity.ActiveReports.Silverlight.License.lcx license file.


Note: If your Silverlight application project already contains the license file, you can update it with the license data for the Silverlight class library. To do that, use the Copy button on the ActiveReports 6 License Generator for Silverlight Class Library dialog to copy and then paste the <Product> node from the generated license data to the existing license file.
- In the dialog that appears, specify the location to save the license file and click OK.
- On the Visual Studio Project, click Add Existing Item to add the saved license file to the Silverlight class library project.
- In the dialog that appears, locate and select the GrapeCity.ActiveReports.Silverlight.License.lcx file and click OK.
- In the Solution Explorer, select the GrapeCity.ActiveReports.Silverlight.License.lcx file.
- In the Properties window, set the Build Action property for this license file to Embedded Resource.
 |
Note: When using the PDF export filter in your project, you should open the licenses.licx file and make sure that it contains a proper reference to the PDF Export Assembly. |
 |
Important: The SetLicense() Method has been deprecated and can no longer be used for licensing ActiveReports. To learn how to license your ActiveReports, please refer to the sections located above. |
To license ActiveReports on the machine without internet connection, please contact our support team: powersupport@grapecity.com.
 Show All
 Hide All