Merging data in Table or Tablix data regions is a common scenario. ActiveReports 13 provides AutoMergeMode property that consists of Always, Never, and Restricted values. The detail cells with same data values and with AutoMergeMode property set to:
- Always - are merged.
- Never - are not merged.
- Restricted - are merged only if the corresponding cells in previous columns are similarly merged. If for example, cells in Column 2 (with same data values) are set 'Restricted' and the corresponding cells (with same data values) in previous column, that is Column 1, are set 'Never', then cells in Column 2 are not merged.
The reports using AutoMerge in older versions can be opened correctly in ActiveReports 13, and new reports with AutoMergeMode are correctly opened in previous ActiveReports versions.
The following steps take you through how to add automatic merge to the cells in Table and Tablix data regions.
These steps assume that you have already added a Page Report/RDL Report template to your project, connected it to a data source and added a dataset. See Adding an ActiveReport to a Project, Connect to a Data Source and Add a Dataset for more information.
To apply merge in Table cells
- From the toolbox, drag a Table data region onto the report design surface.
- Select the Table and set the BorderStyle property to Solid.
- In the Table, select the following TextBoxes and from the Fields Selection Adorner, set their Values as follows.
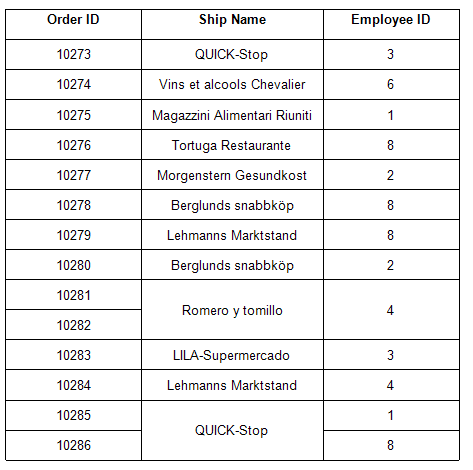
TextBox Value TextBox4 OrderIDTextBox5 ShipNameTextBox6 EmployeeID - Select TextBox6 and set AutoMergeMode property to Restricted. This merges employee ids depending on whether the corresponding ship names (cells in previous column) are merged.
- Select TextBox5 and set AutoMergeMode property to Always. This merges the cells with similar ship names.
- Set the BorderStyle property of Header row and Detail row to Solid to view the merged cells clearly.
To merge cells in Tablix (outside row group)
- From the toolbox, drag a Tablix data region onto the report design surface.
- Select the Tablix and set the BorderStyle property to Solid.
- Right-click Textbox4, select Insert Column, and then select Outside Group - Right.
- In the Tablix, select the following TextBoxes and set their Values as follows.
TextBox Value TextBox3 OrderIDTextBox4 ShipNameTextBox6 EmployeeID - Select TextBox6 and set AutoMergeMode property to Restricted. This merges employee ids depending on whether the corresponding ship names (cells in previous column) are merged.
- Select TextBox4 and set AutoMergeMode property to Always. This merges the cells with similar ship names.
- Select the Row Group area and set the BorderStyle property to Solid to view the merged cells clearly.