You can customize the HTMLViewer interface using JQuery methods. WebViewer control adds JQuery library in page scripts. Use the code in this walkthrough to remove a button from the HTMLViewer toolbar and add a client side PDF export implementation.
This walkthrough is split into the following activities:
- Loading an ActiveReport to a Visual Studio ASP.NET Web application.
- Adding the jQuery library to the Web application project.
- Accessing WebViewer's view model.
- Removing an existing toolbar button.
- Adding a function for PDF exporting.
- Binding the Custom UI to WebViewer's view model.
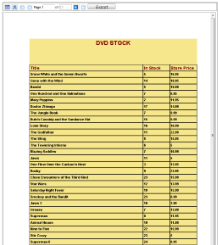
When you complete this walkthrough you get an HTMLViewer that looks similar to the following at run time.
To load an ActiveReport in the Web application
- Create a new Visual Studio ASP.NET Web application.
- In the Default.aspx that gets created, go to the Visual Studio toolbox ActiveReports 13 Page Report tab and drag a WebViewer control onto the Design view.
- Load the report generated at the end of the Single Layout Reports walkthrough.
Note: You may load any report, section or page in the HTMLViewer. See Getting Started with the Web Viewer for information on loading a report.
To add the jQuery library to the Web application project
Follow the steps below to add the jQuery library to your Web application project.
- In the Source view of the Default.aspx file, add the following code.
Add this code after the <head> tag Copy Code<script src="https://code.jquery.com/jquery-2.1.4.min.js"></script>
- In the Source view of the Default.aspx file, add the following code.
Add this code before the </script> tag Copy Codevar clientID = ...; $(document).ready(function () { $('#' + clientID).on('loaded', viewer_loaded); });
To access the WebViewer view model
The HTML Web Viewer is created using the MVVM pattern that provides a view model which does not depend on the UI. The code can access the Viewer's view model and bind the custom UI to it by using well-documented properties and methods. For MVVM support, the code can use knockout.js which is the standard MVVM library for JavaScript. Knockout.js provides declarative bindings, observable objects and collections in HTML markup. See Using Javascript with the HTML Viewerfor more information.
Follow the steps below to access the ViewModel.
- In the Source view of the Default.aspx file, add a <script> tag.
Add a script tag like the following before the body tag Copy Code<script language="javascript" type="text/javascript">
</script>
- Add the following Javascript code for document's Onload event handler and WebViewer's Loaded event handler that gets fired when the UI is rendered on the Html Page:
Paste the code into .aspx source Copy Code<script language="javascript" type="text/javascript">
function viewer_loaded()
{
};
function document_onload()
{
};
</script>
...
<body onload="return document_onload()"> - Add the following Javascript code inside the viewer_loaded event handler to access WebViewer's view model:
Paste the code into .aspx source Copy Codevar viewModel = GetViewModel('WebViewer1'); - Add the following Javascript code inside the document_onload event handler to bind WebViewer's Loaded event to client side viewer_loaded event:
Paste the code into .aspx source Copy Code$('#WebViewer1').bind('loaded', viewer_loaded);
To remove a button from the WebViewer toolbar
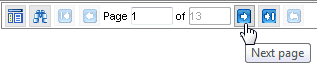
In the Source view of the Default.aspx file, add the following Javascript code inside the viewer_loaded event handler to access the WebViewer toolbar and remove the Next Page button from the toolbar:
| Paste the code into .aspx source |
Copy Code
|
|---|---|
var toolbar = $('#WebViewer1').find('.arvToolBar');
|
|
Note: In order to access the child elements of the WebViewer toolbar you need their css class names. Following is a list for reference:
Toolbar Child Elements
Find button: btnFind
First page button: btnFirst
Previous page button: btnPrev
Page label: toolbarLabel
Page number input box: toolbarInput
Next page button: btnNext
Last page button: btnLast
Back to parent report button: btnBack
To add a function for exporting to PDF
The steps below illustrate how to build a custom UI.
- In the Source view of the Default.aspx file, add following Javascript code inside <script> tag to create a function. This function accesses the view model and exports the report in PDF format :
Paste the code into .aspx source Copy Codefunction exportPDF()
{var viewModel = GetViewModel('WebViewer1');if (viewModel.PageLoaded())
{
viewModel.Export(ExportType.Pdf, function (uri)
{
window.location = uri;
}, true);
}
} - In the Source view of the Default.aspx file, add the following Javascript code inside <form> tag to add a button on a custom toolbar. This button is enabled once the report is loaded and calls the exportPDF() function at run time:
Paste the code into .aspx source Copy Code<div id="customToolbar" style = "display:inline">
<button data-bind='enable: PageLoaded, click: exportPDF' style=" width: 105px;
font-size: medium; height: 22px;">Export</button>
</div> - In the Source view of the Default.aspx file, add the following Javascript code inside the viewer_loaded event handler to attach the custom toolbar with the built-in toolbar:
Paste the code into .aspx source Copy Code$('#customToolbar').appendTo(toolbar);
To bind the custom UI to the WebViewer view model and run the application
- Add the following Javascript code inside the viewer_loaded event handler to bind the custom UI to WebViewer view model:
Paste the code into .aspx source Copy Codeko.applyBindings(viewModel, document.getElementById("customToolbar")); - Press F5 to run the application.