Included with the ActiveReports Excel export filter is the SpreadBuilder API. With this utility, you can create Excel spreadsheets cell by cell for maximum control. This walkthrough illustrates how to create a simple custom spreadsheet and save it to an Excel file.
This walkthrough is split into the following activities:
- Adding an ActiveReport to your project
- Adding an GrapeCity.ActiveReports.Export.Excel.v12 assembly reference
- Creating a Workbook using code
- Viewing the Excel File
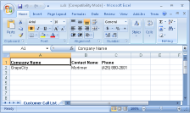
When you have completed this walkthrough, a custom Excel file like the following is created in the Bin/Debug subfolder of your project's folder.
To add an GrapeCity.ActiveReports.Export.Excel.v12 assembly reference to your project
- Create a new Visual Studio project.
- From the Visual Studio Project menu, select Add Reference.
- In the Add Reference window that appears, select GrapeCity.ActiveReports.Export.Excel.v12 assembly reference and click OK.
Note: In ActiveReports, by default, the assemblies are located in the ...\Common Files\GrapeCity\ActiveReports 12 folder.
To add code to create a workbook
Double-click the title bar of the Windows Form to create an event-handling method for the Form_Load event. Add code to the handler to:
- Create a Workbook, and add a sheet to the Workbook's Sheets collection
- Set properties on columns and rows in the sheet
- Set values of cells in the sheet
- Use the Save method to create an Excel file
The following example shows what the code for the method looks like.
To write the code in Visual Basic.NET
| Visual Basic.NET code. Paste inside the form Load event. |
Copy Code
|
|---|---|
'Create a Workbook and add a sheet to its Sheets collection
Dim sb As New GrapeCity.SpreadBuilder.Workbook()
sb.Sheets.AddNew()

'Set up properties and values for columns, rows, and cells as desired
With sb.Sheets(0)
   .Name = "Customer Call List" 'sets the name of the sheet
   .Columns(0).Width = 2 * 1440 'sets the width of the 1st column
   .Columns(1).Width = 1440
   .Columns(2).Width = 1440
   .Rows(0).Height = 1440 / 4

'Header row
    .Cell(0, 0).SetValue("Company Name")
    .Cell(0, 0).FontBold = True
    .Cell(0, 1).SetValue("Contact Name")
    .Cell(0, 1).FontBold = True
    .Cell(0, 2).SetValue("Phone")
    .Cell(0, 2).FontBold = True

'First row of data
    .Cell(1, 0).SetValue("GrapeCity")
    .Cell(1, 1).SetValue("Mortimer")
    .Cell(1, 2).SetValue("(425) 880-2601")
End With

'Save the Workbook to an Excel file
sb.Save(Application.StartupPath & "\x.xls")
MessageBox.Show("Your Spreadsheet has been saved to " & Application.StartupPath & "\x.xls")
|
|
To write the code in C#
| C# code. Paste inside the form Load event. |
Copy Code
|
|---|---|
//Create a Workbook and add a sheet to its Sheets collection
GrapeCity.SpreadBuilder.Workbook sb = new GrapeCity.SpreadBuilder.Workbook();
sb.Sheets.AddNew();

//Set up properties and values for columns, rows and cells as desired
sb.Sheets[0].Name = "Customer Call List";
sb.Sheets[0].Columns(0).Width = 2 * 1440;
sb.Sheets[0].Columns(1).Width = 1440;
sb.Sheets[0].Columns(2).Width = 1440;
sb.Sheets[0].Rows(0).Height = 1440/4;

//Header row
sb.Sheets[0].Cell(0,0).SetValue("Company Name");
sb.Sheets[0].Cell(0,0).FontBold = true;
sb.Sheets[0].Cell(0,1).SetValue("Contact Name");
sb.Sheets[0].Cell(0,1).FontBold = true;
sb.Sheets[0].Cell(0,2).SetValue("Phone");
sb.Sheets[0].Cell(0,2).FontBold = true;

//First row of data
sb.Sheets[0].Cell(1,0).SetValue("GrapeCity");
sb.Sheets[0].Cell(1,1).SetValue("Mortimer");
sb.Sheets[0].Cell(1,2).SetValue("(425) 880-2601");

//Save the Workbook to an Excel file
sb.Save (Application.StartupPath + @"\x.xls");
MessageBox.Show("Your Spreadsheet has been saved to " + Application.StartupPath + @"\x.xls");
|
|
To view the Excel File
- Press F5 to run the project. A message box informs you of the exact location of the exported x.xls file.
- Navigate to the Bin/Debug subfolder of your project's folder and open the XLS file.