The topic takes you through the query building process in the Visual Query Designer. Query building in Visual Query Designer can be accomplished in a few simple steps:
Step 1: Adding fields from a table to generate a simple query
Step 2: Setting relationships (only applicable to queries using multiple tables)
Step 3: Setting options for individual fields or tables
Step 4: Executing a query
Step 5: Previewing a query
- Create and Execute a Query (Single Table)
- Create and Execute a Query (Multiple Tables)
- Preview a Query
- Save a Query
- Edit a Query
- Clear a Query
- Access the Visual Query Designer
- Delete a field
- Sort data
- Display Distinct Values
- Aggregate Functions and Grouping
- Hide Fields from a Query
- Set filter condition
- Create a parameterized query
The following steps assume that you have already added a Page Report or an Rdl Report template and connected it to a data source. See Adding an ActiveReport to a Project and Connect to a Data Source for further information.
For more information on how to access Visual Query Designer, see Accessing Visual Query Designer.
Create and Execute a Query (Single Table)
Go to TopIn the Visual Query Designer, you get a visual interface to assist you in quickly designing simple queries that reference a single table.
Query Result in SQL
| SQL Query |
Copy Code
|
|---|---|
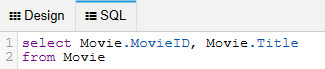
select Movie.MovieID, Movie.Title from Movie |
|
Steps to create the Query in Visual Query Designer
- From the Movie table in the Database view, drag and drop the field MovieID to the Selected Fields panel.
- Add another field, Movie.Title from the same table, to the Selected Fields panel.
- On the Toolbar of the Visual Query Designer, click the Execute button.
Result data similar to the following appears in Results panel.
Create and Execute a Query (Multiple Tables)
Go to TopIn the Visual Query Designer, you get a visual interface to reference multiple tables and set up relationships between them.
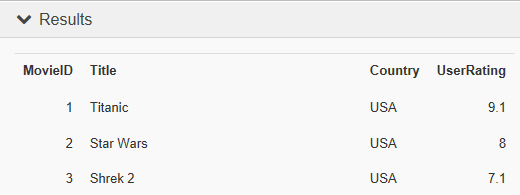
The following example shows how to implement a right outer join using the tables Movie and MovieCrew from Reels database and apply a filter condition to your result set using the WHERE clause. For more information about table relationships and joins in Visual Query Designer, see Tables and Relations.
Query Result in SQL
| SQL Query |
Copy Code
|
|---|---|
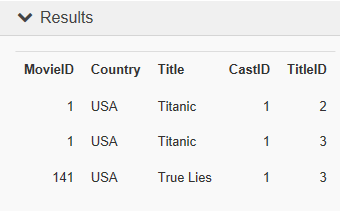
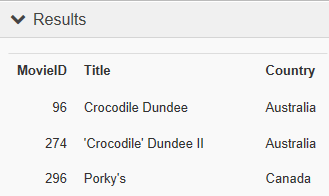
select Movie.MovieID, Movie.Country, Movie.Title, MovieCrew.CastID, MovieCrew.TitleID from Movie right join MovieCrew on MovieCrew.MovieID = Movie.MovieID where (Movie.Country = 'USA' and MovieCrew.CastID =1) |
|
Steps to create the Query in Visual Query Designer
- From the Movie table in the Database view, drag and drop the fields MovieID, Country and Title to the Selected Fields panel.
- From the MovieCrew table in Database view, drag and drop the fields CastID and TitleID to the Selected Fields panel.
- When you add the first field in step 2, a Tables relations dialog automatically appears on the screen.
In Tables relations dialog, you can also select any other field from MovieCrew table which matches the related table's field to form a join between the both. - In Tables relations dialog, select the Right Outer Join Type for joining the two tables Movie and Movie Crew. The Right Outer tab is highlighted.
Refer to Tables And Relations for more information on types of joins.
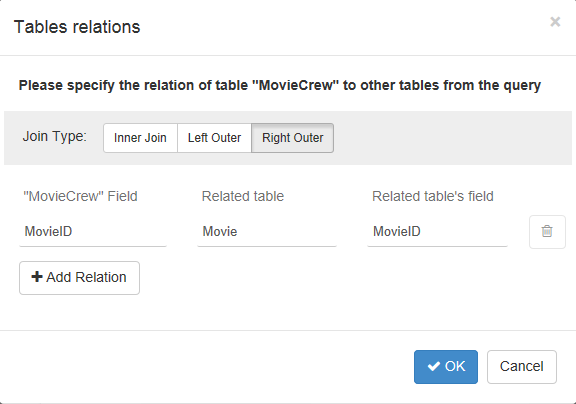
- In Tables relations dialog, click OK to save the relationship between tables.
Once the relationship has been set up between tables, you may also access the Tables relations dialog from the Relations button in the Tables and Relationships panel. - In the Selected Fields panel, under the Where option, add a filter condition for the Country field of the Movie table. Set the value to "= 'USA'".
- Again, in the Selected Fields panel, under the Where option, add a filter condition for the CastID field of the MovieCrew table. Set the value to "= 1".
- On the Toolbar of the Visual Query Designer, click the Execute button.
Result data similar to the following appears in Results panel.
Preview a Query
Go to TopWhen you have finished designing your query, you can execute it and then preview the result in the Visual Query Designer.
- In the Query Tools section of the Visual Query Designer, go to the Toolbar.
- Click the
 button.
You can preview the result in the Results panel at the bottom of the Visual Query Designer dialog.
Save a Query
Go to TopPage Report/Rdl Report
Once a query is created in the Visual Query Designer, the Save button allows you to save the query into the DataSet dialog.
- Once your query is created in Visual Query Designer, in the Query Tools section of the Visual Query Designer, go to the Toolbar.
- Click the
 button. Your query appears in Query field of the Query page in the DataSet dialog.
 - Click OK to close the dialog.
Your data set and queried fields appear as nodes in the Report Explorer.
Section Report
Once a query is created in the Visual Query Designer, the Save button allows you to save the query into the Report Data Source dialog.
- Once the query is created in Visual Query Designer, in the Query Tools section of the Visual Query Designer, go to the Toolbar.
- Click the button.
Your query appears in Query field of the Report Data Source dialog. - Click OK to close the dialog. Your queried fields appear as bound field nodes in the Report Explorer.
Clear a Query
Go to TopOnce a query is created, the Selected Fields panel is populated with fields and Tables and Relationship panel displays the tables to which the fields used in the query belong.
- In the Query Tools section of the Visual Query Designer, go to the Toolbar.
- Click the
 button.
This clears the Query Tools section completely including Selected Fields and Tables and Relationships panel. It also removes the SQL query from the SQL tab and any data appearing in the Results panel.
Edit a Query
Go to TopThere are two ways to edit a query in the Visual Query Designer:
- Edit a query created in the Visual Query Designer directly in the SQL tab.
Follow the steps below to edit a query created in the Visual Query Designer manually in the SQL:
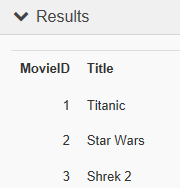
- From the Movie table in Database view, drag and drop the fields MovieID and Title onto the Selected Fields panel.
- Under Query Tools, switch to the SQL tab to edit the query manually.
- Enter the field name Movie.Length in the SQL tab.
SQL Query Copy Codeselect Movie.MovieID, Movie.Title, Movie.Length from Movie
- On the Toolbar of the Visual Query Designer, click the Execute button.
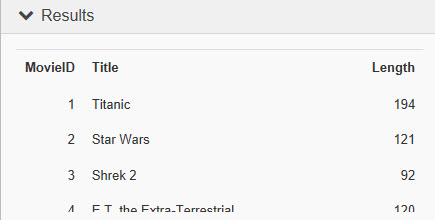
The additional Length column appears in Results panel.
- Edit an existing SQL query in the Visual Query Designer.
This approach has some limitations based on the type of queries that can be handled in the Visual Query Designer. -
Assuming that a query like the following already exists in the Data Set dialog of a Page/Rdl Report or the Report Data Source dialog of a Section Report, follow the steps below to edit it in the Visual Query Designer.
SQL Query Copy Codeselect Movie.MovieID, Movie.Title from Movie
- Open the Visual Query Designer and under Query Tools, go to the SQL tab. Notice that the SQL query is already present in the this tab.
- Go to the Design tab and notice that the Selected Fields panel already contains the fields MovieID and Title.
- From the Database view, drag and drop a field, Length from the Movie table onto the Selected Fields panel.
- Go to the SQL tab again and see that the query now appears as follows:
SQL Query Copy Codeselect Movie.MovieID, Movie.Title, Movie.Length from Movie
- On the Toolbar of the Visual Query Designer, click the Execute button.
Result data similar to the following appears in Results panel.
Delete a field
Go to TopYou can delete any field from a query in the Visual Query Designer. When you delete a field from a query, the field remains in the database, but is no longer used in the query.
- From the Movie table in the Database view, drag and drop the fields MovieID, Country and Title onto the Selected Fields panel.
- Hover your mouse over the MovieID field in Selected Fields panel to display the Delete icon.
- Click the Delete icon to delete the field.
Please note that once you delete a field, it is also removed from the SQL query in the SQL tab.
Sort data
Go to TopYou can sort the records in a table, query, form, or a report on one or more fields in the Visual Query Designer. For example, you can sort the Movie table by Title in ascending order and Country in descending order. In case multiple fields are being sorted, you can also determine which field is sorted first and which is sorted later.
Query Result in SQL
| SQL Query |
Copy Code
|
|---|---|
select Movie.MovieID, Movie.Title, Movie.Countryfrom Movieorder by Movie.Country desc, Movie.Title asc |
|
Steps to create the Query in Visual Query Designer
- In the Database view, from the Movie table, drag and drop the fields MovieID, Title and Country onto the Selected Fields panel.
- In the Selected Fields panel, go to the Title field and set the Sort option to ascending. Sort Order option is automatically set to 1.
- Go to the Country field next and set the Sort option to ascending. Sort Order option is automatically set to 2.
Based on steps 2 and 3, the table values sort on the Title field first and then on the Country field in ascending order. - In Country field, change the Sort Order value to 1. Sort Order value of the Title field automatically changes to 2.
The table values now sort on the Country field first in and then on the Title field in ascending order. - In the Toolbar of the Visual Query Designer, click the Execute button.
Result data similar to the following appears in Results panel.
Display Distinct Values
Go to TopWhen retrieving data from a table, you may get duplicate records. Use the Distinct operator in the Select statement of your query to remove such values.
In the Visual Query Designer, you can use the Distinct checkbox available in the Toolbar to eliminate duplicate records. For example, you can retrieve unique records from YearReleased field of the Movie table.
Query Result in SQL
| SQL Query |
Copy Code
|
|---|---|
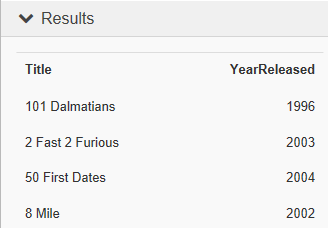
select DISTINCT Movie.Title, Movie.YearReleased from Movie |
|
Steps to create the Query in Visual Query Designer
- From the Movie table in the Database view, drag and drop the Title and YearReleased fields onto the Selected Fields panel.
- In the Toolbar of the Visual Query Designer, check the
 checkbox to display unique values from the YearReleased field.
 - Click the Execute button.
Result data similar to the following appears in Results panel.
Aggregate Functions and Grouping
Go to TopYou can group data on a field and create an aggregate query that involves a function such as Sum or Avg in the Visual Query Designer. For example, you can group the movies in the Movie table by Country and calculate the average movie ratings for different countries using the Visual Query Designer.
Query Result in SQL
| SQL Query |
Copy Code
|
|---|---|
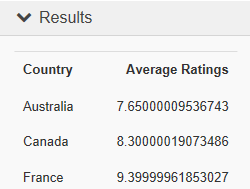
select Movie.Country, Avg(Movie.UserRating) as [Average Ratings] from Movie group by Movie.Country |
|
Steps to create the Query in Visual Query Designer
- From the Movie table in the Database view, drag and drop the Country and UserRating fields onto Selected Fields panel.
- In the Selected Fields panel, under the Country field, select GroupBy from the Total dropdown list. This groups the data by country name.
- In the Selected Fields panel under the UserRating field, select the option Alias and set its alternate name to Average Ratings.
- Under the UserRating field again, select Avg from a list of pre-defined aggregate functions in the Total dropdown list. This provides average user ratings for movies.
- In the Toolbar of the Visual Query Designer, click the Execute button.
Result data similar to the following appears in Results panel.
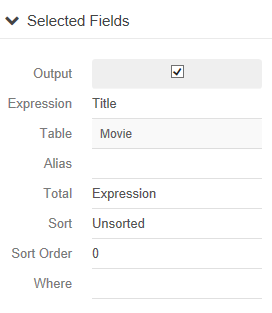
Hide Fields from a Query
Go to TopThe Hide option in the Visual Query Designer allows you to hide part of the data that a query retrieves. For example, you can hide the MovieID field in the Movie table, from the result set of your query.
Follow the steps below to hide a field through the Visual Query Designer:
- From the Movie table in the Database view, drag and drop the fields Title, UserRating and Country onto the Selected Fields panel.
- In the Selected Fields panel, go to the Country field and select the Where option and set it's value to " = 'USA' "
- In the Selected Fields panel, go to the Title field and set the value of the Alias option to Movies from USA.
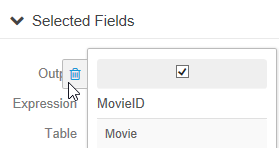
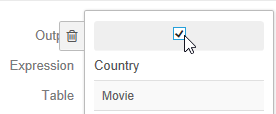
- Clear the Output check box for the Country field as shown in the image below to hide the field from the result set.
- In the Toolbar of the Visual Query Designer, click the Execute button.
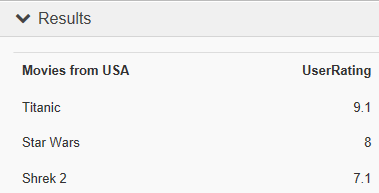
The data for the Country field does not appear in the in the Results panel anymore.
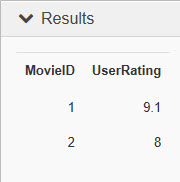
Set filter condition
Go to TopThe SQL Where clause is used to filter results that match a given criteria. The Where clause can be used when you want to fetch any specific data from a table omitting other unrelated data.
For example if you want to display UserRating of only those movies where the MovieID is either 1 or 2, you can use the Where clause with an '=' operator in the Visual Query Designer.
Query Result in SQL
| SQL Query |
Copy Code
|
|---|---|
select Movie.MovieID, Movie.UserRating from Movie where (Movie.MovieID = 1 or Movie.MovieID = 2) |
|
Steps to create the Query in Visual Query Designer
- Form the Movie table in Database view, drag and drop the MovieID and UserRating fields onto the Selected Fields panel.
- In the Selected Fields panel under the MovieID field, select the Where option and set the value to "=1".

- Add an OR condition in MovieID field and set the value to "=2".

Rows which have either have MovieID = 1 or MovieID = 2 are displayed in the Result set. - In the Toolbar of the Visual Query Designer, click the Execute button.
Result data similar to the following appears in Results panel.
Create a parameterized query
Go to TopYou can set parameters in your query using the Visual Query Designer. A parameterized query generally prompts the user to enter a value before the query is executed, to determine the type of data to be displayed in the result set.
As an example of a simple parameterized query, you can create a query parameter that prompts a user for a Movie ID and displays the Title, UserRating and Length of the movie based on the ID entered.
Query Result in SQL
| SQL Query |
Copy Code
|
|---|---|
select Movie.MovieID, Movie.Title, Movie.Country, Movie.UserRating from Movie where Movie.Country = ? |
|
Steps to create the Query in Visual Query Designer
- From the Movie table in the Database view, drag and drop the MovieID, Title, UserRating and Country fields onto the Selected Fields panel.
- In the Selected Fields panel under the Country field, select the option Where and set its value to "= @Country".
This creates a parameter Country.

- In the Toolbar of the Visual Query Designer, click the Execute button. The Parameters dialog automatically appears on the screen.
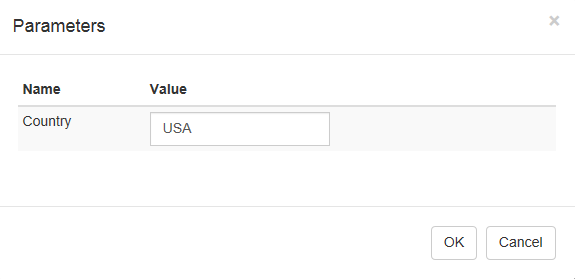
- Enter the parameter value USA in the dialog box and click OK.
Result data similar to the following appears in Results panel.