You can use your existing LDAP or Active Directory® with ActiveReports Server so that your users can log in with their existing user names and passwords, and so that you can use existing groups to provide access to specific data.
To map your user directory to ActiveReports Server, you specify LDAP (Active Directory) as your custom security provider, and set properties to give ActiveReports Server access to it. These properties are described in the table below.
Security provider properties table
| Property | Description |
|---|---|
| LDAP Server URL (required) |
The URL to the directory where you can find users. The syntax is: ldap://host:port/domain
In this example, example.org is the name of the server answering LDAP queries, 888 is a non-standard port used on the LDAP server, and grapecity.net is the ActiveDirectory domain. |
| LDAP Admin User (required) |
The name or DN (distinguished name), or UPN (user principal name) of the user under which the LDAP connection is established. This user is also used to implement the ISecurityProvider.GetAdminContext method when you add a custom entity.
Note: Most non-Active Directory LDAP servers require a DN (distinguished name) for this, so a DN in the administrator account would be the directory manager.
Example: display name: Directory Manager distinguishedName (DN): cn=Directory Manager,cn=Root DNs,cn=config userPrincipalName (UPN): DirectoryManager@grapecity.net
Note: For user authentication, we recommend to use UPN of the user as it is based on samaccountname that is unique in the domain.
|
| LDAP Admin Password (required) | The password associated with the administrative user on the LDAP server. Example: ***** |
| User Name Attribute (optional) | By default, this value is samaccountname and specifies the LDAP attribute to use in resolving the user name passed in the ISecurityProvider.GetUserToken method. Example: uid |
| User Display Name Attribute (optional) | By default, this value is displayName and specifies the LDAP attribute to use in resolving the user-friendly name with the ISecurityProvider.GetUserDescription method. Example: sn |
| User Email Attribute (optional) | By default, this value is mail and specifies the LDAP attribute to use in resolving the user e-mail with the ISecurityProvider.GetUserDescription method. Example: mail |
| Define Mappings | Description |
| User Context Attribute Name | LDAP User Attribute Name |
To configure ActiveReports 10 Server to use your LDAP or Active Directory
- In the Configuration section of the Administrator Dashboard, click Security Provider. The Custom security provider drop-down list appears.
- From the drop down list box, select Active Directory.
- In the Security Provider Settings that appear, enter a value for each of the properties.
- Below the Security Provider Settings, in the Define mappings section, click on Add row button..
- In the boxes that appear, enter a valid User Context Attribute Name, and a LDAP User Attribute Name that you will be able to select when you create security filters in the model editor. (See the To create a new security filter section below.)
To test your custom security provider
You can place percent signs around a UserContext attribute to use it in a connection string when you create a model. This is useful when each tenant in a multi-tenant application has a separate database, and you need to supply a dynamic value for the database.
Provider=SQLOLEDB.1;Data Source=HQ;Initial Catalog=%TenantDatabase%;
User Id=myUsername;Password=myPassword;
When you create a security filter, you can re-use it for other entities that contain the attribute on which the filter expression is based.
To create a new security filter for row-level security
From the Administrator Dashboard, in the Administration section on the left, click Models. The Models list appears.
- Select the model to which you want to add a filter, and then click Edit model button. The model editor appears.
- Select the entity that you want to filter. The editable properties appear in the center workspace.
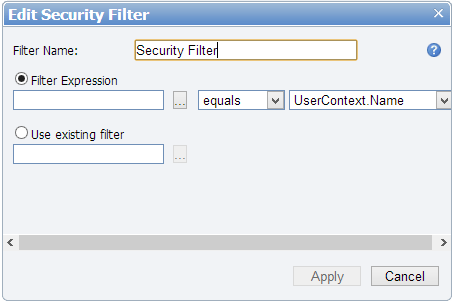
- Next to Security Filter, click the Add command. The Edit Security Filter dialog appears.

- In the box next to Filter Name, enter a name for your filter.
- With Filter Expression selected, click the ellipsis button to open the Select Attribute dialog where you can select an attribute of the entity on which to filter data, and click OK.
- Drop down the list next to the attribute to select whether to display data that equals or does not equal the following value.
- Drop down the list to the right, and select a User Context Attribute Name mapping against which to filter the selected attribute.
- Click the Apply button to create the filter, or to discard the changes, click Cancel.