You can use touch support gestures and the touch menu bar or strip with drag and fill.

Select a range. Tap the range to display the touch menu bar as shown in the above image.
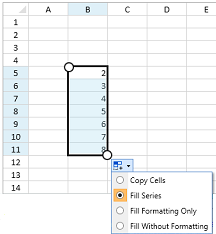
Tap the AutoFill menu item to display the drag fill handle at the bottom-right edge of the selected range as shown in the image below.

Press and slide the handle to drag and fill the range. The CanUserDragFill property must be true to display and use the drag fill handle.

The above image displays a filled range. Click on the drag fill indicator to display additional drag file options as shown in the following image.
Using Code
The following code adds a drag fill option to the touch menu bar.
-
Create a button in the touch bar strip.
-
Create an auto fill click event.
-
Display the drag fill option using the event.
-
Use the TouchToolbarOpening event to specify the location of the touch strip.
| CS |  Copy Code Copy Code |
|---|---|
| private GrapeCity.Windows.SpreadSheet.UI.TouchToolbar _toolbar; public MainPage() { InitializeComponent(); this.InitializeTouchStrip(); } private void GcSpreadSheet1_TouchToolbarOpening(object sender, GrapeCity.Windows.SpreadSheet.UI.TouchToolbarOpeningEventArgs e) { e.Handled = true; _toolbar.Show(e.X - 100, e.Y - 100); } void autoFill_Click(object sender, EventArgs e) { var activeView = this.GcSpreadSheet1.View; if (activeView != null) { activeView.ShowAutoFillIndicator(); } } private void InitializeTouchStrip() { _toolbar = GrapeCity.Windows.SpreadSheet.UI.TouchToolbarFactory.CreateCutCopyPasteToolBar(this.GcSpreadSheet1.View); var separator = new GrapeCity.Windows.SpreadSheet.UI.ToolbarSeparator(); _toolbar.ToolbarItems.Add(separator); var autoFillButton = GrapeCity.Windows.SpreadSheet.UI.TouchToolbarFactory.CreateDragFillButton(); _toolbar.ToolbarItems.Add(autoFillButton); autoFillButton.Click += autoFill_Click; } | |
| VB.NET | Copy Code |
|---|---|
| Private _toolbar As GrapeCity.Windows.SpreadSheet.UI.TouchToolbar Public Sub New() InitializeComponent() Me.InitializeTouchStrip() End Sub Private Sub GcSpreadSheet1_TouchToolbarOpening(sender As Object, e As GrapeCity.Windows.SpreadSheet.UI.TouchToolbarOpeningEventArgs) Handles GcSpreadSheet1.TouchToolbarOpening e.Handled = True _toolbar.Show(e.X - 100, e.Y - 100) End Sub Private Sub autoFill_Click(sender As Object, e As EventArgs) Dim activeView = Me.GcSpreadSheet1.View If activeView IsNot Nothing Then activeView.ShowAutoFillIndicator() End If End Sub Private Sub InitializeTouchStrip() _toolbar = GrapeCity.Windows.SpreadSheet.UI.TouchToolbarFactory.CreateCutCopyPasteToolBar(Me.GcSpreadSheet1.View) Dim separator = New GrapeCity.Windows.SpreadSheet.UI.ToolbarSeparator() _toolbar.ToolbarItems.Add(separator) Dim autoFillButton = GrapeCity.Windows.SpreadSheet.UI.TouchToolbarFactory.CreateDragFillButton() _toolbar.ToolbarItems.Add(autoFillButton) AddHandler autoFillButton.Click, AddressOf autoFill_Click End Sub | |
See Also