You can display multiple column and row headers and specify whether to show letters, numbers, or nothing in the default header. You can also put custom text in the headers.
Clicking on a header will select that row or column by default. You can also resize a column or row by moving the mouse pointer over the line at the edge of a header. The mouse pointer changes to a double arrow and you can then drag the column or row to the new width or height.
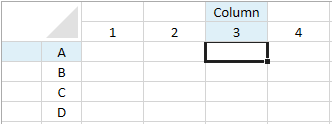
You can use the AutoTextIndex and AutoText properties in code to change the default header text.
Using Code
The following example specifies the type of text in the headers and puts custom text in a column header.
| CS |
Copy Code |
|---|---|
gcSpreadSheet1.Sheets[0].ColumnHeader.RowCount = 2;
gcSpreadSheet1.Sheets[0].RowHeader.ColumnCount = 2;
gcSpreadSheet1.Sheets[0].ColumnHeader.Cells[0, 2].Text = "Column";
gcSpreadSheet1.Sheets[0].RowHeader.AutoTextIndex = 1;
gcSpreadSheet1.Sheets[0].RowHeader.AutoText = GrapeCity.Windows.SpreadSheet.Data.HeaderAutoText.Letters;
gcSpreadSheet1.Sheets[0].ColumnHeader.AutoTextIndex = 1;
gcSpreadSheet1.Sheets[0].ColumnHeader.AutoText = GrapeCity.Windows.SpreadSheet.Data.HeaderAutoText.Numbers;
gcSpreadSheet1.Invalidate(); | |
| VB.NET |
Copy Code |
|---|---|
GcSpreadSheet1.Sheets(0).ColumnHeader.RowCount = 2
GcSpreadSheet1.Sheets(0).RowHeader.ColumnCount = 2
GcSpreadSheet1.Sheets(0).ColumnHeader.Cells(0, 2).Text = "Column"
GcSpreadSheet1.Sheets(0).RowHeader.AutoTextIndex = 1
GcSpreadSheet1.Sheets(0).RowHeader.AutoText = GrapeCity.Windows.SpreadSheet.Data.HeaderAutoText.Letters
GcSpreadSheet1.Sheets(0).ColumnHeader.AutoTextIndex = 1
GcSpreadSheet1.Sheets(0).ColumnHeader.AutoText = GrapeCity.Windows.SpreadSheet.Data.HeaderAutoText.Numbers
GcSpreadSheet1.Invalidate() | |
See Also