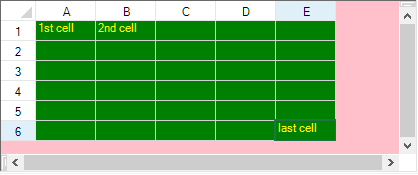
There are two different background colors for a sheet. The first is the background of all the cells in the data area, which can be set at the sheet level. The second is the area beyond the cells but also set at the sheet level, which is called the gray area background color.
The background color for all the cells in the sheet, as well as other properties, can be set using the default style of the sheet. In this example, the background color of the default style for all of the cells is green. You can also set the background color for individual cells.
The gray area background color for the sheet is displayed in the area where cells are not displayed, as shown in the following figure. By default, the area is the system's Control color. This example sets the background color beyond the cells to be pink.

Using the Properties Window
- At design time, in the Properties window, select the Spread component.
- Select the Sheets property.
- Click the button to display the SheetView Collection Editor.
- In the Members list, select the sheet for which to set the gray area background color.
- Select the GrayAreaBackColor property in the property list, and then click the drop-down button to display the color picker.
- Select a color in the color picker.
- Click OK to close the editor.
Using a Shortcut
Set the Sheets shortcut object GrayAreaBackColor property for the sheet.
Example
This example code sets the first sheet’s gray area background color to light yellow.
| C# |
Copy Code
|
|---|---|
// Set the first sheet's background color to light yellow. fpSpread1.InterfaceRenderer = null; fpSpread1.Sheets[0].GrayAreaBackColor = Color.LightYellow; |
|
| VB |
Copy Code
|
|---|---|
' Set the first sheet's background color to light yellow. fpSpread1.InterfaceRenderer = Nothing fpSpread1.Sheets(0).GrayAreaBackColor = Color.LightYellow |
|
Using Code
- Create a new SheetView object.
- Set the GrayAreaBackColor property for the SheetView object.
- Assign the SheetView object to a sheet in the Spread component.
Example
This example code sets the first sheet’s background color to light yellow.
| C# |
Copy Code
|
|---|---|
// Create a new SheetView object. FarPoint.Win.Spread.SheetView newsheet = new FarPoint.Win.Spread.SheetView(); fpSpread1.InterfaceRenderer = null // Set the SheetView object's background color to light yellow. newsheet.GrayAreaBackColor = Color.LightYellow; // Assign the SheetView object to the first sheet in the component. fpSpread1.Sheets[0] = newsheet; |
|
| VB |
Copy Code
|
|---|---|
' Create a new SheetView object. Dim newsheet As New FarPoint.Win.Spread.SheetView() fpSpread1.InterfaceRenderer = Nothing ' Set the SheetView object's background color to light yellow. newsheet.GrayAreaBackColor = Color.LightYellow ' Assign the SheetView object to the first sheet in the component. fpSpread1.Sheets(0) = newsheet |
|
Using the Spread Designer
- Select the sheet tab for the sheet for which you want to set the gray area background color.
- In the property list, select the GrayAreaBackColor property.
- Click the drop-down arrow to display the color picker.
- Select a color from the color picker.
- From the File menu choose Apply and Exit to apply your changes to the component and exit Spread Designer.