This example shows how to use the Excel Import and Export component in an ASP.NET web form application.
Use the following steps to create the example:
- Install the Excel Import and Export component if you have not already done so. For more information, see Installing and Configuring the Excel Import and Export Component.
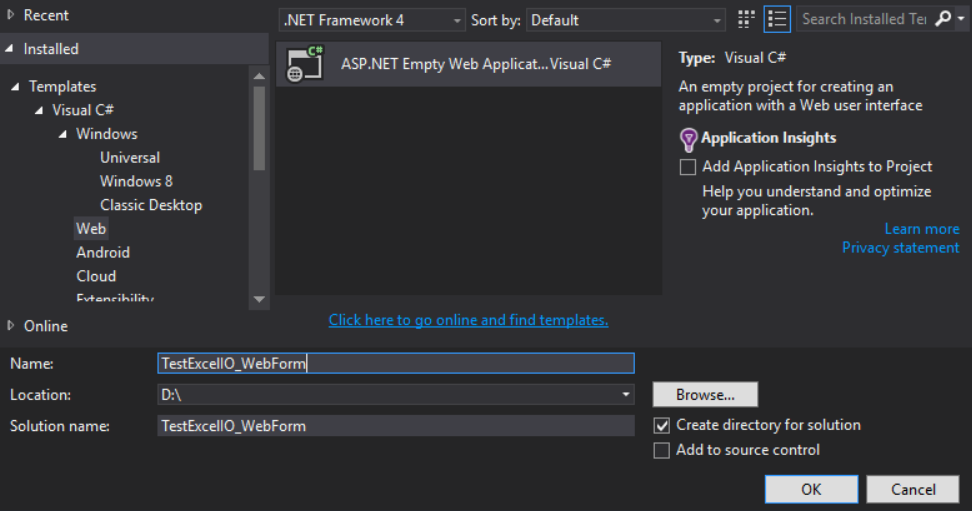
- Create an ASP.NET Empty Web Application in Visual Studio.

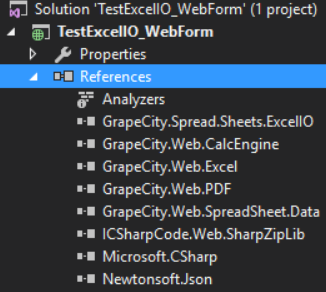
- Add the ExcelIO assembly references from the setup folder: "ProgramData/GrapeCity/Spread Studio 9/SpreadJS/ExcelIO".

- Create a run time license file and add the license information to the file and then add the file as an Embedded Resource in the Properties folder. For more information, see Creating a License File for the Excel Import and Export Component.
- Add a WebForm aspx item to the project.
- Add two Button controls to the project, a FileUpdate control, two HiddenField components, and a div dom element to the form. Add code to the page. For example:
JavaScript Copy Code<%@ Page Language="C#" AutoEventWireup="true" CodeBehind="WebForm1.aspx.cs" Inherits="TestExcelIO_WebForm.WebForm1" %> <!DOCTYPE html> <html xmlns="http://www.w3.org/1999/xhtml"> <head runat="server"> <title></title> <!--SpreadJS Widgets JavaScript--> <link href="css/gcspread.sheets.excel2013white.9.40.20153.0.css" rel="stylesheet" type="text/css" /> <script src="scripts/gcspread.sheets.all.9.40.20153.0.min.js" type="text/javascript"></script> <script> function onLoad() { var spread = new GcSpread.Sheets.Spread(document.getElementById("ss")); var hiddenFile = document.getElementById("HiddenField1"); if (hiddenFile && hiddenFile.value !== "") { spread.fromJSON(JSON.parse(hiddenFile.value)); } } function exportExcel() { var spread = GcSpread.Sheets.findControl(document.getElementById("ss")); var hiddenFile2 = document.getElementById("HiddenField2"); hiddenFile2.value = JSON.stringify(spread.toJSON()); } </script> </head> <body onload="onLoad()"> <form id="form1" runat="server"> <asp:FileUpload ID="FileUpload1" runat="server" Height="24px" Width="223px" /> <asp:Button ID="ImportBtn" runat="server" Text="Import Excel" OnClick="ImportBtn_Click" /> <asp:Button ID="ExportBtn" runat="server" Text="Export Excel" OnClick="ExportBtn_Click" OnClientClick="exportExcel()"/> <div id="ss" style="width:100%;height:500px"> </div> <asp:HiddenField ID="HiddenField1" runat="server" /> <asp:HiddenField ID="HiddenField2" runat="server" /> </form> </body> </html>
- Add the server side code in the server button click event. For example:
C# Copy Codeprotected void ImportBtn_Click(object sender, EventArgs e) { if (this.FileUpload1.HasFile) { Importer excelImporter = new Importer(); this.HiddenField1.Value = excelImporter.ImportExcel(this.FileUpload1.FileContent); } } protected void ExportBtn_Click(object sender, EventArgs e) { if (!string.IsNullOrEmpty(this.HiddenField2.Value)) { Exporter excelExporter = new Exporter(this.HiddenField2.Value); excelExporter.SaveExcel(Response.OutputStream); Response.AddHeader("content-disposition", "attachment; filename= test.xlsx"); Response.End(); } }
- Build and Press F5 to run. Select Choose File to select an Excel file, then select the Import Excel button.
- Select the Export Excel button to export the current SpreadJS to an Excel file.