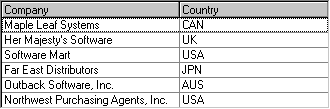
Consider the following example, in which the Country field is represented by a short character code.
To display the character codes as proper names, you can use the column's ValueItems collection to specify automatic data translations. At design time, this is done with the Values property page.

The Values property page enables you to specify data translations on a per-column basis. To construct a list of data translations for an individual column, do the following:
1. Use the Column combo box to select the column for which automatic data translation is to be performed.
2. Select the Translate check box. This enables automatic data translation and causes the DisplayValue column to appear in the property page list. If the Translate check box is not selected, you will only be able to enter items in the Value column of the property page list.
3. Enter as many Value/DisplayValue pairs as necessary. Use the Append or Insert buttons to cause a new data entry row to appear.
4. Select OK or Apply to commit the changes.
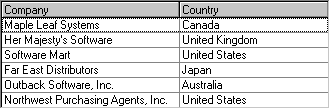
When the program is run, Country field values that match an item in the Value column appear as the corresponding DisplayValue entry. For example, CAN becomes Canada, UK becomes United Kingdom, and so forth.
Note that the underlying database is not affected; only the presentation of the data value is different. The same effect can be achieved in code as follows:
| Example Title |
Copy Code
|
|---|---|
Dim Item As New TrueDBList80.ValueItem With TDBList1.Columns("Country").ValueItems Item.Value = "CAN" Item.DisplayValue = "Canada" .Add Item Item.Value = "UK" Item.DisplayValue = "United Kingdom" .Add Item Item.Value = "USA" Item.DisplayValue = "United States" .Add Item Item.Value = "JPN" Item.DisplayValue = "Japan" .Add Item Item.Value = "AUS" Item.DisplayValue = "Australia" .Add Item .Translate = True End With |
|