In this tutorial, you will learn how navigation features can be added. The control provides custom, button, scrollbar and Outlook-style navigating features. The following tutorial describes these styles in greater detail.
-
Start a new project.
-
From the Visual Basic Project menu, select Components, then check the box labeled ComponentOne True DBCalendar 8.0. Click OK to add the TDBCalendar control icons to the Toolbox.
-
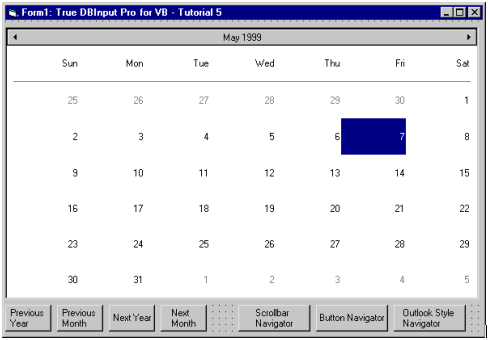
Place a True DBCalendar control (TDBCalendar1) and seven command buttons (Command1 to 7) on the form (Form1) as shown in the following figure.
-
Set the Caption properties of Command1-Command7 as shown in the preceding figure.
-
We will be using code to affect the navigation of the calendar control. The code to move to the previous year is as follows.
Example Title Copy CodePrivate Sub Command1_Click() ' Scroll to previous Year. TDBCalendar1.ScrollYear -1 End Sub -
This code will scroll to the previous month.
Example Title Copy CodePrivate Sub Command2_Click() ' Scroll to previous month. TDBCalendar1.ScrollMonth -1 End Sub -
This code will scroll to the next year.
Example Title Copy CodePrivate Sub Command3_Click() ' Scroll to next Year. TDBCalendar1.ScrollYear 1 End Sub -
This code will scroll to the next month.
Example Title Copy CodePrivate Sub Command4_Click() ' Scroll to next month. TDBCalendar1.ScrollMonth 1 End Sub -
This code will change navigation to the scrollbar.
Example Title Copy CodePrivate Sub Command5_Click() ' Scrollbar. TDBCalendar1.ShowNavigator = 2 ' Right side. TDBCalendar1.NavOrientation = 2 ' Show the scroll top window. TDBCalendar1.ShowScrollTip = True ' Top. TDBCalendar1.ScrollTipAlign = 1 End Sub -
This code will change navigation to the buttons.
Example Title Copy CodePrivate Sub Command6_Click() ' Buttons. TDBCalendar1.ShowNavigator = 1 ' Bottom. TDBCalendar1.NavOrientation = 3 ' Show the scroll top window. TDBCalendar1.ShowScrollTip = True ' Top. TDBCalendar1.ScrollTipAlign = 1 End Sub -
Code to change navigation to OutlookStyle.
Example Title Copy CodePrivate Sub Command7_Click() ' Outlook Style. TDBCalendar1.ShowNavigator = 3 End Sub -
Using the Navigator property page of TDBCalendar1, set ShowNavigator to 0 - None.
When the ShowNavigator property is set to either 1- Buttons or 2- Scrollbar, a navigation bar provided by the control will be shown. Navigating through the months can be achieved by clicking on the inner buttons of the Button navigator or the single arrow buttons of the Scrollbar navigator. Year navigation can be achieved by clicking on the outer buttons of the Button navigator or the double arrow buttons of the Scrollbar navigator. The Scrollbar navigator also provides a button to jump to the current date. Clicking on the scrollbar pane of the Scrollbar navigator will cause scrolling to the next/previous view.
When either of these navigators is being used, they can be positioned on any side of the control by using the NavOrientation property.
Also, when the scrollbar navigator is being used, you can decide whether to display the scroll tip window, which shows the current position of year and month.
When the ShowNavigator property is set to 3- Outlook style, 2 arrow buttons will be shown on the title bar, one on the left and the other on the right. The calendar will move back when the left button (previous month) is clicked, and move forward when the right button (next month) is clicked.
When multiple columns of months are displayed in the control, the navigating arrows will appear only on the left most calendar, and the right arrow on the right most calendar.
Year navigation can be done by clicking on the title bar and popping up a list to select the year and month, or by clicking on the arrow buttons while the CTRL key is pressed down.
Run the program and observe the following:
The sample calendar will use the scrollbar as its navigator; this is the final appearance of the sample calendar. If the steps were followed in order, a scrollbar navigator will be visible on the right-hand side of the control. When clicking on the scrollbar thumb, a scroll tip window will appear, indicating the current position.
This concludes Tutorial 5.