This tutorial demonstrates how rest days can be handled in the calendar control. Rest days can be treated in two ways: as weekends and as holidays. Weekends simply define which weekdays will become rest days, such as Sundays or Saturdays, and holidays define a particular day as a rest day. The following section describes each type of rests in more detail.
-
Start a new project.
-
From the Visual Basic Project menu, select Components, then check the box labeled ComponentOne True DBCalendar 8.0. Click OK to add the TDBCalendar control icons to the Toolbox.
-
Place a True DBCalendar control (TDBCalendar1) on the form (Form1) as shown in the following figure.

-
Using the Weekdays property pages, set the dropdown to Sunday. Check on the Firstweek, Secondweek, Thirdweek, Fourthweek, Fifthweek, and Lastweek. Then set the dropdown to Saturday. Check on the Firstweek, and Thirdweek.
The above sample sets the first and the third week for Saturdays, and all weeks for Sundays to be weekends. Note that if a holiday that has its Override property set to 1- Next day, and this happens to land on a Sunday, it will be overridden since the weekday rest style for Sunday is set to –1 – All, which includes the Override weekday option.
-
Using the Attributes property page of TDBCalendar1, set it to Sunday, choose the Colors button to set the BackColor to White and the ForeColor to Red. Set it to Saturday, choose the Colors button to set the BackColor to White and the ForeColor to Blue.
-
Using the HolidayStyle property page of TDBCalendar1, click on the Insert button. Set the Name to NationalHolidays, Key to NH, choose the Colors button to set the BackColor to White and the ForeColor to Green.
-
Using the Holidays property page of TDBCalendar1, click on the Append button. Set the Name to Holiday1, the Date to 1999/1/1, and the Key to H1. Then click on the Append button. Set the Name to Holiday2, the Date to 1999/5/31, and the Key to H2. Click on the Append button. Set the Name to Holiday3, the Date to 1999/7/4, and the Key to H3.
The above added a holiday style called “National Holiday” to the HolidayStyles collection property. The background color was set to white, text color to green for the holidays in the style. 3 holidays (1/1, 5/31, 7/4) were added to the style.
-
To reflect the added holiday style to the control, the holiday style key must be specified in the UseStyles property. This property handles all the holiday styles to display in the control. Add the following line of code to the Form_Load event:
Example Title Copy CodeTDBCalendar1.UseStyles = “NH”
When defining the holiday style to use, the key name (not the holiday description) must be used. In this case, the holiday key name is “NH”.
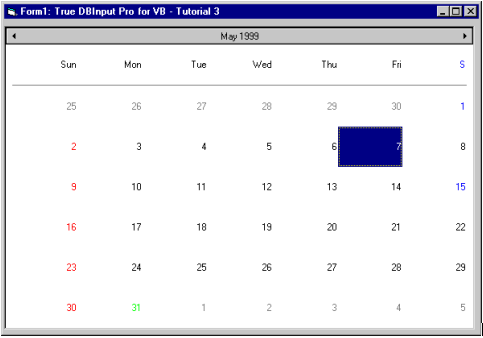
Run the program and observe the following:
-
When Form1 is loaded, TDBCalendar1 displays all Sundays in red, and the first and third week for Saturdays should be displayed in blue.
-
1/1, 5/31 and 7/4 should be displayed in green, since they were defined as national holidays.
Please refer to WeekDay Object Properties and HolidayStyle Object Properties for further details on how they can be used
This concludes Tutorial 3.