In this tutorial, you will learn how the TDBCalendar control is set up, by setting the margin spacing around the control and determining the number of calendar months to display in the control. The following steps describe how to set this up. When completed, you will be able to run the program and observe the run-time features of the input controls.
-
Start a new project.
-
From the Visual Basic Project menu, select Components, then check the box labeled ComponentOne True DBCalendar 8.0. Click OK to add the TDBCalendar control icons to the toolbox. The TDBCalendar icon looks like this:

-
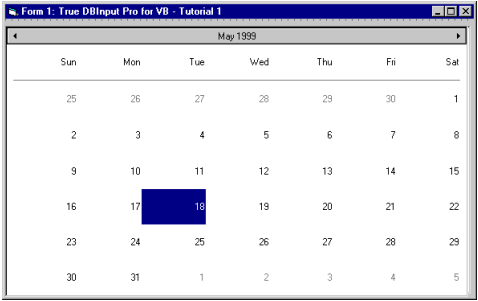
Place a True DBCalendar control (TDBCalendar1) on the form (Form1) as shown in the following figure. Watch the size panel in the Toolbar as you create the control to make it approximately 5000x8700, or set the Width and Height properties after creating the control.
-
Using the Appearance property page of TDBCalendar1, set MarginLeft to 3, MarginTop to 3, Margin Right to 3, MarginBottom to 3, and MarginTitle to 3.
To learn how to access property pages see Property Pages.
-
Using the Appearance property page of TDBCalendar1, set SelEdgeWidth to 6. This feature is supported only when the control is set to multiple selection mode. This spacing can be set by using the SelEdgeWidth property; when this property is set, the day area for each month will be indented on both sides, which opens a margin space for selection.
-
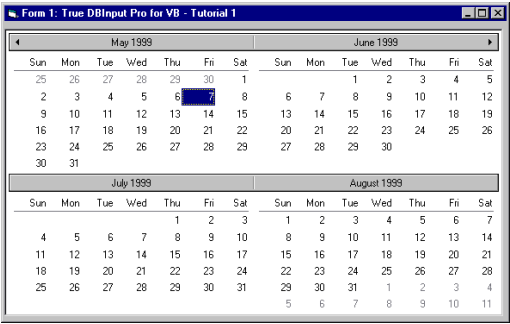
Using the Appearance property page of TDBCalendar1, set MonthCols to 2, and MonthRows to 2.
-
Using the Appearance property page of TDBCalendar1, set MarginWidth to 0, and MarginHeight to 3. The spacing set in the MarginWidth is used for column spacing, and the MarginHeight is used for row spacing. Since plenty of selection spacing was given to each month, just set the spacing for the rows. Set the TitleHeight property to 20.
 |
Note: Usually, there will be plenty of spacing given to each month using the SelEdgeWidth property, so the MarginWidth property may not have to be used. |
Run the program and observe the following:
We have just set up the layout of the control; see how the calendar looks now. Some of the titles use the default settings, but this tutorial should give you an idea of how the control can look if you do some manual setup.
You have created a fully functional calendar viewer without writing a single line of code!
To end the program, press the End button on the Visual Basic toolbar.
Congratulations, you have successfully completed Tutorial 1!