In this tutorial, you will learn how to bind True DBInput controls to a Visual Basic Data control and create a fully functional database browser without writing a single line of code. You will also learn about the basic properties associated with the Data control and True DBInput. You will then be able to run the program and observe the run-time features of the input controls.
-
Start a new project.
-
From the Visual Basic Project menu, select Components, then check the box labeled Microsoft ADO Data Control 6.0 (OLEDB).
-
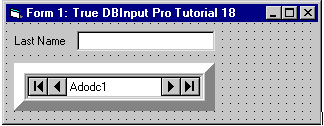
Following Step 3 in Tutorial 16 - Binding True DBInput to a Data Control, place an ADO Data control (Data1) on the form (Form1) as shown in the following figure.
-
Display the custom property pages for Data1. Click the General tab and select the Use Connection String option. Click Next >> and type in the database name (C:\TDBI8\TUTORIAL\TDBIDEMO.MDB). You do not have to enter a user name or password. Click the OK button to close the property page.
-
Set the CommandType property to 2 - adCmdTable.
-
Set the RecordSource property to TimeSheet.
-
Set the DataSource property of TDBCalendar1 to Adodc1.
-
Follow Steps 5 through 7 of Tutorial 16 - Binding True DBInput to a Data Control.
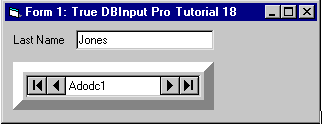
Run the program and observe the following:
-
True DBInput retrieves the database schema information from the Data control and automatically configures itself to display all of the fields contained in the database table. Note that the field names are used as the default column headings.
-
True DBInput automatically communicates with the Data control. Any actions taken on the Data control will be reflected in the input controls. Click the navigation buttons on the Data control to move forward a record, back a record, to the last record, and to the first record. Note that the input control's current record stays in sync with the Data control.
-
You have created a fully functional database browser without writing a single line of code!
To end the program, press the End button on the Visual Basic toolbar.
Run the program and observe the following:
Click the Next, Previous, Last and First buttons of the Data control and observe that the record positions on all bound controls are automatically synchronized.
To end the program, press the End button on the Visual Basic toolbar.
This concludes Tutorial 18.