In Tutorials 16 through 19, you will learn how to bind a True DBText control to different data controls.
You will also learn how the built-in Caption object can be used to eliminate the need to have a separate Label control for each field.
The True DBInput controls support Visual Basic’s data binding. This and the next two tutorials will demonstrate this capability by binding the controls to the TDBIDemo.MDB database. We will not include the ability to Add and Delete records, but it would be very easy to add this functionality later.
-
Start a new project.
-
Make sure the True DBInput controls are available in the Visual Basic Toolbox. See Adding True DBInput Components to the Visual BasicToolbox for detailed instructions.
-
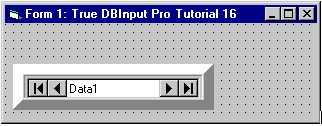
Place a TDBContainer3D control (TDBContainer3D1) near the bottom of the form (Form1) as shown in the figure. Set its AutoSize property to 1 – Autosize Child and BevelInner property to 10. This gives it a raised 3D look as shown here.
-
Place a Data control (Data1) inside TDBContainer3D1. TDBContainer3D1 will automatically size Data1 as shown here. Set the DatabaseName property of Data1 to TDBIDemo.MDB, and the RecordSource property to TimeSheet.
-
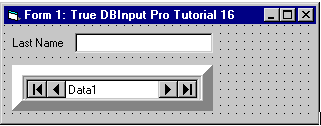
Place a TDBText control (TDBText1) in the upper-left corner of Form1 and size it to approximately 3000x300.
The initial size of the True DBInput controls must be large enough to accommodate the Caption object, (see Step 7 of this tutorial).
-
Set the DataSource property of TDBText1 to Data1, and the DataField property to LastName. Using the Caption property page of TDBText1, set Text to Last Name and Size to 60.
-
Using the Caption property page of TDBText1, set Text:TDBText to Last Name and Size to 60. See TDBText Control Property Pages for more information.
To learn how to access property pages, see Property Pages.
Important points to notice:
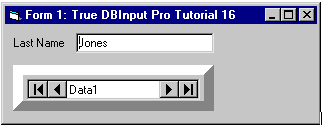
You have created a fully functional database viewer and data entry screen having some complicated data elements which require special formatting, validation requirements, data entry filtering, and data type conversions, and yet, there is no Visual Basic code. The controls handle all of this.
Run the program and observe the following:
Click the Next, Previous, Last and First buttons of the Data control and observe that the record positions on all bound controls are automatically synchronized.
To end the program, press the End button on the Visual Basic toolbar.
This concludes Tutorial 16.