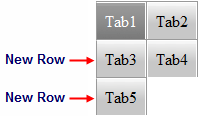
You can create multiple rows on a C1TabStrip control using the ForceNewLine property. Whenever you set a tab's ForceNewLine property to True, a new row will be created on the tabstrip. This topic illustrates how to create three rows of tabs on a C1TabStrip control in Design view, in Source view, and in code.
For more information about multiple tabstrip rows, see Multiple Tabstrip Rows.
In Design View
Complete the following steps:
1. Create a new ASP.NET AJAX-Enabled Web Site in Visual Studio.
2. Add a C1TabStrip control to your project.
3. Click C1TabStrip's
smart tag (![]() ) to open the
C1TabStrip Tasks menu and then select TabStrip Designer.
) to open the
C1TabStrip Tasks menu and then select TabStrip Designer.
The C1TabStrip Designer Form appears.
4. Click the Add Child Item button ![]() five times to add five
tabs to the C1TabStrip
control.
five times to add five
tabs to the C1TabStrip
control.
5. Select Tab3, locate its ForceNewLine property, and set it to True.
6. Select Tab5, locate its ForceNewLine property, and set it to True.

7. Press OK and then run the project.
Observe that Tab3 and Tab4 are placed located in a row beneath Tab1 and Tab2, while Tab5 sits below Tab3 on a row of its own.
In Source View
Complete the following steps:
1. In Design view, add a C1TabStrip control to your Web project.
2. Switch to Source view and add five tabs to your C1TabStrip control by placing the following HTML markup between the <cc1:C1TabStrip> tags:
<Tabs>
<cc1:C1Tab runat="server" Text="Tab01">
</cc1:C1Tab>
<cc1:C1Tab runat="server" Text="Tab02">
</cc1:C1Tab>
<cc1:C1Tab runat="server" ForceNewLine="True" Text="Tab3">
</cc1:C1Tab>
<cc1:C1Tab runat="server" Text="Tab04">
</cc1:C1Tab>
<cc1:C1Tab runat="server" ForceNewLine="True" Text="Tab5">
</cc1:C1Tab>
</Tabs>
3. Add ForceNewLine="True" to the <cc1:C1Tab> tags for Tab3 and Tab5. After you add the HTML to those tags, they will resemble the following:
Tab03 - <cc1:C1Tab runat="server" ForceNewLine="True" Text="Tab3">
Tab05 - <cc1:C1Tab runat="server" ForceNewLine="True" Text="Tab5">
In Code
Complete the following steps:
1. In Design view, add a C1TabStrip control to your Web project.
2. Switch to the code window and import the following namespace into your project:
Imports C1.Web.UI.Controls.C1TabStrip
• C#
using C1.Web.UI.Controls.C1TabStrip;
3. Create five C1Tabs by adding this code to the Page_Load event:
Dim C1Tab1 As New C1Tab("Tab1")
Dim C1Tab2 As New C1Tab("Tab2")
Dim C1Tab3 As New C1Tab("Tab3")
Dim C1Tab4 As New C1Tab("Tab4")
Dim C1Tab5 As New C1Tab("Tab5")
• C#
C1Tab C1Tab1 = new C1Tab("Tab1");
C1Tab C1Tab2 = new C1Tab("Tab2");
C1Tab C1Tab3 = new C1Tab("Tab3");
C1Tab C1Tab4 = new C1Tab("Tab4");
C1Tab C1Tab5 = new C1Tab("Tab5");
4. Add the new tabs to the C1TabStrip control:
C1TabStrip1.Tabs.Add(C1Tab1)
C1TabStrip1.Tabs.Add(C1Tab2)
C1TabStrip1.Tabs.Add(C1Tab3)
C1TabStrip1.Tabs.Add(C1Tab4)
C1TabStrip1.Tabs.Add(C1Tab5)
• C#
C1TabStrip1.Tabs.Add(C1Tab1);
C1TabStrip1.Tabs.Add(C1Tab2);
C1TabStrip1.Tabs.Add(C1Tab3);
C1TabStrip1.Tabs.Add(C1Tab4);
C1TabStrip1.Tabs.Add(C1Tab5);
5. Set the ForceNewLine properties of C1Tab03 and C1Tab05 to True:
C1Tab03.ForceNewLine = True
C1Tab05.ForceNewLine = True
• C#
C1Tab03.ForceNewLine = true;
C1Tab05.ForceNewLine = true;
6. Run the program.
![]() This Topic Illustrates
the Following:
This Topic Illustrates
the Following:
In this topic, you have added new tabs to a C1TabStrip and used the ForceNewLine property to create multiple rows on your tabstrip. Your final result will resemble the following image:

|
