Visual Studio Project template allows you to create a simple ASP.NET MVC application. To use C1 MVC controls, few additional steps are required to configure the project created using the basic Visual Studio project template.
- Select File | New | Project.
- Under installed templates, select Visual C# | Web | ASP.NET Web Application (.NET Framework).
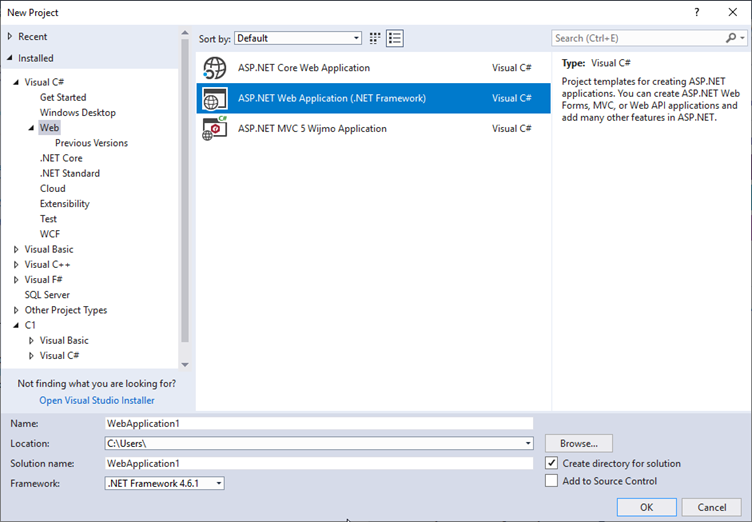
- Set a Name and Location for your application. Click OK.
- In the New ASP.NET Web Application dialog, select MVC and click OK.
- From the Solution Explorer, expand the folder Views and double click the
web.configfile to open it. - Add the following markups in <namespaces></namespaces> tags, within the
<system.web.webPages.razor></system.web.webPages.razor>tags.HTML Copy Code<add namespace="C1.Web.Mvc" /> <add namespace="C1.Web.Mvc.Fluent" />
-
(Optional) To add specific controls in your application, you need to add the following markups in <namespaces></namespaces> tags below the C1.Web.Mvc markup.
Control Markup Financial Chart <add namespace="C1.Web.Mvc.Finance" />
<add namespace="C1.Web.Mvc.Finance.Fluent" />FlexSheet <add namespace="C1.Web.Mvc.Sheet" /> <add namespace="C1.Web.Mvc.Sheet.Fluent" />OLAP <add namespace="C1.Web.Mvc.Olap" /> <add namespace="C1.Web.Mvc.Olap.Fluent" />MultiRow <add namespace="C1.Web.Mvc.MultiRow" /> <add namespace="C1.Web.Mvc.MultiRow.Fluent" />FlexViewer <add namespace="C1.Web.Mvc.Viewer" /> <add namespace="C1.Web.Mvc.Viewer.Fluent" /> - Save the changes made to web.config file.
- Add a license file manually to the application. For detailed steps on adding the license file, see Adding License File Manually.
- Add the ASP.NET MVC Edition references to the project. In the Solution Explorer, right click References and select Manage NuGet Packages. Browse to the location- C:\Program Files (x86)\ComponentOne\ASP.NET MVC Edition\bin, select C1.Web.Mvc.dll and click Add. Set the Copy Local property of the C1.Web.Mvc.dll to True.
-
(Optional) Add additional references to use specific controls in your MVC Application based on the control.
Control Assembly (Location - C:\Program Files (x86)\ComponentOne\ASP.NET MVC Edition\bin) Financial Chart C1.Web.Mvc.Finance.dllFlexSheet C1.Web.Mvc.FlexSheet.dllOLAP C1.Web.Mvc.Olap.dllMultiRow C1.Web.Mvc.MultiRow.dllFlexViewer C1.Web.Mvc.FlexViewer.dllNote: All the assemblies mentioned above automatically installs the required dependencies. For more information, see Dependencies. - After completing the steps above, register the resources for the controls to be used in the application. For more information, see Registering Resources.