You can license your ASP.NET MVC applications using the following two ways:
Using GrapeCity License Manager Extension
If you are using ComponentOne controls with Visual Studio 2017 or above, you can use the GrapeCity ComponentOneMenu Extension to License applications, open Sample Explorer, update projects and contact Technical Support. After installation, it gets available with various options as shown below.
Note: If you are using Visual Studio 2015 or previous versions of Visual Studio, you can use the GrapeCity License Manager add-in. The add-in is available in Tools menu in Visual Studio. For detailed information on using the GrapeCity License Manager add-in, see Generate License using GrapeCity License Manager Add-in.
To use GrapeCity License Manager Extension for licensing you app, follow these steps:
- From the Tools menu, select GrapeCity > GrapeCity License Manager. The License Manager window appears as shown in the image below:

The GrapeCity License Manager displays the following options:
-
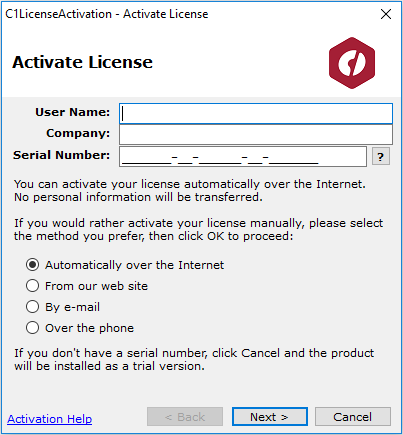
Activate License
It allows the users to activate the License (Serial Number) using the Internet, ComponentOne website, e-mail, or over phone. On clicking this option, C1LicenseActivation - Activate License application window appears as shown below. Users can follow the wizard to do the license activation.
-
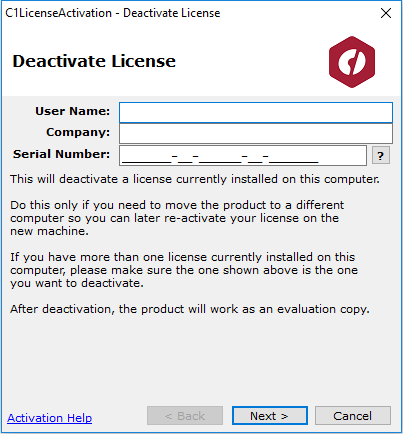
Deactivate License
It allows the users to deactivate the License (Serial Number) using the Internet, ComponentOne website, e-mail, or over phone. On clicking this option, C1LicenseActivation - Deactivate License application will appear as shown below. Users can follow the wizard to do the license deactivation.
-
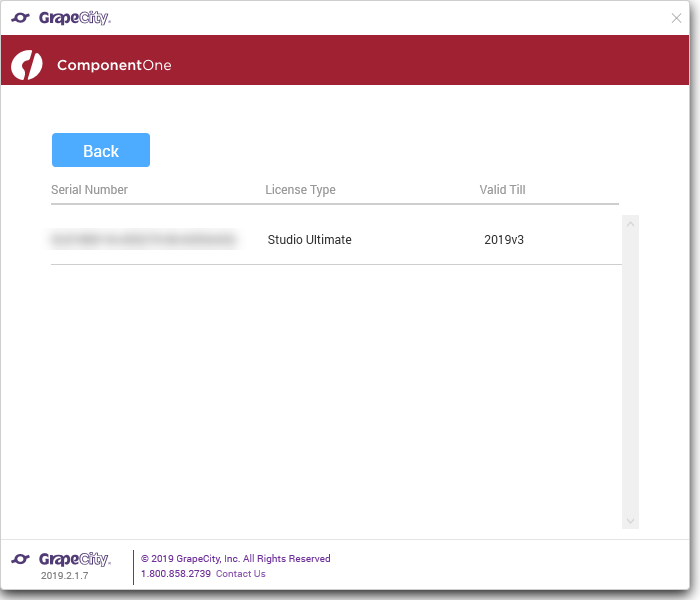
View Installed Licenses
It allows the users to view the Serial Number, License Type, and Validity of the installed licenses on the system. The license can be viewed as shown below:
-
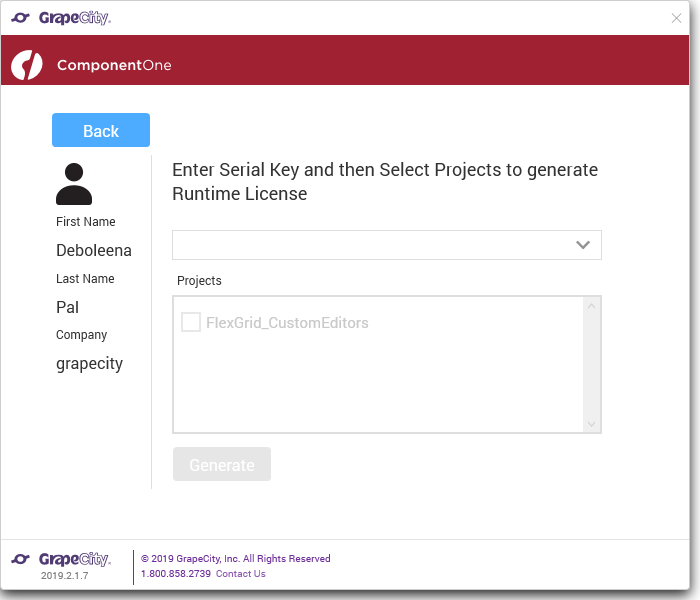
Create RunTime License
It allows the users to generate runtime license for the project(s). On clicking this option, the following window appears. However, the application name is disabled for ASP.NET applications.
-
Adding License File Manually
- In the Solution Explorer, right click the project name and select Add | New Item. The Add New Item dialog appears.
- In the Add New Item dialog, select C# | General and select Text File in the right pane.
- Name the text file as licenses.licx.
- Paste the following code in the text file:
licenses.licx Copy CodeC1.Web.Mvc.LicenseDetector, C1.Web.Mvc
- Few additional steps may be required for using FinancialChart, FlexSheet, MultiRow, FlexViewer and OLAP controls in your application. In the licenses.licx file, press enter after C1.Web.Mvc.LicenseDetector, C1.Web.Mvc, and paste the following code:
licenses.licx Copy CodeC1.Web.Mvc.Finance.LicenseDetector, C1.Web.Mvc.Finance C1.Web.Mvc.Sheet.LicenseDetector, C1.Web.Mvc.FlexSheet C1.Web.Mvc.Viewer.LicenseDetector, C1.Web.Mvc.FlexViewer C1.Web.Mvc.Olap.LicenseDetector, C1.Web.Mvc.Olap C1.Web.Mvc.MultiRow.LicenseDetector, C1.Web.Mvc.MultiRow