In this example you'll add interactivity to the wijlineargauge widget. You'll add a slider that when changed at run time will change the current value of the gauge. See the lineargauge > Interactive sample of the MVC Control Explorer live demo at http://demo.componentone.com/ASPNET/MVCExplorer/lineargauge/Interactive.
- Create an C1 ASP.NET MVC 4 Web Application.
- Navigate to the Solution Explorer, expand the Shared folder inside the Views folder, and double-click _Layout to open the file.
- Add the following markup within the <body> tags of the page, just after
@RenderBody():
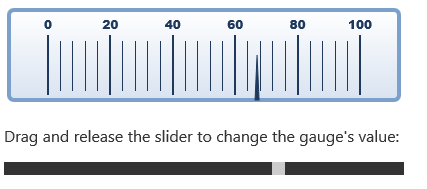
This markup will add content for a linear gauge widget and a slider to the page. In the next step, you'll set interactivity for the linear gauge.<div id="gauge" class="ui-corner-all"></div> <p>Drag and release the slider to change the gauge's value:</p> <div id="slider" style="width: 400px"></div>
After the closing </div> tag you added in the previous step, add the following jQuery script to customize and initialize the wijlineargauge widget:
<script type="text/javascript">
$(document).ready(function () {
    $("#gauge").wijlineargauge({
        width: 400,
        height: 100,
        value: 50,
        max: 100,
        min: 0,
        animation: {
            enabled: true,
            duration: 400,
            easing: ">"
        },
        labels: {
            style: {
        fill: "#1E395B",
        "font-size": "12pt",
        "font-weight": "800"
            }
        },
        tickMajor: {
            position: "inside",
            offset: -11,
            interval: 20,
            factor: 12,
            style: {
                fill: "#1E395B",
                 stroke: "none",
            }
        },
        tickMinor: {
            position: "inside",
            offset: -11,
            visible: true,
            interval: 4,
            factor: 10,
            style: {
                 fill: "#1E395B",
                stroke: "none",
            }
        },
        pointer: {
            shape: "tri",
            length: 0.5,
            style: {
                fill: "#1E395B",
                stroke: "#1E395B"
            }
        },
        face: {
            style: {
                fill: "270-#FFFFFF-#D9E3F0",
                  stroke: "#7BA0CC",
                  "stroke-width": "4"
            }
        }
    });
    $("#slider").slider({
        value: $("#gauge").wijlineargauge("option", "value"),
        change: function (event, ui) {
            $("#gauge").wijlineargauge("option", "value", ui.value);
        }
    });
});
</script>
This will add elements to customize the wijlineargauge's interactivity. At run time when you change the slider's value, the gauge's value will change as well.
What You've Accomplished
Press F5 to run the application. Click and drag the slider's thumb button, release the mouse and notice that the gauge now reflects the new value of the slider.