The SelectedIndex property of a C1MultiPage can be used to determine which page will be viewed when your project is run. The following topic shows you how to manipulate this property in Design view, in Source view, and in code.
Note: If you change the SelectedIndex property on a C1MultiPage and have it bound to a C1TabStrip, you will also have to manipulate C1TabStrip's SelectedIndex property in order to get the page to load with the proper tab.
Changing the Selected Index in Design View
To change the SelectedIndex, use the following steps:
1.
Click C1MultiPage's smart tag (![]() ) to open the C1MultiPage
Tasks menu and select MultiPage Designer.
) to open the C1MultiPage
Tasks menu and select MultiPage Designer.
2. Use the Add Child
Item button ![]() to add three pages to your C1MultiPage.
to add three pages to your C1MultiPage.
3. Select C1TabStrip from the treeview to reveal its list of properties.
4. Locate the SelectedIndex property and set its value to "1".
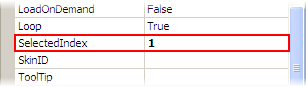
Observe that the default value of the SelectedIndex property is 0. If you had kept this setting, your C1MultiPage would have loaded with the first page in view.
5. Press OK and run the project.
Changing the Selected Index in Source View
Add SelectedIndex="1" to the <cc1:C1MultiPage> tag. The resulting HTML should resemble the following:
<cc1:C1MultiPage ID="C1MultiPage1" runat="server" Height="29px"
MultiPageID="C1MultiPage1" OverlapOrder="Ascending" VisualStyle="Office2007Blue"
VisualStylePath="~/C1WebControls/VisualStyles" Width="563px" SelectedIndex="1">
Changing the Selected Index in Code
To change the selected index in code, use the following steps:
1. Import the following namespaces into your project:
Imports C1.Web.UI.Controls.C1MultiPage
• C#
using C1.Web.UI.Controls.C1MultiPage;
2. Add the following code to the Page_Load event:
C1MultiPage.SelectedIndex = 1
• C#
C1MultiPage.SelectedIndex = 1;
3. Run the program.
|