In this tutorial, you will learn how to use NumericInput mode for editing numeric data. C1TextBox and C1NumericEdit controls have a NumericInput property that is True by default. If the NumericInput property is set to True and DataType is a numeric type, the control functions in numeric mode facilitating typing of digits, decimal point and other numeric characters.
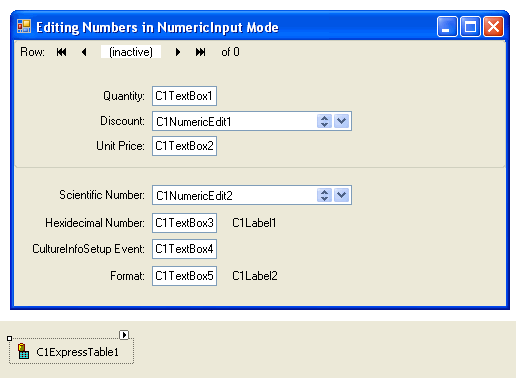
- Create a new Windows Application project. Place the following components on the form as shown in the figure:
- C1ExpressTable1 (C1.Data.Express.C1ExpressTable)
- Label1-7 (System.Windows.Forms.Label)
- C1DbNavigator1 (C1.Win.C1Input.C1DbNavigator)
- C1TextBox1-5 (C1.Win.C1Input.C1TextBox)
- C1Label1-2 (C1.Win.Input.C1Label)
- C1NumericEdit1-2 (C1.Win.C1Input.C1NumericEdit)
- From the Properties window, set the following properties for the Label and C1DbNavigator controls:
Control Property Value Label1 Text Quantity: Label2 Text Discount: Label3 Text Unit Price: Label4 Text Scientific Number: Label5 Text Hexidecimal Number: Label6 Text CultureInfoSetup Event: Label7 Text Format: C1DbNavigator1 Dock Top - Select the C1ExpressTable1 component, go to the Properties window, open the ConnectionString property. Add the following to the ConnectionString property: Provider=Microsoft.Jet.OLEDB.4.0;Data Source="Documents\ComponentOne Samples\Common\C1NWind.mdb".
- For the C1ExpressTable1 component, open the DbTableName property combo box and select Order Details from the database table list.
- To bind controls to the data source, set the following properties:
Control Property Value C1DbNavigator1 DataSource C1ExpressTable1 C1TextBox1 DataSource C1ExpressTable1 DataField Quantity C1NumericEdit1 DataSource C1ExpressTable1 DataField Discount C1TextBox2 DataSource C1ExpressTable1 DataField UnitPrice - Adjust some appearance properties of the controls:
- Set BorderStyle to FixedSingle for the controls: C1Label1-2, C1TextBox1-5, C1NumericEdit1-2.
- Expand the VisibleButtons property of C1DbNavigator1 and make two additional buttons visible: Apply and Cancel.
- Expand the UIStrings property of C1DbNavigator1 and change Row: to Order Item:.
- In C1NumericEdit1, set the VisibleButtons property to UpDown (this control will have only up/down buttons, no drop-down). And vice versa, in C1NumericEdit2 we want to have only drop-down calculator, no up/down buttons, so we set its VisibleButtons property to DropDown.
- C1TextBox1 represents an integer Quantity field. As an integer, it contains only digits, without decimal point and exponent. To specify integer format, set the FormatType to Integer.
- C1NumericEdit1 is used for editing a Discount field that is represented as a percentage value. This is specified by setting FormatType to Percent. Also, specify the increment to be used to increase/decrease the value by a fixed amount using the up/down buttons: Increment to 0.0005. That will make the control’s up/down button increment/decrement the value by 0.05%.
-
C1TextBox2 is used to display and edit a UnitPrice field of Decimal type. To show it in currency format, with dollar sign, set FormatType to Currency. In this case, the currency sign shown in the value is defined by the current culture setting controlled by Culture property. If Culture is set to (Current Culture), current system regional settings are used.
There are several unbound (not bound to a data source) controls in the bottom part of the form. C1NumericEdit2 edits numbers in scientific format, with decimal point and exponent. This control also includes a drop-down calculator.
- Set DataType to Decimal (the default).
- Set FormatType to Scientific. By default, a number in scientific format contains six digits after decimal point and three digits in the exponent. If you need a non-default format, it can be defined in the CustomFormat property.
- The C1TextBox3 control edits numbers in hexadecimal format. Set the DataType property to Int16 (16-bit integer number).
- Then set the FormatType property to Hexadecimal. In this mode, the user will be able to type only digits 0-9, letters A-F, and minus sign (or change the sign of the number pressing F9).
- The C1Label control (C1Label1) adjacent to C1TextBox3 shows the entered number in the usual decimal format. To connect it to the number, set C1Label1.DataType to Int16 and add an event handler for the ValueChanged event of the C1TextBox3 control:
To write code in Visual Basic
Visual Basic Copy CodePrivate Sub C1TextBox3_ValueChanged( ByVal sender As Object, ByVal e As System.EventArgs) Handles C1TextBox3.ValueChanged Try C1Label1.Value = C1TextBox3.Value Catch End Try End SubTo write code in C#
C# Copy Codeprivate void c1TextBox3_ValueChanged(object sender, System.EventArgs e) { try { c1Label1.Value = c1TextBox3.Value; } catch { } }The C1TextBox4 control demonstrates how you can change number format by changing culture settings used in formatting. Set the DataType property to Int32
- The set the FormatType property to StandardNumber. A number in this format has a sign, thousands separators and decimal point. Settings used for this formatting, such as the sign, thousand separator, and decimal point characters, are defined by the current culture settings controlled by the Culture property.
- You can specify non-default culture settings handling the CultureInfoSetup event.
For example, we can show negative numbers with the word “minus” instead of the usual “-“. We will also suppress the fractional part of the number, and use “|” as thousands separator. We will also change the group sizes (so they are no longer thousands), make the first (rightmost) group contain one digit, second – two digits, third – three digits, and all the rest (higher) digits make a single group. This is done by the following event handler:
To write code in Visual Basic
Visual Basic Copy CodePrivate Sub C1TextBox4_CultureInfoSetup(ByVal sender As Object, ByVal e As C1.Win.C1Input.CultureInfoSetupEventArgs) Handles C1TextBox4.CultureInfoSetup Dim ci As System.Globalization.CultureInfo = e.CultureInfo ci.NumberFormat.NegativeSign = " minus " ci.NumberFormat.NumberGroupSeparator = "|" ci.NumberFormat.NumberGroupSizes = New Integer() {1, 2, 3, 0} ci.NumberFormat.NumberDecimalDigits = 0 End SubTo write code in C#
C# Copy Codeprivate void c1TextBox4_CultureInfoSetup(object sender, C1.Win.C1Input.CultureInfoSetupEventArgs e) { System.Globalization.CultureInfo ci = e.CultureInfo; ci.NumberFormat.NegativeSign = " minus "; ci.NumberFormat.NumberGroupSeparator = "|"; ci.NumberFormat.NumberGroupSizes = new int[] {1, 2, 3, 0}; ci.NumberFormat.NumberDecimalDigits = 0; }C1TextBox5 shows how to specify a custom, non-standard number format.
- Set DataType to Decimal, FormatType to CustomFormat and CustomFormat to "#,##0,;(###0,);zero".
In this format, three colon-separated parts define three different formats used, correspondingly, for positive, negative numbers and zero. Character ‘0’ denotes a required digit, character ‘#’ specifies an optional digit, and ‘,’ is the thousands separator. Thousands separator on the right means the number is stored as times 1000 the entered number (per separator).
- To see the number that is stored when we enter a number in C1TextBox5, we use a C1Label control (C1Label2) adjacent to C1TextBox5. Set C1Label2.DataType to Decimal and add an event handler for the ValueChanged event of the C1TextBox5 control:
To write code in Visual Basic
Visual Basic Copy CodePrivate Sub C1TextBox5_ValueChanged(ByVal sender As Object, ByVal e As System.EventArgs) Handles C1TextBox5.ValueChanged C1Label2.Value = C1TextBox5.Value End SubTo write code in C#
C# Copy Codeprivate void c1TextBox5_ValueChanged(object sender, System.EventArgs e) { c1Label2.Value = c1TextBox5.Value; }
Run the program and observe the following:
- The user cannot enter arbitrary text in NumericInput mode. For example, if you type a letter, it is ignored. Only characters allowed by the specified format are permitted.
- Using properties FormatType and CustomFormat, you can specify any standard or custom format supported in .NET (for details see Numeric Format Strings in the .NET documentation). All these formats are used both for display and editing of numeric values.
- Changing culture settings, you can control literal characters used in formatting and various other format settings.