In this tutorial, you will see how to combine multiple tables into a data set, how to specify master-detail relations and to build a master-detail data-bound form. Complete the following steps:
- Create a new .NET 2.0 Windows Application project.
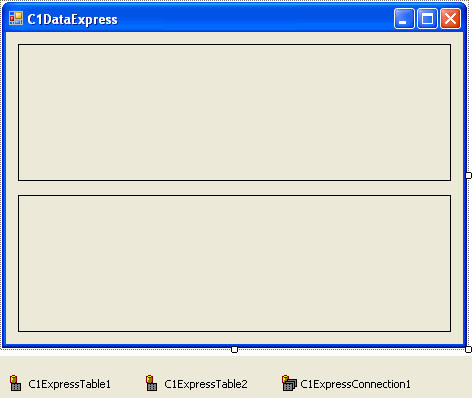
- Place the following components on the form as shown in the figure.
Number of Components Name Namespace 2 C1ExpressTable C1ExpressTable1
C1ExpressTable2C1.Data.Express.C1ExpressTable 1 C1ExpressConnection C1ExpressConnection1 C1.Data.Express.C1ExpressConnection 2 C1TrueDBGrid C1TrueDBGrid1
C1TrueDBGrid2C1.Win.C1TrueDBGrid.C1TrueDBGrid
- Click the drop-down arrow next to the ConnectionString property in the Properties window and select <New Connection…>. The Add Connection dialog box opens.
- Select the provider, the database and other necessary connection properties in that dialog box. In this tutorial, we use the standard MS Access Northwind sample database (C1NWind.mdb).
- Click the Change button, if necessary, and select Microsoft Access Database File. The .NET Framework Data Provider for OLE DB is selected under Data provider.
- Under Database file name, browse to locate the C1NWind.mdb. The database is installed in the Common folder in the ComponentOne Samples directory.
- Click OK to close the Add Connection dialog box.
- Select C1ExpressTable1 and set the ConnectionComponent property to C1ExpressConnection1 in the Properties window.
- Set C1ExpressTable1's DbTableName property to Customers and click Yes when asked to retrieve fields. C1ExpressTable1 now represents the Customers database table.
- Select C1ExpressTable2 and set the ConnectionComponent property to C1ExpressConnection1 in the Properties window.
- Set C1ExpressTable2's DbTableName property to Orders and click Yes when asked to retrieve fields. C1ExpressTable2 now represents the Orders database table.
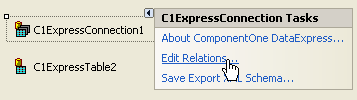
- Select C1ExpressConnection1 and open its Relations editor by clicking Edit Relations under C1ExpressConnection Tasks.
- In the Relations editor, click the Add button to create a new relation.
- Select Customers as the parent table and Orders as the child table in the Parent and Child drop-down lists.
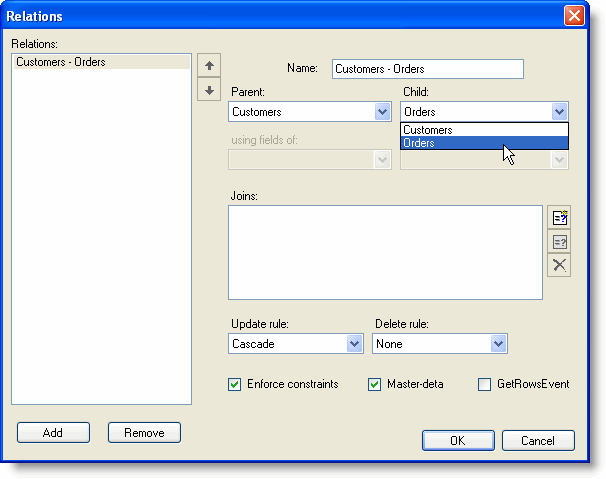
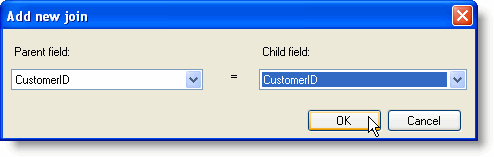
- Press the Add join button
 to open the Add new join dialog box.
 - Select CustomerID in both the Parent and Child field drop-down lists and click OK.
The following join connects the Orders table to its parent table Customers:
Customers.CustomerID = Orders.CustomerID - Click OK to close the Relations editor.
- Select C1TrueDBGrid1 and set its DataSource property to C1ExpressConnection1 in the Properties window.
- Set the DataMember property to _Customers to bind the first grid to the master (parent) table, Customers. Click Yes to replace the existing column layout. Note that the Customers table appears twice in the DataMember drop-down list, once with a leading underscore and once without it.
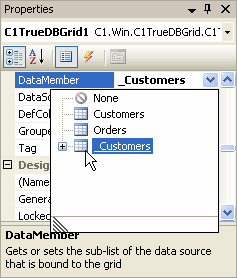
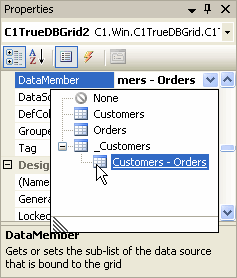
The instance without a leading underscore represents a standalone Customers table that is not a part of master-detail hierarchy. The instance with a leading underscore represents the same Customers table as the root of a master-detail hierarchy. It is also indicated by the presence of the + sign, expanding it you will see the Customers – Orders relation representing the child (detail) node of the hierarchy. - Select the C1TrueDBGrid2and set its DataSource property to C1ExpressConection1 in the Properties window.
- Set the DataMember property to _Customers, Customer – Orders. This binds the second grid to the detail (child) table, Orders. Click Yes to replace the existing column layout.
Run the program and observe the following:
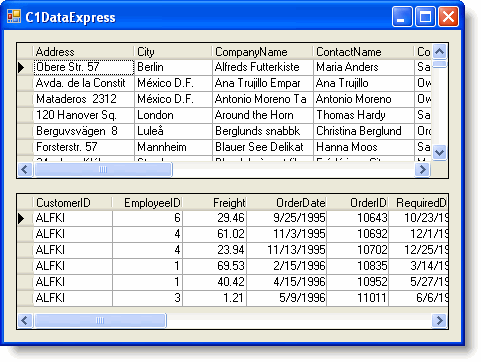
The two grids show Customers – Orders data in a master-detail hierarchy. When you select a row in the Customers grid, the Orders grid is populated with order information for the selected customer.
Save your project, note that Tutorial 4 uses the project created in this Tutorial.