There are three ways to add topic links to the topic pages: you can use the floating toolbar, the collection editor, or code. In this topic, you will learn how to add links to topic pages using each of these three methods.
Using the Floating Toolbar
Complete the following steps:
- Navigate to the Toolbox and double-click the C1TopicBar icon. The C1TopicBar control is added to the form. Observe that one page, named Page 1, appears on the control by default. If you'd like to add more pages to the control, see Adding Topic Pages to the TopicBar.
- Hover over Page 1 with your cursor until the floating toolbar appears. The topic page's toolbar appears as follows:

- Click the Add topic link button
 .
.
The topic link, Link 1, is added to the topic page.
Using the Collection Editor
Complete the following steps:
- Navigate to the Toolbox and double-click the C1TopicBar icon. The C1TopicBar control is added to the form. Observe that one page, named Page 1, appears on the control by default.
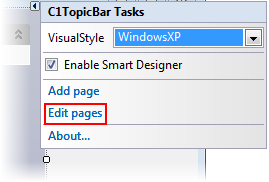
- Click C1TopicBar's smart tag (
 ) to open the C1TopicBar Tasks menu.
 - On the C1TopicBar Tasks menu, click Edit Pages.
The C1TopicPage Collection Editor opens. - In the Members pane, select a page.
- In the Properties grid, locate the Links property and click the ellipsis button
 . The C1TopicLink Collection Editor opens.
 - Click Add to add a topic link to the topic page.
- Click Close to close the C1TopicLink Collection Editor.
- Click Close to close the C1TopicPage Collection Editor.
The topic link, Link 1, is added to the topic page.
Using Code
Complete the following steps:
- Navigate to the Toolbox and double-click the C1TopicBar icon. The C1TopicBar control is added to the form. Observe that one page, named Page 1, appears on the control by default. If you'd like to add more pages to the control, see Adding Topic Pages to the TopicBar.
- Click C1TopicBar's smart tag () to open the C1TopicBar Tasks menu.
- On the C1TopicBar Tasks menu, click Edit Pages.
The C1TopicPage Collection Editor opens. - Select the page you wish to remove and then set its Tag property to “Tag1”. Adding this tag gives the page a unique indicator that will allow you to find it later using the FindPageByTag method.
- Click OK to close the C1TopicPage Collection Editor.
- Double-click the empty portion of the form to open Code view. Notice that a Form_Load event handler has been added to Code view.
- Import the following namespace into the project:
To write code in Visual Basic
Visual Basic Copy CodeImports C1.Win.C1Command
To write code in C#
C# Copy Codeusing C1.Win.C1Command;
- Add the following code to the Form_Load event. This code will find the page and assign it to a variable, create a new topic link object, and then add the topic link object to the topic page.
To write code in Visual Basic
Visual Basic Copy Code'Find the topic page and assign it to a variable Dim c1TopicPage1 = c1TopicBar1.FindPageByTag("Tag1") 'Create a new topic link and assign it a name Dim c1TopicLink1As New C1TopicLink("Link 1") 'Add the new topic link to the topic page c1TopicPage1.Links.Add(c1TopicLink1)To write code in C#
C# Copy Code//Find the topic page and assign it to a variable var c1TopicPage1 = c1TopicBar1.FindPageByTag("Tag1"); //Create a new topic link and assign it a name C1TopicLink c1TopicLink1 = new C1TopicLink("Link 1"); //Add the new topic link to the topic page c1TopicPage1.Links.Add(c1TopicLink1); - Press F5 to build the project and observe that the link has been added to the page.
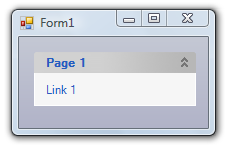
This topic illustrates the following:
In this topic, you learned how to add topic links to topic pages using three different methods. The result of this topic will look as follows:
See Also