This lesson illustrates how to populate a C1Menu with site map data.
To create the Site Map and bind it to the C1Menu control, complete the following:
- In the Solution Explorer, right-click the project's name and select Add New Item.
The Add New Item dialog box appears.
- Select Site Map from the list of templates, and then click Add to add the new Web.sitemap page to the project.
The following default source code appears for the Web.sitemap file:
To write code in Source View
<?xml version="1.0" encoding="utf-8" ?>
                                <sitemap xmlns="http://schemas.microsoft.com/AspNet/SiteMap-File-1.0">
<siteMapNode url="" title="" description=""> <siteMapNode url="" title="" description="" /> <siteMapNode url="" title="" description="" /> </siteMapNode> </sitemap> - Replace the default data with the following data for the Web.sitemap file:
To write code in Source View
<?xml version="1.0" encoding="utf-8" ?>
<siteMap xmlns="http://schemas.microsoft.com/AspNet/SiteMap-File-1.0" >
<siteMapNode title="ComponentOne">
<siteMapNode title="Products">
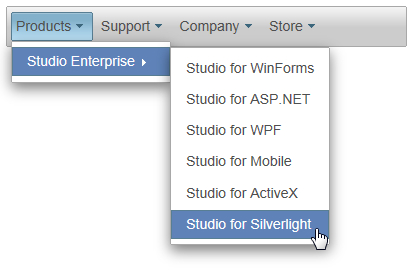
<siteMapNode title="Studio Enterprise">
        <siteMapNode title="Studio for WinForms" />

        <siteMapNode title="Studio for ASP.NET" />

        <siteMapNode title="Studio for WPF" />

        <siteMapNode title="Studio for Mobile" />

        <siteMapNode title="Studio for ActiveX" />

        <siteMapNode title="Studio for Silverlight" />

      </siteMapNode>

    </siteMapNode>

    <siteMapNode title="Support">

      <siteMapNode title="Support Services" />
      <siteMapNode title="HelpCentral" />

      <siteMapNode title="Product Forums" />
    </siteMapNode>

    <siteMapNode title="Company">

      <siteMapNode title="About Us" />

      <siteMapNode title="Partners" />

      <siteMapNode title="Contact Us" />

      <siteMapNode title="Join Us" />

      <siteMapNode title="Press Center" />

      <siteMapNode title="Governance" />

    </siteMapNode>
<siteMapNode title="Store">
      <siteMapNode title="Buy Now" />

      <siteMapNode title="Resellers" />
    </siteMapNode>

  </siteMapNode>

</siteMap> - Open C1Menu control's Tasks menu and click the Choose Data Source drop-down arrow. Select New Data Source to open the Data Source Configuration Wizard.
- Select Site Map and click OK.
SiteMapDataSource1 is added to your project.
- Press F5 to run the project and observe the following:
The data from the Web.sitemap file is reflected in the C1Menu control.
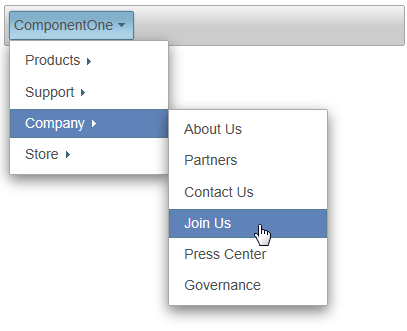
Observe that the control opens with the top-level node, ComponentOne. In the next step, you'll learn how to remove the top-level node so that you just expose the second-level nodes in the C1Menu.
- Close the browser and return to the project.
- In Design view, select SiteMapDataSource and, in the Properties window, set the ShowStartingNode to False.
- Press F5 to run the project and observe that the top-level node has been removed.