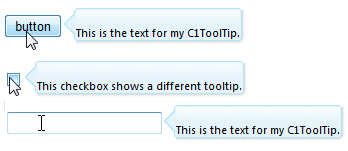
You can assign one C1ToolTip to multiple control. You can also show different content for each control's ToolTip. In this example, we will add three controls, a button, a check box, and a text box, to the C1ToolTipTargetControlCollection. The button and text box will show the same ToolTip, and the check box will have a different ToolTip.
In Design View
Follow these steps to add the controls and C1ToolTip:
1. Add a Button, CheckBox, TexBox, and C1ToolTip control to your page.
2. Click the C1ToolTip smart tag
(![]() ) and select
Edit TargetControls in the C1ToolTip Tasks menu. The C1ToolTip
Designer Form opens.
) and select
Edit TargetControls in the C1ToolTip Tasks menu. The C1ToolTip
Designer Form opens.
3. Select C1ToolTip1 on the Edit tab.
4. In the properties pane, enter the text for your ToolTip next to the Text property.
5. Click the Add Child Item button on the toolbar and select the C1ToolTipTargetControl item in the tree.
6. In the properties pane, enter Button1 next to the C1ToolTip.TargetControlID property.
7. Add two more child items in the same way, making sure C1ToolTip1 is selected when you click the Add Child Item button.
8. Enter CheckBox1 next to the C1ToolTip.TargetControlID property for the check box.
9. With CheckBox1 still selected, enter some text next to the Value property. This is the ToolTip content that will appear for this control.
10. Enter Text1 next to the C1ToolTip.TargetControlID property for the textbox.
11. Click OK to close the designer.
12. Press F5 to run the project and then mouse over each control. Notice the C1ToolTip for the button and textbox is the same. The text box for the check box is different.
In Source View
Follow these steps to add the controls and C1ToolTip:
1. Create a C1ToolTip by entering the following markup within the <form> tags of the page, after the ScriptManager tags. Here is an example:
<cc1:C1ToolTip ID="C1ToolTip1" runat="server" HideDelay="0" Position="Auto" ShowAnimation="FadeIn" ShowDelay="0" Text="This is the text for my C1ToolTip." VisualStyle="Vista">
</cc1:C1ToolTip>
2. Add a Button, CheckBox, and TextBox control to your page by adding the following markup within the <body> tags after the C1ToolTip tags:
<p>
<input id="Button1" type="button" value="button" /></p>
<p>
</form>
<p>
<input id="CheckBox1" type="checkbox" /></p>
<p>
</p>
<p>
<input id="Text1" type="text" /></p>
3. Add the TargetControls using markup like the following, which should appear within the C1ToolTip tags from step 1.
<cc1:C1ToolTip ID="C1ToolTip1" runat="server" HideDelay="0" Position="Auto"
ShowAnimation="FadeIn" ShowDelay="0"
Text="This is the text for my C1ToolTip." VisualStyle="Vista">
<TargetControls>
<cc1:C1ToolTipTargetControl IsAjaxUpdate="False" TargetControlID="Button1" />
<cc1:C1ToolTipTargetControl IsAjaxUpdate="False" TargetControlID="CheckBox1"
Value="This checkbox shows a different tooltip." />
<cc1:C1ToolTipTargetControl IsAjaxUpdate="False" TargetControlID="Text1" />
</TargetControls>
</cc1:C1ToolTip>
Notice the Value is set for the CheckBox so that it will show a different ToolTip.
4. Press F5 to run the project and then mouse over each control. Notice the C1ToolTip for the button and textbox is the same. The text box for the check box is different.
|