While FormDecorator for ASP.NET comes with five built-in styles, we recognize that there are instances where you will want to customize your C1FormDecorator control. To customize the C1FormDecorator control, you will create a custom CSS style sheet and add it to your project as a visual style. The custom CSS stylesheet must always be named "styles.css".
 Tip: The
easiest way to create a custom visual style is by modifying one of the control's
pre-existing visual styles. You can find the .css sheets and images for
C1FormDecorator's visual styles within
the installation directory at C:\Program Files\ComponentOne\Studio for
ASP.NET\C1WebUI\VisualStyles.
Tip: The
easiest way to create a custom visual style is by modifying one of the control's
pre-existing visual styles. You can find the .css sheets and images for
C1FormDecorator's visual styles within
the installation directory at C:\Program Files\ComponentOne\Studio for
ASP.NET\C1WebUI\VisualStyles.
Before you add your .css file and images, you will have to create a folder to contain them. The folder that will contain them will be buried within a hierarchy of folders. On the top-level of your project, create a folder named "VisualStyles". Underneath the VisualStyles folder, create a sub-folder bearing the theme name (such as "CustomVisualStyle"), and then, beneath that, create a sub-folder named "C1FormDecorator". The image folder and .css file should be placed underneath the C1FormDecorator folder. The folder hierarchy will resemble the following:
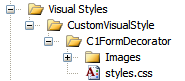
This structure of these folders is very important; C1FormDecorator will always look for the ~/VisualStyles/StyleName/C1FormDecorator/styles.css path, as it is the default visual style path for the control.
Once the .css file and images are in place, set the VisualStylePath property to the path of the first folder (~/VisualStyles), set the UseEmbeddedVisualStyles property to False, and then set the VisualStyle property to the custom theme name.
|