By default, when the user clicks the C1ColorPicker control's drop-down arrow at run-time the color picker will appear below the control, and if that is not possible, above the control. However, you can customize where you would like the color picker to appear. For more information about the drop-down arrow direction, see Drop-Down Direction.
At Design Time in Blend
To change the drop-down window direction at run time, complete the following steps:
-
Click the C1ColorPicker control once to select it.
-
Navigate to the Properties window and click the C1ColorPicker.DropDownDirection drop-down arrow.
-
Choose an option, for example ForceAbove.
This will set the C1ColorPicker.DropDownDirection property to the option you chose.
In XAML
For example, change the drop-down window direction add DropDownDirection="ForceAbove" to the <c1:C1ColorPicker> tag so that it appears similar to the following:
| XAML |
Copy Code
|
|---|---|
<c1:C1ColorPicker Name="C1ColorPicker1" Margin="296,98,273,0" Height="45" VerticalAlignment="Top" DropDownDirection="ForceAbove"/> |
|
In Code
For example, to change the drop-down window direction, add the following code to your project:
| Visual Basic |
Copy Code
|
|---|---|
Me.C1ColorPicker1.DropDownDirection = DropDownDirection.ForceAbove |
|
| C# |
Copy Code
|
|---|---|
this.c1ColorPicker1.DropDownDirection = DropDownDirection.ForceAbove;
|
|
This will set the DropDownDirection property to ForceAbove.
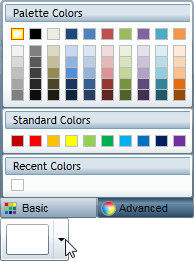
Run the application and observe:
When you click the C1ColorPicker control's drop-down arrow, the drop down window will appear above the control: