The control includes several built-in visual styles, including Vista and Office 2007 styles, to style your application. For more information about available styles, see Visual Styles. You can easily change Visual Styles in Source view, from the C1Expander Tasks menu, from the Properties window, and in code.
In Source View
In Source view add VisualStyle="Vista" to the <cc1:C1Expander> tag so it appears similar to the following:
<cc1:C1Expander ID="C1Expander1" runat="server" HeaderSize="25px" Height="200px" Width="100px" VisualStyle="Vista">
From the Tasks Menu
You can access Visual Styles from the C1Expander Tasks menu:
1. Click on the C1Expander's smart tag to open the C1Expander Tasks menu.
2. Click the Visual Style drop-down box and select a style to apply, for example Vista.
The style you choose will be applied to the control.
From the Properties Window
You can select a Visual Style to apply from the Properties window:
1. Click on the C1Expander to select it.
2. Navigate to the Properties window and select the drop-down arrow next to the VisualStyle property.
3. Select a style to apply, for example Vista.
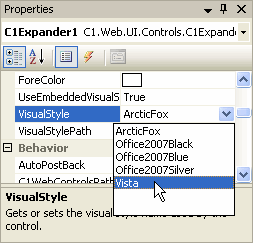
The Visual Style you chose will be applied to the C1Expander control.
In Code
Add the following code to the Page_Load event to set the VisualStyle property to Vista:
Me.C1Expander1.VisualStyle = "Vista"
• C#
this.C1Expander1.VisualStyle = "Vista";
|
