ActiveReports allows you to create reports with embedded script and save them to the XML-based RPX file format. By embedding script in reports saved as RPX files, you can later load, run, and display reports directly in the viewer control without rebuilding the application. This walkthrough illustrates how to create a simple report, using the XML-based report template.
This walkthrough is split into the following activities:
- Adding an ActiveReport to the Visual Studio project
- Creating a layout for the report
- Adding scripting to supply data for the controls
- Applying scripting to set alternate row colors in the detail section
- Loading an XML-based report from resources
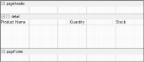
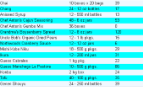
When you have finished this walkthrough, you get a report that looks similar to the following at design time and at run time.
Design-Time Layout
Run-Time Layout
To add an ActiveReport to the Visual Studio project
- Create a new Visual Studio project.
- From the Project menu, select Add New Item.
- In the Add New Item dialog that appears, select ActiveReports 13 Section Report (xml-based) and in the Name field, rename the file as rptScript.
- Click the Add button to open a new section report in the designer.
- In the Solution Explorer click the rptScript.rpx item and in the properties window set the Build Action property to Embedded Resource.
See Adding an ActiveReport to a Project for information on adding different report layouts.
To create a layout for the report
- In the Visual Studio toolbox, expand the ActiveReports 13 Section Report node and drag three TextBox controls onto the detail section and set the properties of each textbox as indicated:
TextBox1
Property Name Property Value DataField ProductName Text Product Name Location 0, 0in Size 2.3, 0.2in TextBox2
Property Name Property Value DataField QuantityPerUnit Text Quantity Location 2.4, 0in Size 2.4, 0.2in TextBox3
Property Name Property Value DataField UnitsInStock Text Stock Location 4, 0in Size 1, 0.2in - Click just below the fields to select the Detail section, and in the Properties Window, set the CanShrink property to True to eliminate white space in the rendered report.
To add scripting to the report to supply data for the controls
- Click the Script tab located at the bottom of the report designer to access the script editor.
- Add the scripting code.
The following example shows what the scripting code looks like.
Warning: Do not access the Fields collection outside the DataInitialize and FetchData events. Accessing the Fields collection outside of these events is not supported, and has unpredictable results.To write the script in Visual Basic.NET
Visual Basic.NET script. Paste in the script editor window. Copy CodePrivate Shared m_cnn As System.Data.OleDb.OleDbConnection Public Sub ActiveReport_ReportStart() 'Set up a data connection for the report Dim connString As String = "Provider=Microsoft.Jet.OLEDB.4.0;Data Source=C:\Users\[User Folder]\Documents\GrapeCity Samples\ActiveReports 13\Data\NWIND.mdb" Dim sqlString As String = "SELECT * FROM products" m_cnn = new System.Data.OleDb.OleDbConnection(connString) Dim m_Cmd As System.Data.OleDb.OleDbCommand = new System.Data.OleDb.OleDbCommand(sqlString, m_cnn) If m_cnn.State = System.Data.ConnectionState.Closed Then m_cnn.Open End If rpt.DataSource = m_Cmd.ExecuteReader End Sub Public Sub ActiveReport_ReportEnd() 'Close the data reader and connection m_cnn.Close End SubTo write the script in C#
C# script. Paste in the script editor window. Copy Codeprivate static System.Data.OleDb.OleDbConnection m_cnn; public void ActiveReport_ReportStart() { //Set up a data connection for the report string m_cnnString = @"Provider=Microsoft.Jet.OLEDB.4.0;Data Source=C:\Users\[User Folder]\Documents\GrapeCity Samples\ActiveReports 13\Data\NWIND.mdb"; string sqlString = "SELECT * FROM products"; m_cnn = new System.Data.OleDb.OleDbConnection(m_cnnString); System.Data.OleDb.OleDbCommand m_Cmd = new System.Data.OleDb.OleDbCommand(sqlString, m_cnn); if(m_cnn.State == System.Data.ConnectionState.Closed) { m_cnn.Open(); } rpt.DataSource = m_Cmd.ExecuteReader(); } public void ActiveReport_ReportEnd() { //Close the data reader and connection m_cnn.Close(); }
To add scripting to alternate colors in the detail section
- Click the Script tab located at the bottom edge of the report designer to access the scripting editor.
- Add the scripting code to set alternate colors in the rows of the detail section.
The following example shows what the scripting code looks like.
To write the script in Visual Basic.NET
Visual Basic.NET script. Paste in the script editor window. Copy CodeDim b as boolean = true Sub Detail_Format if b then Me.Detail.BackColor = Color.AliceBlue b= false else me.Detail.BackColor = Color.Cyan b = true End If End Sub
To write the script in C#
C# script. Paste in the script editor window. Copy Codebool color = true; public void Detail_Format() { if(color) { this.Detail.BackColor = System.Drawing.Color.AliceBlue; color = false; } else { this.Detail.BackColor = System.Drawing.Color.Cyan; color = true; } }
Loading the report to the Viewer
You can quickly view your report at design time by clicking the Preview tab at the bottom of the designer. You can also load the report to the Viewer control.
- Drag the ActiveReports Viewer control from the Visual Studio toolbox onto the Windows Form and set its Dock property to Fill.
- Double-click the title bar of the Windows Form containing the viewer to create a Form_Load event and add the code needed to load the RPX into a generic ActiveReport and display it in the viewer.
The following example shows what the code for the method looks like.
To write the script in Visual Basic.NET
Visual Basic.NET script. Paste INSIDE the Form_Load event. Copy CodeDim sectionReport As New GrapeCity.ActiveReports.SectionReport() Dim xtr As New System.Xml.XmlTextReader("..\..\rptScript.rpx") sectionReport.LoadLayout(xtr) xtr.Close() Viewer1.LoadDocument(sectionReport)To write the script in C#
C# script. Paste INSIDE the Form_Load event. Copy CodeGrapeCity.ActiveReports.SectionReport sectionReport = new GrapeCity.ActiveReports.SectionReport(); System.Xml.XmlTextReader xtr = new System.Xml.XmlTextReader(@"..\..\rptScript.rpx"); sectionReport.LoadLayout(xtr); xtr.Close(); viewer1.LoadDocument(sectionReport);