You can use the GrapeCity License Manager utility to license ActiveReports during installation or if you already have a trial version installed. This topic gives an overview of all aspects of licensing in ActiveReports.
License Types
See ActiveReports Editions to learn which features are exclusive to the Professional Edition.
| License Type | Description |
|---|---|
| Evaluation |
Trial key is required. Evaluation banners display on all reports and controls, and the product stops functioning after 30 days from the date of installation. The first key is already activated when you download the trial. If needed, you can request a new key from the Sales department for an additional 30 day trial. |
| Standard |
Standard Edition product key is required. Evaluation banners appear only on features that are exclusive to the Professional Edition. You receive this key by email when you purchase ActiveReports Standard Edition or upgrade from a previous version of ActiveReports Standard Edition. |
| Professional |
Professional Edition product key is required. All reporting functionality and controls appear without any evaluation banners. You receive this key by email when you purchase ActiveReports Professional Edition or upgrade from a previous version of ActiveReports Professional Edition. |
If you cannot find your email with the product key, please contact activereports.sales@grapecity.com to have it looked up.
Licensing a Developer Machine
Note that any machine on which ActiveReports are opened in Visual Studio or on which ActiveReports projects are compiled in Visual Studio must be licensed.
To license a machine with ActiveReports during installation or to license a trial without reinstalling
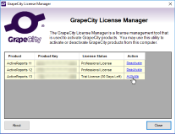
- From the Start menu, go to All Programs (or All apps) > GrapeCity > License Manager, or during installation, select Activate now and the dialog will appear automatically.
- In the GrapeCity License Manager window that appears, under Action click Activate.
- On the Activate ActiveReports 13 dialog that appears, click the Next button.
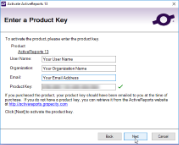
- In the Enter a Product Key screen that appears next, enter the following information:
- User Name: Enter your name here.
- Organization: Enter your company name here.
- Email: Enter your e-mail address here.
-
Product Key: Enter the product key exactly as you received it from GrapeCity, including any capital letters. When you enter the product key, a green check mark appears next to this field to indicate a valid key.
- Click the Next and then the Finish button to complete the licensing process.
To license ActiveReports on a machine without an internet connection
- At the time of installation, on the last screen a check box that states Run license manager appears. Select this checkbox and click the Close button to complete the installation.
- In the GrapeCity License Manager window that appears, under the Action field, click Activate.
- In the Activate ActiveReports 13 screen that appears, click the Next button.
- In the Enter a Product Key screen that appears next, enter the following information:
- User Name: Enter your name here.
- Organization: Enter your company name here.
- Email: Enter your e-mail address here.
-
Product Key: Enter the product key exactly as you received it from GrapeCity, including any capital letters. When you enter the product key, a green check mark appears next to this field to indicate a valid key.
- Click the Next button to authenticate the license.
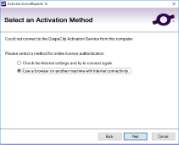
- If your machine does not have an internet connection, select the Use a browser on another machine with Internet connectivity option from the following screen and click the Next button.
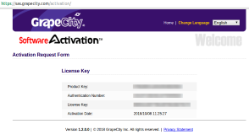
- From the Activate using the GrapeCity web site screen that appears, copy the Product Key and Authentication Number.

- On another machine with an internet connection, go to https://sas.grapecity.com/activation. Remember not to close the activation dialog on your original machine until the activation process is complete.
- Enter the Product Key and Authentication Number you copied in step 7 on this website.
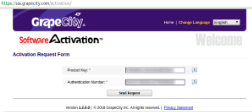
- Click the Send Request button to generate a license key.
- Copy the license key from the web page that looks like the following image and in the Activate using GrapeCity web site dialog under step 3, enter the key.
- Click the Next and then the Finish button to complete the licensing process.
To activate a license for ActiveReports on multiple machines
You can only activate a single developer license key for ActiveReports on three machines for use by one developer.
If you have used all three of the license activations and you want to license a fourth machine, for example, a virtual machine for use by the same licensed developer, you must deactivate the license key from one of the other machines. For more information, drop down the section below titled "To deactivate an ActiveReports license."
After you have deactivated licensing on one of the machines, you can activate ActiveReports on another machine.
To deactivate an ActiveReports license
To use your ActiveReports license on another machine for your own use when you have used up all three of your activations, you can deactivate it on one machine.
- From the Start menu, go to All Programs (or All apps) > GrapeCity > License Manager.
- In the GrapeCity License Manager window that appears, under Action click Deactivate.
- In the Deactivate ActiveReports 13 page that appears, select the Next button.
- In the Confirm the Product screen that appears, confirm that the correct product is getting deactivated and click the Next button.
- The Deactivation Successful screen appears with the Product Name as ActiveReports 13 and the Current Status as Trial License (number of days left).
To upgrade or downgrade a license
If you want to change your ActiveReports license type you need to do one of the following:
Upgrade from a Standard to a Professional License:
- From the Start menu, go to All Programs (or All apps) > GrapeCity > License Manager.
- In the GrapeCity License Manager window that appears, under Upgrade/Downgrade click Upgrade to Professional License.
- Follow the activation steps from step 3 of To license an ActiveReports Trial without reinstalling to upgrade.
Downgrade from a Professional to a Standard License:
- From the Start menu, go to All Programs > GrapeCity > License Manager.
- In the GrapeCity License Manager window that appears, under Upgrade/Downgrade, click Downgrade to Standard License.
- In the Deactivate ActiveReports 13 page that appears, select the Next button.
- In the Confirm the Product screen that appears, confirm that the correct product is being downgraded and click the Next button.
- The Deactivation Successful screen appears with the Product Name as ActiveReports 13 and the Current Status as Standard License.
Note: You can upgrade a license only if you buy an upgrade from Standard Edition to Professional Edition.
To determine whether a machine is licensed
- In Visual Studio, open any sample from the included samples located in C:\Users\USERNAME\Documents\GrapeCity Samples\ActiveReports 13.
- Open one of the reports in the sample and click the Preview tab.
- Scroll to the bottom of the report. If there is red evaluation text, the machine is not licensed.
Note: To check for Professional Edition licensing, open a sample from the Professional folder, run it, and look for evaluation messages.
Licensing a Project
Tips:
- To deploy using XCOPY, you must include the DLLs for all of your ActiveReports references in your bin/debug folder. To do this, in the Visual Studio Solution Explorer, select each reference, and in the Properties window, set Copy Local to True and rebuild your solution.
- To avoid having to change the version number every time you install an ActiveReports service pack, in the Visual Studio Solution Explorer, select each reference, and in the Properties window, set Specific Version to False.
To license Windows Forms projects made on the trial version
These steps assume that you already have an ActiveReports licensed edition installed on your system.
- Open the project in Microsoft Visual Studio.
Note: If another application calls the one containing ActiveReports features, you must license the calling application to avoid evaluation banners after deployment.
- Go to the Visual Studio Build menu and select Rebuild Solution.
- To verify that the application is licensed, open the licenses.licx file and compare it to the Required references section below.
The executable application is now licensed, and no nag screens or evaluation banners appear when you run it. You can distribute the application to unlicensed machines and no nag screens or evaluation banners appear.
Required references in the licenses.licx file (for Standard and Professional Editions)
The licenses.licx file must contain the following references to ActiveReports if you were using both Section and Page reports, and both Windows and WPF viewers. See the table below for the references to the ActiveReports version and the reference to the Viewer control.
| Paste INSIDE the licenses.licx file. |
Copy Code
|
|---|---|
GrapeCity.ActiveReports.SectionReport, GrapeCity.ActiveReports GrapeCity.ActiveReports.PageReport, GrapeCity.ActiveReports GrapeCity.ActiveReports.Viewer.Win.Viewer, GrapeCity.ActiveReports.Viewer.Win GrapeCity.ActiveReports.Viewer.Wpf.Viewer, GrapeCity.ActiveReports.Viewer.Wpf |
|
Here are all of the license strings that you may need:
| Component | License String |
|---|---|
| Section report engine | GrapeCity.ActiveReports.SectionReport, GrapeCity.ActiveReports |
| Page and RDL report engine | GrapeCity.ActiveReports.PageReport, GrapeCity.ActiveReports |
| WinForms viewer control | GrapeCity.ActiveReports.Viewer.Win.Viewer, GrapeCity.ActiveReports.Viewer.Win |
| WPF viewer control | GrapeCity.ActiveReports.Viewer.Wpf.Viewer, GrapeCity.ActiveReports.Viewer.Wpf |
| PRO (some features) PDF export | GrapeCity.ActiveReports.Export.Pdf.Section.PdfExport, GrapeCity.ActiveReports.Export.Pdf |
| PRO ONLY: WebViewer, HTTP handlers, Web service | GrapeCity.ActiveReports.Web.WebViewer, GrapeCity.ActiveReports.Web |
| PRO ONLY: End-user designer | GrapeCity.ActiveReports.Design.Designer, GrapeCity.ActiveReports.Design.Win |
Note: When using the PDF export filter in your project, make sure you check the licenses.licx file for reference to the PDF Export Assembly.
To license Web Forms projects made on the trial version
Follow these steps after you license ActiveReports on your machine.
- Open the project in Microsoft Visual Studio.
- Open the Visual Studio Build menu and select Rebuild Solution.
- The web site application is now licensed. You can distribute the web site application to unlicensed machines and no evaluation banners appear.
To license Web Site applications
Follow these steps after you license ActiveReports on your machine.
- Open the project in Visual Studio.
- In the Solution Explorer, right-click the licenses.licx file and select select Build Runtime Licenses to create the App_Licenses.dll file.
The web site application is now licensed. You can distribute the web site application to unlicensed machines and no evaluation banners appear.
To license medium trust projects
To provide licensing for medium trust projects with ActiveReports, you can generate a web key using the Web Key Generator utility on a machine with licensed ActiveReports.
- From the ...\GrapeCity\ActiveReports 13\Tools folder, run the WebKeyGenerator.exe.
- In the dialog that appears, click Copy.
Note: In your web.config file, if you already have content in your <configuration> and <appSettings> elements, you can use the first Copy button to copy only the web key. If not, you can use the second Copy button to copy the whole <configuration> section.
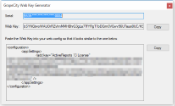
- In your project web.config file, between the opening and closing <configuration> tags (or in place of them, if they are empty) paste the web key so that it looks like the following.
XML code. Paste INSIDE the Web.config file Copy Code<configuration> <appSettings> <add key=" ActiveReports 13 License" value="Generated Web Key" /> </appSettings> </configuration>
To license a class library project
Follow these steps after you license ActiveReports on your machine.
- Open the project for the root-level calling application, that is, the executable that calls your class library, in Visual Studio.
Note: If you do not have access to this project, see "To license ActiveReports when you cannot compile the calling application."
- From the Project menu, select Add New Item, and the select an ActiveReports report. (You can delete it later. This is only to add the references to the project.)
- Open the Visual Studio Build menu and select Rebuild Solution.
- Check the licenses.licx file and verify that ActiveReports licensing is added for all of the features used in your project.
To license ActiveReports when you cannot compile the calling application or the calling application is COM
When you are not able to compile the calling application in .NET, whether because you don't have access to build a third-party project, or because the calling application is COM, you can still license ActiveReports using the Application License Generator utility.
Definition: A calling application is the root-level application that the user initiates to eventually access your compiled assembly. This could be an executable, a web page, a COM executable, etc.
IMPORTANT: This is the ONLY reason you should ever use the Application License Generator.
Follow these steps after you license ActiveReports on your machine.
- From the ...\GrapeCity\ActiveReports 13\Tools folder, run the ApplicationLicenseGenerator.exe. If you are using a Windows 7 or higher machine, right click the executable file and select Run As Administrator.

- Click the Browse button and select the compiled dll that requires licensing.
- In the Assembly description field, enter the description for the assembly that you are licensing. You can later view this description by right-clicking the licensed assembly.
- Click the Generate button.
- Distribute the generated file <AssemblyName>.GrapeCity.Licenses.dll along with the application.
Licensing Errors
Here are some common licensing errors and their causes.
| Error | Cause |
|---|---|
| Application cannot run because it was built with no license. | Licensing is not present in the application or the calling application. See below for information on how to license the calling application. |
| License for XXXX (control name) could not be found. | Extra lines for components that you do not use are in the licenses.licx file. Delete unnecessary information and Rebuild the project. |
| Licensing has not been correctly applied to the application. | Check the three key points below. |
| Exception (LicenseException) | Check the three key points below. |
-
Ensure that the license file is added to the appropriate project.
The licenses.licx file is automatically generated in the project where ActiveReports is used. But if your application is composed of multiple projects and another project calls the reports defined in your class library, you need to register it in the calling project rather than just in your report project.
When you add an ActiveReports web service to a Page report, RDL report, or XML-based Section report project, the licenses.licx file is not created automatically, and the license strings are not added. You also need to manually add licensing to your application if you want to create a control at run time or use the HTTP handlers.
To manually add licensing to the calling application
Note: In a C# Windows Forms project, the license file is in the Properties folder. In a Visual Basic project, it is in the My Project folder.1. In your application that contains ActiveReports components, check that the proper licensing strings are in the licenses.licx file. (See the table of license strings below.)
2. Copy the ActiveReports strings from the file into the licenses.licx file in the calling application.
a. If there is no license file, from the Project menu, select Add New Item.
b. From the listed templates, select Text file and change the name to "licenses.licx."
c. In the Solution Explorer, double-click the newly created licenses.licx file to open it, and paste in the licensing strings for all components you use.3. From the Build menu, select Rebuild Project to embed the licensing.
Note: If your project is a web site, the bin folder has the licenses embedded in the App_Licenses.dll file.
-
Ensure that the contents of the license file are correct.
Depending on which features of ActiveReports you use in your application, the license file may need to contain multiple license strings.
You will find a full list of license strings that you may need in the Required references in the licenses.licx file (for Standard and Professional Editions) section above.
-
Ensure that the Build Action property is configured correctly for the license file.

1. In the Solution Explorer, select licenses.licx (you may need to click the Show all files button to see it).
2. In the Properties window, ensure that the Build Action property is set to Embedded Resource.