When you begin working with Layers, access the Layers List window to handle basic functions like adding or removing a Layer from a report at design time. You may also change the settings for each Layer at design time through a set of in-built properties.
Using the Layers List
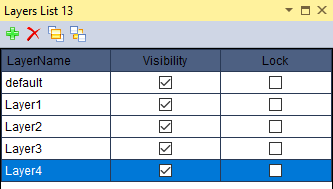
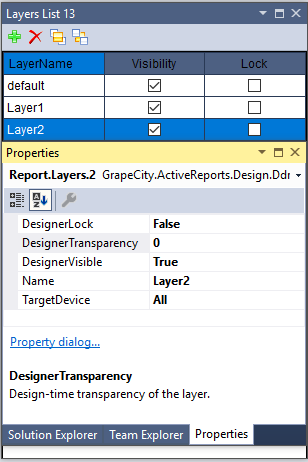
The Layers List window displays a list of Layers in the report along with their visibility and lock options. You can also add or remove Layers and even send the Layer back or bring it to the front in the Layers List.
In the Layers List window,
- A Default Layer is automatically added when you create a new page report. This Layer cannot be deleted or renamed.
- Any Layer can be set as an Active Layer in the report by selecting it in the Layers List 13 window. There is only one Active Layer at any given time in a report.
Note: Modifications can only be made to the Active Layer in the report. No modifications are possible on the inactive Layers.
Show or Hide the Layers List
When ActiveReports is installed on your system, a Layers List button is automatically added to the Visual Studio toolbar and it appears every time you create a new application.
- Right-click the Visual Studio toolbar and select ActiveReports 13 to display the report designer toolbar. See Toolbar for further details.
- On the report designer toolbar, click the View Layers List button. The Layers List 13 window appears.
- Click the View Layers List button again to hide the Layers List 13 window.
Note:
- In case the Layers List window does not appear automatically in your application, select View > Other Windows > Layers List 13 in Visual Studio.
- A LayerList control is also available in the Visual Studio toolbar and can be used to add the Layers feature in the End User Designer application. See how to add the Layer List control in the walkthrough on Creating a Basic End User Report Designer (Pro Edition).
- The stand-alone designer application (GrapeCity.ActiveReports.Designer.exe) also contains a Layers List window. See Stand-alone Designer and Viewer for more information.
Add a Layer
Once a report is created, a Default Layer is automatically added in the Layers List.
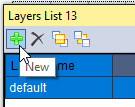
- In the report, select the page on which the Layer is to be added.
- On the Layers List toolbar, click the New button.
- A new Layer with the name 'Layer1' gets added to the report and the Layers List.
Remove a Layer
All Layers, except the Default Layer, can be removed.

- In the Layers List, select the Layer to be removed.
- On the Layers List toolbar, click the Remove button to remove the selected Layer.
This removes the selected Layer along with the controls placed on it from the report and the Layers List.
Send to Back/Bring to Front
Use the Send to Back or Bring to Front buttons to send a group of controls placed on a selected Layer to the front or to the back of the controls on other layers.
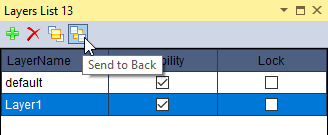
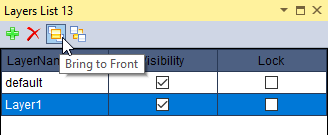
- In the Layers List, select the Layer for which the order is to be set.
- In the Layers List toolbar, click the Bring to Front or Send to Back button to send the controls placed on a Layer to the front or the back.
Using the Layers Properties
Select a Layer from the Layers List to access the following properties in the property grid.
| Property | Value | Description |
|---|---|---|
| DesignerLock | True/False |
Locks or unlocks controls placed on a Layer. You cannot move or resize the controls placed on the design surface of a locked Layer through a keyboard or a mouse. Other editing functions like cut, copy or paste and addition or deletion of controls are possible. This property can also be set using the check-box for Lock in the Layers List. |
| DesignerTransparency | 0 to 1 | Sets the transparency of the controls on a Layer at design time to a value between 0 and 1. A Layer with transparency set to 1 is not visible on the designer. |
| DesignerVisible | True/False |
Determines if the controls placed on a Layer are visible on the designer or not. This property can also be set using the check-box for Visibility in the Layers List. |
| Name | Layer Name (string) |
Sets the name of a Layer (except the Default Layer). |
| TargetDevice | None, Screen, Paper, Export, All |
Specifies or limits the visibility of controls placed on a Layer based on the selected target.
See View, Export or Print Layers for information on TargetDevice specific outputs. |