Queries can incorporate fields from different tables. It is the relationship you set up between the data in these tables that determines how the data appears in the result set.
Users can set up these relationships between tables using SQL Joins like Inner Join, Left Join and Right Join in the Visual Query Designer.
- Inner Join (simple join) - Inner Join matches rows from Table1 with rows in Table2, and allows the user to retrieve records that show a relationship in both the tables. Inner join produces a set of data that matches both Table1 and Table2.
Syntax for the SQL Inner Join:
SELECT columns
FROM table1
INNER JOIN table2
ON table1.column = table2.column;
Visual Illustration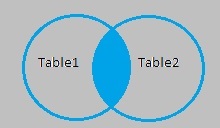
SQL Inner Join returns the records where table1 and table2 intersect. - Left Outer Join (left join) - Left Outer Join allows users to select rows that match from both the left and right tables, plus all the rows from the left table (table 1). This means only those rows from table2 that intersect with table1 appear in the result set.
Syntax for SQL Left Outer Join:
SELECT columns
FROM table1
LEFT [OUTER] JOIN table2
ON table1.column = table2.column;
Visual Illustration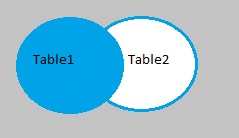
SQL Left Outer Join returns the records from table1 and only those records from table2 that intersect with table1. - Right Outer Join (right join) - Right outer join allows users to select rows that match from the both the left and right tables, plus all the rows from right table (table 2). This means that only those rows from table 1 that intersect with table 2. appear in the result set
Syntax for SQL Right Outer Join:
SELECT columns
FROM table1
RIGHT [OUTER] JOIN table2
ON table1.column = table2.column;
Visual Illustration
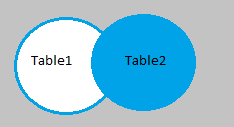
SQL Right Outer Join returns the records from table 2 and only those records from table 1 that intersect with table2.
Tables relations dialog
The Tables relations dialog allows users to set up a relationship between two different tables with at least one common field.
Complete the following steps to access the Tables relations dialog:
- In the Visual Query Designer, drag and drop a field or fields from a table in the Database view to the Selection Fields panel.
- Add another field from a different table in the Database tab to the Selected Fields panel. Make sure that at least one field between these two tables' matches i.e. the second table contains a foreign key.
- When the field in step 2 is added, the Tables relations dialog automatically pops up on the screen.
Once the relationship has been set up between tables, you may also access the Tables relations dialog from the Relations button in the Tables and Relationships panel.
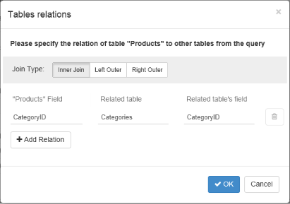
Tables Relations
| Option | Description |
|---|---|
| Join Type | Enables selection of an appropriate Join type out of Inner Join, Left Outer Join and Right Outer Join. Example: Inner Join tab is highlighted in the image above. |
| <Table Name> Field | Displays the name of the field that is common between tables i.e. the foreign key name in the second table. Example: "Products" Field contains the 'Category ID' field in the image above. |
| Related Table | Displays the name of the table to which the relationship has been set up. Example: 'Categories' table is listed in the image above. |
| Related Table's Field | Displays the name of the field from the table to which the relationship has been set up. Example: 'Category ID' is the field from the Categories tables listed in the image above. |
| Delete | Icon adjacent to the Related Table's Field to delete the currently added relation. |
| Add Relation | Button that allows users to add another relationship to the table. |
| Cancel | Closes the Tables relations window. |
| OK | Saves the relationship between tables as a SQL query in the SQL tab. |
See Also