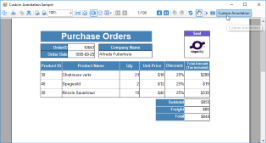
The Custom Annotation sample demonstrates how to add the Custom Annotation button to the Viewer toolbar and depicts the method to add any annotation (seal image in this case) to the report. Only one annotation can be used per page.
Sample Location
Visual Basic.NET
<User Folder>\Documents\GrapeCity Samples\ActiveReports 13\API\Section\CustomAnnotation\VB.NET
C#
<User Folder>\Documents\GrapeCity Samples\ActiveReports 13\API\Section\CustomAnnotation\C#
Details
When you run the sample, the report appears in the Viewer control. The Viewer control toolbar contains the Custom Annotation button that opens the report annotation.
Note: To run this sample, you must have access to the Nwind.mdb. A copy is located at [User Documents folder]\GrapeCity Samples\ActiveReports 13\Data. If you are unable to access the data files in the sample, create the Data folder and place all the data files to this folder, or change the reference path to the data files within the folder according to your environment.
- AnnotationForm: Add Custom Annotation button in Form_Load event. The behavior on clicking the Custom Annotation button is mentioned in the description of the Click event.
- Annotation report:
- ghOrderID section
Product order receipt is grouped according to OrderID. - Detail section
Use RepeatToFill property to output empty rows till the end and perform page break group wise. -
GFOrderID section
This group footer section displays the bulk of the data for the report in TextBox controls that have values passed in code, or are bound to fields from the report's Fields collection (see FetchData and DataInitialize events in the code) using the DataField property. The total units and sales for each product are summarized using the following properties:-
SummaryFunc: Sum (the default value) adds values rather than counting or averaging them.
Caution: SummaryFunc has no effect unless the SummaryType property is set to either SubTotal or GrandTotal.
- SummaryGroup: ghOrderID summarizes the values that fall within the current order id.
- SummaryRunning: None (the default value) ensures that this value is reset each time the order id changes.
- SummaryType: SubTotal summarizes the current group rather than a page or report total.
-
SummaryFunc: Sum (the default value) adds values rather than counting or averaging them.
- ghOrderID section
- Resources folder: This folder holds the icon used for adding annotation (seal image) to the report.
- Resource1.resx: This file contains the string for the message box that appears when Custom Annotation button is clicked again to add the annotation.
