This walkthrough explains the steps involved in connecting a page report to a JSON data source at run time and using a web service to fetch the data with the authorized access.
Note: For this walkthrough, you must have the IIS Express installed on your machine.
The walkthrough is split up into the following activities:
- Adding an ActiveReport to a Visual Studio project
- Connecting the report to a JSON data source at run time
- Adding a dataset
- Adding controls to the report
- Displaying a report in the Viewer
- Adding a Web service that requires authentication to access JSON data
- Adding the DataLayer class
- Modifying Web.config file
- Viewing the report
Note: This walkthrough uses the Customers sample data file. By default, in ActiveReports, the customers.json file is located at [User Documents folder]\GrapeCity Samples\ActiveReports 12\Data\customers.json.
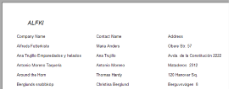
When you complete this walkthrough you get a layout that looks similar to the following at design time and at run time.
Design-Time Layout
Run-Time Layout
To add an ActiveReport to the Visual Studio project
- Create a new Visual Studio project.
- In the New Project dialog that appears, select ActiveReports 12 Page Report Application and in the Name field, rename the file as CustomerDetails.
- Click OK to create a new ActiveReports 12 Page Report Application. By default a Page report is added to the project.
- Right-click the solution and select Restore Nuget Package.
See Adding an ActiveReport to a Project for information on adding different report layouts.
To connect the report to a data source
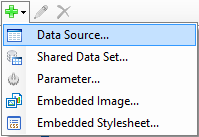
- In the Report Explorer, right-click the Data Sources node and select the Add Data Source option or select Data Source from the Add button.
- In the Report Data Source Dialog that appears, select the General page and enter the name of the data source.
- Under the Type field, select Json Provider.
- On the same page, select Embedded under Schema and enter the following schema to be embedded.
JSON schema Copy Code{
"$schema": "http://json-schema.org/draft-04/schema#",
"type": "object",
"properties": {
"Customers": {
"type": "array",
"items": {
"type": "object",
"properties": {
"Id": {
"type": "string"
},
"CompanyName": {
"type": "string"
},
"ContactName": {
"type": "string"
},
"ContactTitle": {
"type": "string"
},
"Address": {
"type": "string"
},
"City": {
"type": "string"
},
"PostalCode": {
"type": "string"
},
"Country": {
"type": "string"
},
"Phone": {
"type": "string"
},
"Fax": {
"type": "string"
}
},
"required": [
"Id",
"CompanyName",
"ContactName",
"ContactTitle",
"Address",
"City",
"PostalCode",
"Country",
"Phone",
"Fax"
]
}
},
"ResponseStatus": {
"type": "object",
"properties": {}
}
},
"required": [
"Customers",
"ResponseStatus"
]
}Note: The schema shown above has been generated for customers.json data, using the JSON schema generator available at http://jsonschema.net/#/.
- Click OK to save the data source connection.
To add a dataset
- In the Report Explorer, right-click the data source node and select the Add Data Set option or select Data Set from the Add button.
- In the DataSet Dialog that appears, select the General page and enter the name of the dataset as Customers.
- On the Query page, click Edit with JSON Query Designer button and choose the JSONPath upto
[*]to obtain the following query in the Query text box:$.Customers[*] - Click OK to close the dialog. Your dataset and queried fields appear as nodes in the Report Explorer.
To add controls to the report
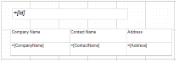
- From the Report Explorer, drag the Id field onto the design surface of the report and go to the Properties window to set the properties as follows.
Property Name Property Value Location 0.375in, 0.25in FontSize 14pt FontStyle Italic Size 4in, 0.375in - From the Report Explorer, drag the Table data region onto the design area and go to the Properties window to set the properties as follows.
Property Name Property Value Location 0.375in, 1in Size 4.5in, 1.125in FixedSize 4.5in, 0.75in
- Right-click any row handle to the left of the table and click Table Footer to remove the table footer row.
- Hover over TextBox5 to reveal the field selection adorner, click it to display a list of available fields, and select the CompanyName field. This automatically adds a static label in the table header row.
- Hover over TextBox6 to reveal the field selection adorner, click it to display a list of available fields, and select the ContactName field. This automatically adds static label in the table header row.
- Hover over TextBox7 to reveal the field selection adorner, click it to display a list of available fields, and select the Address field. This automatically adds static label in the table header row.
To display a report in the Viewer
- From Solution Explorer, open Form1.
- From the Visual Studio toolbox, drag the Viewer control onto the Form1.
- Set the viewer's Dock property to Fill to show the complete Viewer control on the Form1 and set the viewer's Name property to reportPreview.
- Double-click the title bar of the Form1 to create an event-handling method for the Form1_Load event.
- In Form1.cs, paste the following code after InitializeComponent method to load data in the report and display the report in the viewer.
Form1.cs Copy Code// The handler of <see cref="PageDocument.LocateDataSource"/> that returns appropriate data for a report. private void OnLocateDataSource(object sender, GrapeCity.ActiveReports.LocateDataSourceEventArgs args) { object data = null; var dataSourceName = args.DataSourceName; var source = new DataLayer(); if (dataSourceName == "DataSource1") { data = source.CreateData(); } args.Data = data; } // Loads and shows the report. private void Form1_Load(object sender, EventArgs e) { var rptPath = new System.IO.FileInfo(@"..\..\Customers.rdlx"); var definition = new GrapeCity.ActiveReports.PageReport(rptPath); definition.Document.LocateDataSource += OnLocateDataSource; reportPreview.ReportViewer.LoadDocument(definition.Document); }
To add a Web service project
The web service added to the project authenticates access to the JSON data.
- From the File menu, go to Add, and then select New Project.
- In the New Project dialog that appears, select ASP.NET Web Application and in the Name field, rename the file as WebService.
- Click OK to add the new project.
- In the New ASP.NET Project dialog, select Empty template and click OK.
- In the Solution Explorer, right-click the WebService node, go to Add, and select Add Class.
- In the Add New Item dialog that appears, select Class and in the Name field, rename the file as BasicAuthHttpModule.cs.
- Click the Add button to add the new class to the project.
- In the BasicAuthHttpModule class file that opens, add the following code inside the WebService namespace.
BasicAuthHttpModule.cs Copy Codenamespace WebService
{
public class BasicAuthHttpModule : IHttpModule
{
private const string Realm = "My Realm";
public void Init(HttpApplication context)
{
// Register event handlers
context.AuthenticateRequest += OnApplicationAuthenticateRequest;
context.EndRequest += OnApplicationEndRequest;
}
private static void SetPrincipal(System.Security.Principal.IPrincipal principal)
{
System.Threading.Thread.CurrentPrincipal = principal;
if (HttpContext.Current != null)
{
HttpContext.Current.User = principal;
}
}
// Validate the username and password.
private static bool CheckPassword(string username, string password)
{
return username == "admin" && password == "1";
}
private static void AuthenticateUser(string credentials)
{
try
{
var encoding = System.Text.Encoding.GetEncoding("iso-8859-1");
credentials = encoding.GetString(Convert.FromBase64String(credentials));
int separator = credentials.IndexOf(':');
string name = credentials.Substring(0, separator);
string password = credentials.Substring(separator + 1);
if (CheckPassword(name, password))
{
var identity = new System.Security.Principal.GenericIdentity(name);
SetPrincipal(new System.Security.Principal.GenericPrincipal(identity, null));
}
else
{
// Invalid username or password.
HttpContext.Current.Response.StatusCode = 403;
}
}
catch (FormatException)
{
// Credentials were not formatted correctly.
HttpContext.Current.Response.StatusCode = 401;
}
}
private static void OnApplicationAuthenticateRequest(object sender, EventArgs e)
{
var request = HttpContext.Current.Request;
System.IO.FileInfo info = new System.IO.FileInfo(request.Url.AbsolutePath);
if (!info.Name.Equals("GetJson")) return;
var authHeader = request.Headers["Authorization"];
if (authHeader != null)
{
var authHeaderVal = System.Net.Http.Headers.AuthenticationHeaderValue.Parse(authHeader);
// RFC 2617 sec 1.2, "scheme" name is case-insensitive
if (authHeaderVal.Scheme.Equals("basic",
StringComparison.OrdinalIgnoreCase) &&
authHeaderVal.Parameter != null)
{
AuthenticateUser(authHeaderVal.Parameter);
}
}
else
{
HttpContext.Current.Response.StatusCode = 401;
}
}
// If the request was unauthorized, add the WWW-Authenticate header
// to the response.
private static void OnApplicationEndRequest(object sender, EventArgs e)
{
var response = HttpContext.Current.Response;
if (response.StatusCode == 401)
{
response.Headers.Add("WWW-Authenticate",
string.Format("Basic realm=\"{0}\"", Realm));
}
}
public void Dispose()
{
}
}
} - Add reference to System.Net.Http.dll in the WebService project.
- In the Solution Explorer, right-click the WebService node, go to Add, and select New Item.
- In the Add New Item dialog that appears, select Web Service and in the Name field, rename the file as Service.asmx.
- Click the Add button to add the new service to the project.
- In the Service file that opens, uncomment
[System.Web.Script.Services.ScriptService]line of code and add the following code below the WebMethod.Service.asmx.cs Copy Code[System.Web.Script.Services.ScriptMethod(UseHttpGet = true, ResponseFormat = System.Web.Script.Services.ResponseFormat.Json)]
public string GetJson()
{
string result;
try
{
using (System.IO.StreamReader streamReader = new System.IO.StreamReader(Properties.Resource.JsonFilePath, System.Text.Encoding.UTF8))
{
result = streamReader.ReadToEnd();
}
}
catch (System.IO.FileNotFoundException e)
{
var errorMessage = String.Format(Properties.Resource.FormatErrorMessage, e.Message, e.StackTrace);
result = "{'error': '" + errorMessage + "'}";
}
return result;
} - In the Solution Explorer, right-click the WebService node, go to Add, and select New Item.
- In the Add New Item dialog that appears, select Web Form and in the Name field, rename the file as default.aspx.
- Click the Add button to add a new file to the project.
- In the default.aspx code file that opens, replace <div> tags with <form> tags as shown.
default.aspx Copy Code<form id="form1" runat="server">
<asp:Label ID="messageLabel" runat="server" Text=""></asp:Label>
</form> - In Solution Explorer, right-click default.aspx and select View Code.
- In the default.aspx code file that opens, add the following code to the Page_Load event.
default.aspx.cs Copy CodemessageLabel.Text = Properties.Resource.bodyOfMessage;
- In the Solution Explorer, right-click the WebService node, go to Add, and select New Item.
- In the Add New Item dialog that appears, select Resources File and in the Name field, rename the file as Resource.resx.
- Click the Add button to add a new file to the project. Make sure that the Resources file is located in the WebService>Properties node.
- Add the following data to the Resource file.
Name Value bodyOfMessage Json Data Source Sample WebService was started successfully FormatErrorMessage Message : {0}, StackTrace: {1} JsonFilePath C:\Users\user\Documents\GrapeCity Samples\ActiveReports 12\Data\customers.json - In the Solution Explorer, right-click the solution node and select Properties.
- In the Solution Property Pages dialog that appears, select Multiple startup projects and then the Start action for each of the two projects.
- Click Apply and then OK to apply the changes to the solution.
To add the DataLayer class
The DataLayer class provides the data used in the walkthrough.
- Right-click WebService project, go to Add and select Class.
- In the Add New Item dialog that appears, select Class and in the Name field, rename the file as DataLayer.cs.
- Click the Add button to add the new class to the project.
- In the DataLayer class file that opens, add the following code inside the project namespace.
Caution: It is required to change the URL port number set in “source_url” (the part after http://localhost:) to the port number that the IIS Express is actually using. The port number used by IIS Express can be confirmed or changed on the property page of the WebService project.
DataLayer.cs Copy Code// Provides the data used in the sample. internal sealed class DataLayer
{
public String CreateData()
{
string source_url = @"http://localhost:6719/Service.asmx/GetJson";
string responseText = null;
using (var webClient = new System.Net.WebClient())
{
webClient.Headers[System.Net.HttpRequestHeader.Authorization] = "Basic " + Convert.ToBase64String(System.Text.Encoding.Default.GetBytes("admin:1")); // username:password
webClient.Headers[System.Net.HttpRequestHeader.ContentType] = "application/json;";
webClient.Encoding = System.Text.Encoding.UTF8;
var responseJson = webClient.DownloadString(source_url);
Dictionary<string, string> values = new System.Web.Script.Serialization.JavaScriptSerializer().Deserialize<Dictionary<string, string>>(responseJson);
if (values.ContainsKey("d"))
{
responseText = values["d"];
}
}
return responseText;
}
}
Modify the Web.config file
- From the Solution Explorer, open the Web.config file inside the WebService project.
- Replace the <configuration> tags with following code.
Web.config Copy Code<configuration>
<system.web>
<compilation debug="true" targetFramework="4.5"/>
<httpRuntime targetFramework="4.5"/>
<httpModules>
<add name="ApplicationInsightsWebTracking" type="Microsoft.ApplicationInsights.Web.ApplicationInsightsHttpModule, Microsoft.AI.Web"/>
</httpModules>
<webServices>
<protocols>
<add name="HttpGet"/>
<add name="HttpPost"/>
<add name="HttpSoap"/>
</protocols>
</webServices>
</system.web>
<system.codedom>
<compilers>
<compiler language="c#;cs;csharp" extension=".cs"
type="Microsoft.CodeDom.Providers.DotNetCompilerPlatform.CSharpCodeProvider, Microsoft.CodeDom.Providers.DotNetCompilerPlatform, Version=1.0.0.0, Culture=neutral, PublicKeyToken=31bf3856ad364e35"
warningLevel="4" compilerOptions="/langversion:6 /nowarn:1659;1699;1701"/>
<compiler language="vb;vbs;visualbasic;vbscript" extension=".vb"
type="Microsoft.CodeDom.Providers.DotNetCompilerPlatform.VBCodeProvider, Microsoft.CodeDom.Providers.DotNetCompilerPlatform, Version=1.0.0.0, Culture=neutral, PublicKeyToken=31bf3856ad364e35"
warningLevel="4" compilerOptions="/langversion:14 /nowarn:41008 /define:_MYTYPE=\"Web\" /optionInfer+"/>
</compilers>
</system.codedom>
<system.webServer>
<validation validateIntegratedModeConfiguration="false"/>
<modules>
<add name="BasicAuthHttpModule" type="WebService.BasicAuthHttpModule, WebService"/>
<remove name="ApplicationInsightsWebTracking"/>
<add name="ApplicationInsightsWebTracking" type="Microsoft.ApplicationInsights.Web.ApplicationInsightsHttpModule, Microsoft.AI.Web"
preCondition="managedHandler"/>
</modules>
</system.webServer>
</configuration>
To view the report
- From the Build menu option, select Build Solution.
- Press F5 to run the project.
See Also