ActiveReports HTML5 Viewer is a fully customizable control. You can easily change the look of the viewer and show or hide the components using its public API.
The following example demonstrates few of the many modifications possible in the HTML5 Viewer. It shows setting the Custom uiType, adding the custom buttons for Print and Export and adding the Paginator control that allows you to display the number of report pages and to navigate through them.
Note: These steps assume that you have already created a new ASP.Net Web Application and added a sample report to display in the viewer.
- Add a new HTML page item to the project and in the Name field, rename the page item as HTML5Viewer.html.
- Copy and place GrapeCity.ActiveReports.Viewer.Html.js and GrapeCity.ActiveReports.Viewer.Html.css files in the project folder and add them to your project.
Note: In ActiveReports, these files are located in the C:\Program Files\GrapeCity\ActiveReports 12\Deployment\Html folder.
- In the HTML5Viewer page item, add references to the stylesheets that will control the styling and appearance of the HTML5 Viewer.
Note: You can obtain the source of Bootstrap.min.js from Content Delivery Network (CDN) like shown in the code below. You can also download the file from the source website and add the file to the project locally.
Code
Paste inside the <head></head> tags Copy Code<link href="//netdna.bootstrapcdn.com/bootstrap/3.0.0/css/bootstrap.min.css" rel="stylesheet" /> <link href="/GrapeCity.ActiveReports.Viewer.Html.css" rel="stylesheet" />
- Add the following DIV element inside the <body></body> tags that will contain the HTML5 Viewer and the Paginator control.
Code
Paste inside the <body></body> tags Copy Code<div class="container"> <div id="paginator" class="pagination"></div> <div id="viewer" style="width: auto; height: 600px"></div> </div> - Add the following Style element inside the <body></body> tags to make the viewer fill the entire browser window.
Code
Paste inside the <body></body> tags Copy Code<style> #viewer { position: absolute; left: 5px; right: 5px; top: auto; bottom: 5px; font-family: 'segoe ui', 'ms sans serif'; overflow: hidden; } </style> - Add the following DIV element inside the <body></body> tags that will contain the buttons for Print and Export.
Code
Paste inside the <body></body> tags Copy Code<div class="panel panel-default"> <div class="panel-heading"> <div id="appToolbar" class="btn-toolbar" style="margin-bottom: 10px"> <button type="button" class="btn" id="btnPrint"> Print</button> <button type="button" class="btn" id="btnExport"> Export to PDF</button> </div> </div> </div> - In the Project menu, click Add New Item, select ActiveReports 12 Web Service and then click the Add button. This adds the ActiveReports.ReportService.asmx file to the project.
- Add the reference to the GrapeCity.ActiveReports.Viewer.Html.js and its following dependencies:
- jQuery 1.10.2 or higher
- Bootstrap 3.1.0 or higher
- Knockout 2.3.0 or higher
Note: You can obtain the source of dependencies like jQuery from Content Delivery Network (CDN). You can also download and add them to the project locally.Code
Paste inside the <head></head> tags Copy Code<script src="//cdnjs.cloudflare.com/ajax/libs/jquery/1.10.2/jquery.js" type="text/javascript"></script> <script src="//cdnjs.cloudflare.com/ajax/libs/twitter-bootstrap/3.1.0/js/bootstrap.js" type="text/javascript"></script> <script src="//cdnjs.cloudflare.com/ajax/libs/knockout/2.3.0/knockout-debug.js" type="text/javascript"></script> <script src="/GrapeCity.ActiveReports.Viewer.Html.js" type="text/javascript"></script>
- Add the following script element below other script elements to create the HTML5 Viewer for the viewer <div> element we have added above.
Code
Paste inside the <body></body> tags Copy Code<script type="text/javascript"> $(function () { var paginator = $('#paginator'); var viewer = GrapeCity.ActiveReports.Viewer( { element: '#viewer', report: { id: "SampleReport.rdlx" }, reportService: { url: '/ActiveReports.ReportService.asmx' }, //Setting the uiType to Custom uiType: 'custom', documentLoaded: function () { setPaginator(); } }); //Creating the function for Printing $('#btnPrint').click(function () { viewer.print(); }); //Creating the function for Exporting $('#btnExport').click(function () { viewer.export('Pdf', function (uri) { window.open(uri); }, false, {}); }); //Creating the function for using Paginator control to display report pages and to navigate through them function setPaginator() { if (viewer.pageCount > 0) { for (var i = 1; i <= viewer.pageCount; i++) { $('<li data-bind="' + i + '"><a class="js-page" href="javascript:void(0)">' + i + '</a></li>').appendTo(paginator); } paginator.children(":first").addClass('active'); paginator.children().click(function () { var self = $(this); viewer.goToPage(self.attr('data-bind'), 0, function () { paginator.children().removeClass('active'); self.addClass('active'); }); }); } } }); </script> - Press F5 to run the project and navigate to the webpage containing the HTML5 Viewer that we have just created.
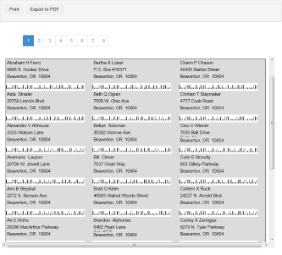
- As the report gets loaded in the viewer, use the paginator control to navigate through the all the report pages and click Print or Export to PDF to print or export the displayed report.